Friday, July 27, 2012

Hong Kong Style Steamed Cod Fish (港蒸鳕鱼)

By just reading the name of this dish, you knew it is healthy and absolutely delicious.

The ultra fresh, sweet, clear consistency, and the fish is so tender and smooth. And the umami sauce! Wosh!!!


Max always tells me how he loves steamed cod fish. But..... Hello? Who don't? This 1 inch thick cod steak cost me S$20 ok?! Say me stingy, but to me, eating fresh steamed cod is a luxury. So, I don't buy cod fish often, because in Singapore, it cost about S$50 to $55 per kg here.

You do not need excessive seasoning or heavy garnishing for fresh cod. Fresh cod itself taste really good. Rich with Omega 3. And well, there must be a reason why this fish is so expensive. Right?

I topped some crisped fried garlic and some spring onions after the steamed fish is done. And you may embellish further with some red chili julliened and maybe coriander for colorful presentation. It's up to you.

Now, let's start cooking...

Ingredients
  • 1 thick slice of Fresh Cod Fish Steak (About 1 inch thick)
  • 2 slices Ginger 
  • a dash of pepper
For the Sauce
  • 1 tbsp Light Soy Sauce
  • 1 tsp Rock Sugar (You could use normal sugar if you don't have rock sugar)
  • 1 tbsp Water
  • 1 tbsp Hsao Xing Wine 
For Garnishing
  • 3 bulbs of garlic, finely chopped.
  • 1 tbsp Cooking Oil
  • some spring onions, cut into 1 inch length

Method
  1. Clean fish, pat dry. Place ginger on a steaming dish, place fish on top.
  2. Bring water in the steamer to a boil and steam fish over high heat for 6 minutes. 
  3. While the fish is steaming half way, heat sauce ingredient in a pot and bring to a boil.
  4. Remove fish from the steamer, pour away the steaming liquid .
  5. Add a dash of pepper and drizzle sauce over.
  6. Fry chopped garlic with oil in another pan until golden brown. Don't burnt it.
  7. Pour the hot garlic oil over, garnish with golden brown garlic and spring onions. Serve!
Note 1 :  The purpose of ginger (or sometimes we used spring onions) slides under the plate is to provide ventilation to the underside of the fish and or avoiding the skin sticking on the plate. But of course, it gives better flavor to the dish in whole.

Note 2 : There is a delicate balance between perfectly cooked fish and overcooked fish. First of all, remember the principle of residual heat. A pan will hold heat when it's removed from the heat source, continuing to cook the food for several minutes. For best results, cook fish until it is almost done, then remove the pan from the stove. Let it stand for about 1 or 2 minutes before serving. I know, waiting is really torturing.

The criteria we go with is that the meat still has a tinge of red but the meat comes off the bone easily with chopsticks or a fork. If the meat sticks to the bone then it is under cooked  If you overcooked your fish, the texture will turn harder and not as tender as what you expect. Different fish size requires different steaming time. I'm not sure about others, but to me, my fish steamed nicely according to below timing. Fish must be in room temperature.
  • 400g Fish = 6 to 7 minutes
  • 450g Fish = 7 to 8 minutes
  • 500g Fish = 8 to 9 minutes
  • 600g Fish = 9 to 10 minutes
If you are steaming a whole fish that has thicker body, you probably would wanna steam it slight longer. Like, another minute or so. But if you are steaming fish steak like I did, no need.

There are a ton of different variations on how to do a proper steamed fish, and as long as your fish is not overcooked, I think they’re all wonderful.

This recipe is simple and absolutely delicious. Cooking fish at home isn't difficult. If you wanted to make your home-cooked fish more perfect, it just requires a little knowledge.


You don't have to live near the ocean to enjoy fresh fish. We have it there near the wet market. And you don't have to go to the restaurant and pay high price to enjoy this scrumptious fish dish. You can do it at home! :D

You know what? I drizzle the sauce over my bowl of hot Koshihikari rice, and I can eat half bowl of rice just like that. It's simply umami! It's awesome!


Do visit my other steamed fish recipes too :)

Prosperity Steamed Cod (富贵鳕鱼)


Canto Style Steamed Red Grouper (清蒸红石斑)


.
.
.
This post has been featured in Asian Food Channel (AFC) Facebook

And Asia Food Recipe
.
.
.


Tuesday, July 24, 2012

Stir-Fried Cabbage with Glass Noodles (包菜炒冬粉)

I do understand that cooking at home involves the risk of incomplete recipes, smoke clouds, and sometimes, the advances of an oven in heat. The worst part, messy kitchen!

You don't need to think too much. It could be simple. What about the childhood dish that your mother or your grandmother cooked for you? Some really simple and effortless dish like this? Stir-Fried Cabbage with Glass Noodles - my all-time favorite!


This dish uses simple ingredients. The common cabbage, glass noodles and dried silver fish. That's all. It isn't as complicated as what you imagined. I used HCP (Happy Call Pan) to cook this dish. So, cooking time cut short by a minute or so. 

Ingredients
  • 300g Cabbage (包菜 / 高丽菜)
  • 30g Dried Glass Noodles (冬粉)
  • 20g Dried Silver Fish (银鱼仔)
  • 2 cloves Garlic, finely chopped
  • 50ml Water
  • ½ tbsp Fish sauce
  • Salt and Pepper to taste 
If you couldn't get dried silver fish, go ahead to use dried shrimps (虾米). It is equally welcoming. Infact, my mother uses dried shrimps for this dish.

Oh, incase if you are not sure. We called glass noodles tang-hoon (冬粉) in hokkien, literally mung bean noodles. I have some Taiwanese glass noodles at home, so I just use it. It's slight thicker and chewier than the ordinary glass noodles.

Method
  1. Cut cabbage into strips. Soak glass noodles in water till soft. Set aside.
  2. Heat pan, a tablespoon of oil, and fry garlic and dried silver fish till fragrant.
  3. Add in cabbage and give it a toss. Cover with lid, cook for 2 minutes.
  4. Open the lid, add in glass noodles, water and stir. 
  5. Add fish sauce, pepper and salt. Stir well.
  6. Cover with lid and cook for another minute, or 2 minutes if you are not using HCP, or until cooked.
And it's done :)


I like the glassy look and texture of the glass noodle.


This is what I called the real home-cooked dish :)

Thursday, July 19, 2012

Pan-Fried Pomfret with Caramelized Onion Topping

I love this fish! But I love the caramelized onion more!

It's mild, sweet, and delicious! Ahhh... I will never had enough of this. But this is not the ordinary caramelized onion that we see in western dishes. This is asian style. Or... my style? Haha. I used Soy Sauce. That's why I said so.

Whatever! As long as it taste nice.


But I don't cook this often. I will try to steam my fish more as it is a healthier choice. Frying fish at home can be lots of work. Because the fish smell and the oil ... you know? But again, I wanna eat. So, must work for it lah. Cannot eat steamed fish all the time also. It's boring!

Ingredient
  • 1 black Pomfret
  • 1 large Onion
  • 3 slices of ginger, julienned
  • 1 + 1 tbsp Soy Sauce
  • ½ tbsp Sugar 
  • ½ tbsp Sesame Oil
  • 1 tsp Salt
  • some Spring Onion for garnishing
This is a good recipe for any whole fish, but these small Pomfret are well-suited to soak up all the flavors and smaller Pomfret cost cheaper too.

Simple ingredients also can create nice dish :)

Method
  1. Clean fish, pat dry using kitchen towel. Rub 1 tsp salt all over the fish.
  2. In a non-stick pan, or Happycall pan if you have. Heat a tablespoon of oil, pan fry the fish under medium low heat. Just fry it slowly. Like that, you will have nice and crispy fish skin outside and soft fish meat inside. Heat off, dish up.
  3. Using the same pan, add in ginger and sesame oil, fry till fragrant. Heat off. Pour a tablespoon of soya sauce on it, set aside.
  4. In a skillet, heat a tablespoon of oil, add in onion, under medium heat, fry till onion turned soft. Add 1 tbsp soy sauce and ½ tbsp Sugar. Continue to fry till onions turned caramelized. 
  5. Pour caramelized onion on top of the fish, pour over the ginger and soya sauce, sprinkle with onion and there you are.
This should be the way, from raw onion turned into beautiful caramelized onions!

And then, the dish is ready. I believe your mama cooked this dish too. Right?


With this dish alone, Max can finish 1 big bowl of rice :)

Friday, July 13, 2012

Quick Meal : Smoked Duck Spaghetti

Like people, food items require adequate partner pairings for healthy social development and reduce tendencies to mutter to oneself at home. Make friends, spread love, with food. Probably the common but comforting Spaghetti and of course... Salad!

I always believe in good combination of meat, starch and vegetables in a meal. I always do :)


I don't think I need to give this plate of spaghetti any fanciful introduction. The post title says it all.

Cold Storage grilling section sells delicious smoked duck. I still remember how much my deceased father love the smoked duck that I bought from there. They grill it fresh everyday and they are ready to eat. I will grab one home whenever I'm feelin' good. Although it's not often, but I had been buying smoked duck from Cold Storage for a number of years, and I'm still doing it. They are really good. You could say me cheat, but who don't? You will have to agree that some shop-bought stuffs are really good, inexpensive and really convenient!

Here, this is what I usually do after I brought the duck home. Leave it cool abit, so that it's easier to handle. I will cut away the two drumsticks and wings, and I eat them fresh on the same day. And for the body part, I debone it, pack it up nicely, airtight, keep it in the freezer. It comes in really handy when I wanna do stir-fry. Be it noodles or grill it hot and serve along with salad or something. Smoked duck is really good alternative when bacon has become boring.

Aside the smoked duck, the main ingredients in this spaghetti is shallots and olive oil. It's like the traditional aglio olio, but aglio olio called for garlic and oil, and some likes to sprinkle with some chilli flakes. It's so simple.

Ingredients  (Serves 2, easily)
  • 230 grams Smoked Duck Meat, cut into pieces
  • 130 grams Spaghetti
  • 3 shallot, finely sliced.
  • Thyme infused or Garlic infused Olive Oil, Ordinary Olive Oil works fine too
  • a splash of White Wine (if you have it at home)
  • Parmesan Cheese for topping (Optional)
  • Sea Salt and Pepper to taste

Method
  1. Bring a large saucepan of water to a boil and add the spaghetti. Stir well and boil rapidly until the pasta is al dente.
  2. Strain spaghetti, set aside. Keep the starchy water that you used to cook spaghetti. It's useful.
  3. Meanwhile, combine the oil and garlic in a small saucepan. Fry the shallots till fragrant. And then, add in smoked duck pieces. Continue to fry until you could smell the smoked duck's fragrance.
  4. Add in spaghetti, salt and pepper. Toss. Add abit of the starchy water along the way, to give the noodles more moisture.
  5. Give a splash of white wine, give it a quick toss before you turn off the heat. If you have Parmesan Cheese at home, grate some on top before serve.
It's easy, right?

Oh yes! Side track abit. Salad! The veggies must be fresh from the market. I love and I'd always try my best to make my salad to looks more vibrant. It's like, when I look at it, I will smile. You know?


I will always wanna put our bellies in a good mood over the weekend. Although it might looks simple.

Max prefers such simple spaghetti to the more traditional tomato-based or creamy based variety. The smoky flavor of smoked duck gives the spaghetti a twist!
 

For a lazy sunday, I wanna make it simple. Just give my spaghetti a quick toss and serve with a bowl of effortless salad.

Yumms!

Monday, July 9, 2012

Pig's Stomach Soup (猪肚汤)

I had been really craving for this soup for very very very long time. Like years? Sigh!

Hokkien called this "too-thor th’ng", literally Pig's Stomach Soup. Hokkien version too-thor th’ng has Ginko Nuts in it. Some added mushroom too. Mine is Canto version, or rather, my mother's version. I'll just do it in a traditional way. The way my mother taught. 


Boiling a pot of Pig's Stomach soup is easy. But the part where you need to clean the Pig's Stomach is tricky. If you are not familiar with cleaning pig's stomach, you will end up with a smelly soup.

Before we start with the soup making, this is something I need to highlight, especially for those who never handle pig's stomach before. If you don't have the patience to read up the whole post of mine, thinking you could just note down the recipe and do it blindly (with that half-cleaned smelly stomach maybe?), drop it. Don't bother to follow this. Because you will end up complain that my recipe gives you smelly and murky soup.

For the amateur cooks who want to make this soup, you can go to the wet market butcher and ask for Pig's Stomach. Wet market do sell both cleaned and un-cleaned Pig's Stomach. So, here's the difference :

If you can get cleaned ones :-
  • Probably more expensive?
  • It's convenient, because you will save the hassle of doing the dirty job. 
  • They used chemicals to get rid of all the gunk from the stomach I heard.
If you get the un-cleaned ones :-
  • Cheaper, and fresher I assume.
  • Need to clean it at home. Lot's of hassle. 
  • Cleaning using the traditional method to remove the slimy or greasy residue. Usually, Tapioca Flour, Salt, Oil, Coke, boiling water & etc is used.
Supermarket like Giant, NTUC and Sheng Siong do sell Pig's Stomach. But they usually categorized it as Raw (un-cleaned) and Cooked version. See picture below. Left picture is raw stomach (the one I bought), and right picture is cooked stomach. 


I couldn't convince myself to get the cooked stomach out of convenience. Seriously, NO! I really not sure if they did put in effort to get rid of the gunk completely before they cook it. And the cooked stomach are frozen, and then thawed, and re-packed to sell. I never taste this readily packed cooked stomach before, so I won't comment much. But I could assure you that, if buy cooked stomach, the soup will not taste as good as the one from the butcher. This is the fact that you have to face it. Your mouth wants to eat good food, you will have to work for it. Right?

It is my 1st time washing Pig's Stomach. Seriously, it's stinky if it is not washed properly. So, if you're really not ready for the challenge, never attempt to cook a pig’s stomach. Unless you are mentally prepared. You don’t want your kitchen to smell like a pigs’ farm.

So, how to clean the stomach? It requiring multiple scrubs with salt and tapioca starch, along with a bit of knife scraping. Now... Cleaning Stomach method :
  1. Prepare a bowl of salt and a bowl of tapioca flour. You will need alot of this.
  2. Apply a handful of salt on the stomach surface, turn the stomach inside out, and apply another handful of salt. Give it a good rub. Like washing a piece of cloth using hand. Then, add tapioca flour on both inside and outside the stomach. Give it a good rub. Don't be gentle.
  3. Rinse with running water. By now, you should get rid some of the slimy and greasy residue. Use knife to scrap the stomach as and when, so as to scrap away the fats and other impurities on the lining. Rinse with running water.
  4. Repeat step 2 and 3 process a few times. Smell the stomach. Until the "pigs’ farm" smell is gone, you are there.
  5. Then, I used Coca Cola to rinse the stomach. Then, rinse away the Coca Cola with running water. Coca Cola could get rid of the smell totally. However, this step is optional. I'll explain why later. 
  6. Boil the stomach in a boiling water for 5 minutes. The five minute boil will set it's shape. And you're done.
Now, take a look at the photo :


The water is in pale milky color. These are the slimy impurities. If you didn't wash the stomach clean enough, once you blanch it, you will have super murky water, and even your soup! You won't wanna drink that, don't ya? I washed the stomach clean. So, during the blanching you only see pale milky water.

And you see the brownish color lining? It looks dirty? Nope! Those are a thin layer of lining / fats. This brownish color is stained by Coca Cola. oI rinse the stomach using Coca Cola, remember? Coca Cola has caramel in it. So, the caramel color stained on it. Not dirty. It's edible. If you prefer the stomach not to have such brownish color at the lining, then, skip the Coca Cola part.

Once it's out of the boiling water, scissor it apart and do a check inside. This is to make sure they are clean within. It shouldn't have slimy feel anymore. They are like towels with funny surface, and the color differs at different part. That's normal. And here, the stomach is ready to use.


Now, get ready all the soup ingredients we need.


Ingredients
  • 1 Kampung Chicken / Free Range or Organic Chicken.
  • 1 Pig's Stomach - (Cleaned and prepared as written above)
  • Ginger - About double size of your thumb. Skinned, smashed.
  • 15g White Pepper, cracked. (Amount depending on the spiciness to your liking)
  • 1.8L Water.
  • Sea salt to taste. 
I got my Kampung Chicken from the wet market. Standard wet market price for Kampung Chicken is about S$8.00/kg. Mine is slightly heavier, it cost me S$11.00 for this bird.

Talking about this wonderful and extremely peppery broth containing the organ, good quality pepper is important. Especially those from Sarawak one's. It has the Umph! But too bad, I got mine from the wet market. Not particularly good. But fairly okay. And now, let's crack the pepper. Slightly wet your chopping board, place the pepper on the wet chopping board. Like this, the pepper won't run around. Crack it using the back of your knife or the mortar.


Method
  1. Pig's stomach should be well prepared. Rinse chicken. Rinse and crack white pepper. Skinned ginger, smashed. 
  2. Pig's stomach, white pepper and ginger in a pot. Add in 1.8L water. Bring to a boil. Reduce to medium low heat, simmer for 30mins.
  3. Add in chicken, turn heat higher and bring to a boil, and then reduce to medium low heat, simmer for 2 hours. I used slow cooker, so I leave it there for 3 hours. Discard the scums that float on top.
  4. Dish up the stomach, leave it cool abit if you can't handle the stomach while it's hot. Chop them into pieces (Like... maybe about 2cm x 5cm? It depend's on how big chunk you want it to be). Put the chunked stomach back to the soup.
  5. Before serving, remember to salt your soup.

Saw the soup base? It should looks clear, still slight cloudy, but not murky. But it doesn't mean that this soup base is watery and plain. The broth is really thick and peppery. This is the soup base color you should get if you did put in effort to really clean the stomach. Some shop-bought pig's stomach soup looks murky color - due to the slimy impurities, due to the half-cleaned stomach and whatever. I don't wanna describe further. Now you know the difference between shop-bought and the home-cooked one.


For those who never taste pig's stomach before, this offal has a nice meaty sweet pork taste and pleasant chewy texture. The broth is thick, sweet and peppery.

If you'd had a bad week, not eating well, feels very much missing home and your mama, have a bowl of Pig's Stomach Soup! I'm sure you will feel that the world isn't that bad afterall :)

Friday, July 6, 2012

Ling Zhi Black Chicken Tonic Soup (野山灵芝乌鸡汤)

We all knew that herbal soups are central to the chinese diet, and are essential for maintaining good health. I noticed that my mother-in-law is getting really busy with her work recently, and she seldom cook tonic soup for us, not as frequent as before. Although I knew she tried her best to.

Max looks weak and tired recently. I feels the same too. Is it the weather? Or is it we are not eating well? Or is it we are getting older or what?

I forgotten when was the last time I cook tonic soup. I think it's time to cook some to boost our vitality. The philisophy that food is like medicine, and that prevention is better than cure, you know? It sounds boring. I know. But still... It's the truth and it is good.


I do learn very basic chinese herbs knowledge from fellow seniors before. From my grandma, my mom, and now my mother-in-law. Not much, just abit of here and there. I know what is the basic chinese herbs to be used to boil nourishing soups.

This Ling Zhi Black Chicken Tonic Soup, it promotes general good health, improves vital energy, complexion, stamina, helps rejuvenate body and prevent cancer.

I've got myself a nice black chicken in NTUC. This bird cost me S$5.95, which I think it sounds reasonable. Henny complained to me that she got her black chicken from Cold Storage, and it cost her S$7.00. So, this is the price comparison for you, incase you wanna get one.

The ingredients that I'm using for this soup is actually the basic ones. Those are general herbs for chicken soup. But I have to be frank that the Ling Zhi 灵芝 that I used cannot categorized as the basic ingredient. It can be costly. Moreover, I'm using wild-life Ling Zhi here. I bought my wild-life Ling Zhi from Taiwan when I visit a very beautiful place called Sun-Moon Lake (日月潭) sometimes ago. You can get Ling Zhi from any of the general Chinese medicinal hall. Or you may opt out Ling Zhi if you face difficulties getting it due to the high cost. For the rest of the ingredients, they are general ingedients for chicken soup. Not difficult at all.

I'd named the ingredients accordingly. For easy reference and verification when you purchase ingredients :


Ingredients
  • 1 Black Chicken 黑鸡 / 乌鸡 / 竹丝鸡
  • 6g Ling Zhi 灵芝 (Ganoderma Lucidum)
  • 6g Dang Shen 党参 (Codonopsis Pilosula)
  • 3g Dang Gui 当归 (Angelica Root)
  • 1g Gan Cao 甘草 (Licorice Root)
  • 5g Chuan Xiong 川芎 (Sichuan Lovage Root)
  • 15g Huai Shan 淮山 (Chinese Yam)
  • 20g Yu Zhu 玉竹 (Solomon seal rhizome)
  • 7g Goji 枸杞子 (Wolfberries)
  • 1.5L Water 清水, or upto 1.8L if you want.
  • 1tsp Sea Salt 海盐
If you are lazy and or rather feelin' stressed over the list of ingredients here, go grab a pack of Chicken Soup Convi Pack from any of the chinese medicinal hall. You should be getting such standard ingredients, but not 100% same as mine of course. At least I know they won't include Ling Zhi into the convi pack.

You must be wondering why didn't I use Chicken soup convi pack instead. Reason is simple. I do keep stock for all above ingredients in the fridge. Especially Ling Zhi, Dang Gui,Yu Zhu and Goji. For the rest, my mother-in-law kept them. So, it's not something difficult for me to gather all these and put them into my soup. Stress free :)

Method
  1. Rinse chicken and the rest of the ingredients.
  2. Everything in a pot, except salt. Add in 1.5L water. Bring to a boil.
  3. Reduce to medium low heat, simmer for 2 hours. I used slow cooker, so I leave it there for 3 hours.
  4. Salt to taste and serve hot. 

And incase you are unsure on the goodness of the ingredients, below info sourced from one of my recipe book named Tonic Soup For Vitality. I only listed down the function of 4 main ingredients, which I think it is always good to know :

Ling Zhi 灵芝 (Ganoderma Lucidum)
It is neutral in nature and taste bitter sweet. It is the parasite mushroom in the roots of oak trees or broad-leaved trees. It is rich in water-soluble proteins and amino acids. It is nourishing, enhances the body, helps digestion, cures asthenia, insomnia, warms the stomach, relieves pain and prevents cancer.

Dang Shen 党参 (Codonopsis Pilosula)
It is warm in nature and tase bittersweet. It contains protein, starch, glucose, Vit B2, B2 ad other nutriens. It regulates the functions of the spleen and stomach, replenish qi, improves lung-asthenia and qi-asthenia and cures Leukopenia.

Dang Gui 当归 (Angelica Root)
It is warm in nature, tastes savoury and bitter sweet. It contains oil essence with a unique flavour. It accelerates body circulation, replenish blood, treats menstrual disorder and physical weakness. 

Chuan Xiong 川芎 (Sichuan Lovage Root)
Warm in nature and taste savoury. It regulates qi, expels wind and heat, revitalizes blood, stops pain, relieves headache, expands blood vessels, relieves joint pain and muscle soreness

This bowl of goodness, it is probably one of the most nourishing meals because of the long, slow cooking makes the ingredients easier to absorb into our body. I don't know about others, but me, whenever I see mothers serving their family member a bowl of soup is like showering them with lots of love.


It is virtually a medicine for invalids and tonic for your family. At least the home-made version is. And why would you not make your own soup?

It takes only minutes to put together a large pot of soup and it could feed the whole family, happily :)

Tuesday, July 3, 2012

Quadruple Cheesy Pizza!

It's Sunday. I'm baking pizza for lunch again.

This version of home-made pizza is doughier, and with more topping, but very good on it's own in a different way. It consist of 4 types of cheese. Mozarella, Parmesan, Cheddar and Camembert! Yumm~!!!

How would I describe this?

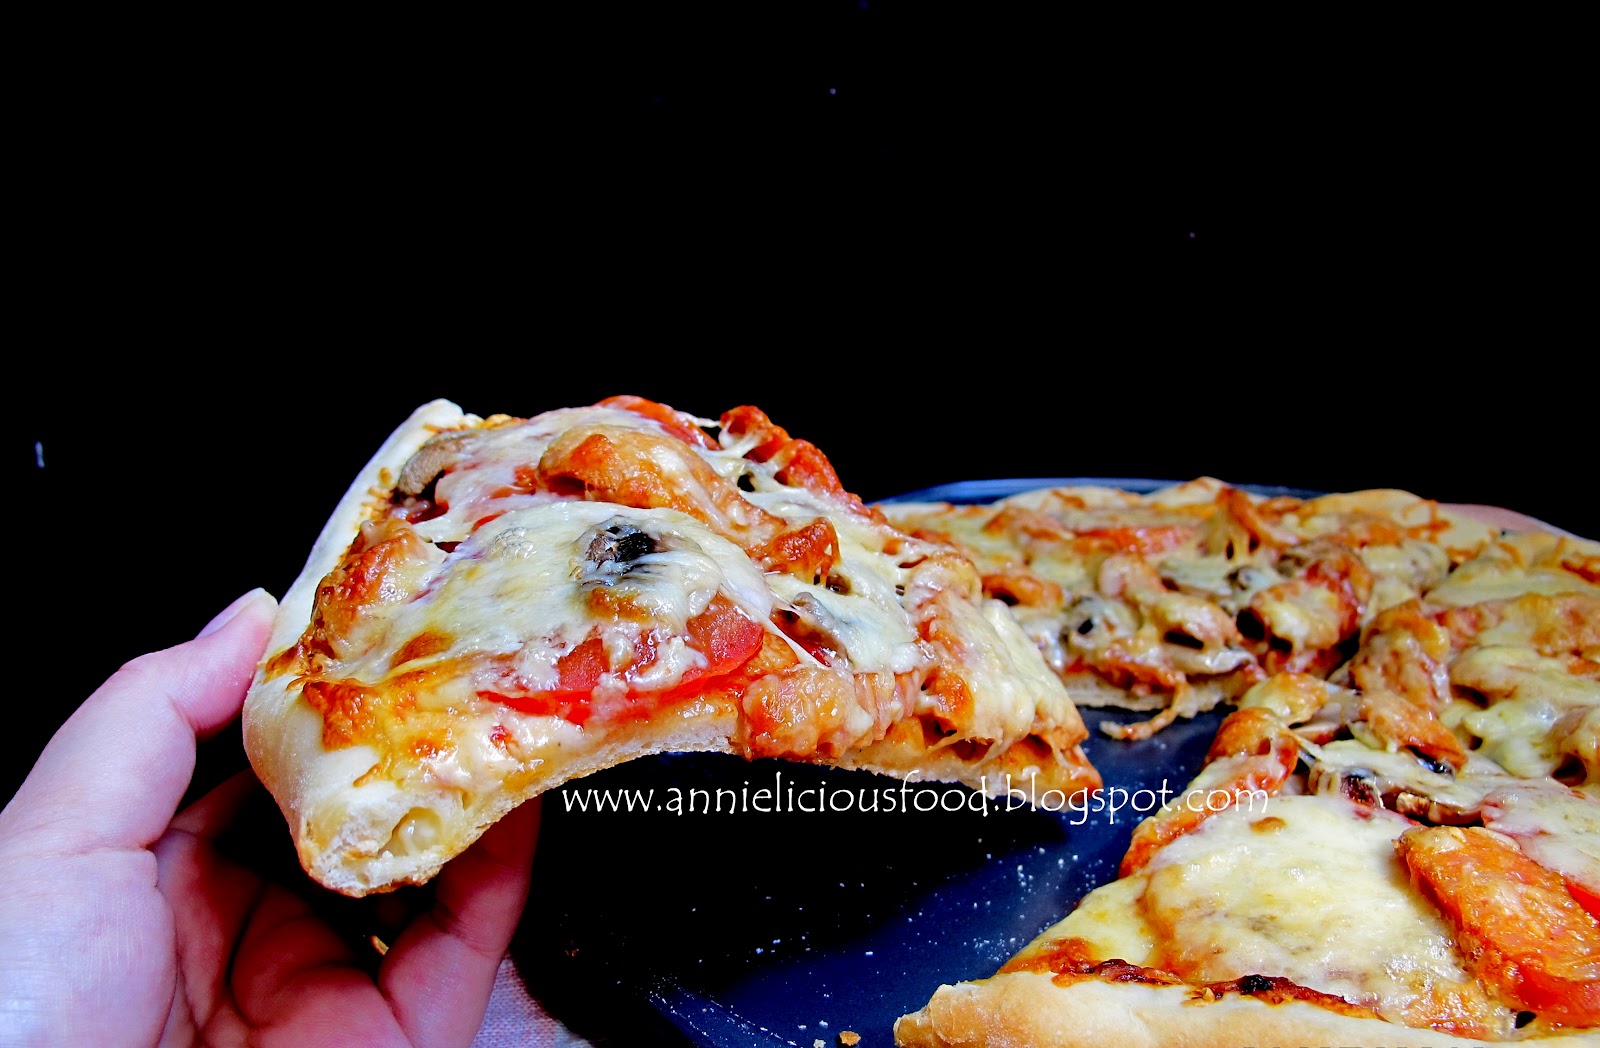
It tastes like a slice of melted cheese with a slight crisp to it. The cheese is so good. A little salty with a gooey satisfaction. The zetsy flavor of the tomatoey taste blended so well with the bread dough. The crust is slightly salty, fluff and crispy at the bottom. It's awesome. And the cheese sausages that I added on it that adds a whole another dimension.

Oh! I almost forgot my plate of fresh salad and a big cuppa ice-cold Ribena!

I'm sorry man, a slice of real cheesy pizza would be like a slice of heaven to me. I love my Sunday lunch!


The thing about a pan of delicious pizza is that the pizza crust must be good, and the topping must be from fresh ingredients. I feel bad about using canned tomato paste. But sometimes I really gotta heck it! Haha!

For those friends who knows me well, I'm a big fan of Nigella Lawson. She's one of the best and most influential of British food writers. This time, I followed the pizza crust recipe from Nigella Lawson's Pizza Casareccia. But for the topping, I just do it freely on my own.

Quadruple Cheese!!!


Although you don't see a real thick layer of cheese on the pizza, because I control the amount of cheese I put. It's sinful you know? :(

So, here's the cheese for the pizza. I purchase those cheeses in a block, and I grated them myself. As much as I could, I'll try not to purchase readily grated cheese. For cheddar, it depends. I do purchase them in block, and sometimes in slices. I have some left-over cheddar cheese slice in the fridge. So, I'll just use it.


Incase you are confused with all the cheeses. Here, read this...

Cheddar
Everybody eat cheddar cheese. The most common ones are Cheesedale, Kraft & etc brand that we usually seen in asian supermarket. Those are good for general sandwiches. Cheddar is rich with a tendency to melt in the mouth, the flavour full and fine. But if it is a good quality cheddar, it tends to have a sharp, pungent flavour, often slightly earthy. To me, Cheddar and bread is a perfect combination!

Mozarella
A mild semi-soft Italian cheese that has a rubbery texture and is often eaten melted on pizza. Good quality fresh mozzarella is generally white. But may vary seasonally to slight yellow. Those that general stores selling ones are usually slight yellow in color. Having mozarella on pizza is a must! No mozarella, no pizza. Hehe..

Parmesan
To me, Parmesan is a hard, sharp, dry Italian cheese that usually served grated as a garnish on top of my pasta or pizzas. I love it's sharp flavour. I think this is one of the important topping for all Italian dish.

Camembert
The cheese itself is really soft and runny and strongly flavoured as it ages. I love it very much. People normally eat it uncooked on bread, burgers, with wine or meat. Just like Brie, the subtle flavour and texture do not survive heating. That is why I always freeze the whole block of Camembert and grate it later. By doing so, I could prolong it's shelf life too.

Okays! I'm done with my cheese.

Now, you could prepare some basic ingredients of your preferred choice. Fresh seafood, ham, chicken or whatever you want. It's really up to you. I use whatever I have in the fridge. Those standard stuffs but it will never goes boring. Fresh tomatoes, my all time fave white button mushrooms, and since I'm gonna make cheesy pizza, it must be cheesy sausage this time!


Ingredients

for the dough: 
  • 250 Plain Flour - I used bread flour. It works fine.
  • 1 heaped tsp Active dry yeast - I used about 10 grams.
  • 1/2 tsp Sea Salt
  • Approx 150ml warm water
  • 2 tbsp Olive Oil - I used Truffle Infused Olive Oil.
for the topping (Quadruple Cheese):
  • 2 Fresh Tomato
  • 2 Sausages of your choice - I used Cheese Sausages. 
  • 4 White button mushroom 
  • 1 tbsp Canned tomato paste
  • 1 tbsp Olive Oil - I used Truffle Infused Olive Oil.
  • Paramesan Cheese
  • Mozarella Cheese
  • Camembert Cheese
  • 2 slices of Cheddar Cheese.
It's slightly different this time. Other than the additional existence of Cheddar and Cheese sausages, I doubled up the fresh tomatoes, and I reduced abit on the white button mushroom. 

Method
  1. Combine the flour, yeast and salt in a mixing bowl. Stir in the warm water and the olive oil. Add more water as necessary to form a dough. When you've got a shaggy mess, that's on it's way to being a dough. Leave the mess to your mixer, beat until smooth and bouncy, though expect this still to be on the sticky side. The beating should be about 5mins should be fine. (I used KA Mixer, bread dough hook) 
  2. Stick some flour on your palm, take the dough out of the mixer bowl, just give it a quick roll and form the dough into a round shape. 
  3. Then, oil your palm, and give your dough a roll again. Just to give your dough a really thin layer of oil.
  4. Once your dough is oiled, put the dough back to the mixer bowl, covered with cling film, let it rest for 1 hour till the dough's doubled in size. Although it is not advisable, but if you really don't have the 1 hour luxurious time, you may consider to shorten the proofing time to at least 30mins. I proof my dough for 40mins only. I don't have the patience. And I know, it's bad.
  5. Preheat oven to 240 degrees C (bottom heat, switch on the fan).
  6. Knock the air out of the dough using well-oiled hands, knead a little, and press onto the baking pan.  
  7. All ingredients ready, the bread dough is also ready, and let's assemble the pizza :
a)  Line stripped cheddar cheese along the side of the pizza. Fold in the cheddar cheese and give it a press. I mentioned before... Cheddar and bread is the best combination. So, I want the cheddar to hide inside the bread :)


b)  Use fork to poke some holes on the crust, apply a layer of olive oil on top, and put it into the oven for 15mins, or even upto 20mins if you wants your bread dough to be more crusty. It's like, until the dough has a hollow sound when knocked. It's up to you, because it can be quite individual when it comes to the crust level that you are looking for. I only baked mine for 15mins, and I think it is fine.

c) Once the crust is out of the oven, apply a layer of tomato paste on it.


 c)  Add in tomatoes in sequence and the rest of the ingredients.


d)  Sprinkle the cheese generously on top and put the pizza back in the oven and cook for a further 5 to 10 minutes or until the cheese has melted and the base is crisp.


Once it's out of the oven, it is advisable to let the pizza rest for 5mins before you start cutting em'.


But I know you wouldn't be able to wait for 5mins to cut it. I don't have such patience, and I don't pretend to be one.

You want a slice? I'm sure you want.


Did you see the cheddar cheese at the side of the pizza?


I'm seriously considering if I should get a pizza stone. If I have pizza stone at home, I believe the pizza will be even better! :)

With this homemade pizza recipe, including pizza dough and toppings, step-by-step instructions with photos. I can't find any reason why you can't make your own pizza at home.

It's true! You never try, you won't know. Max swallowed 3 big slices of the pizza! When I see the way he eat, happily, just like a big child, and I know that home-made pizza is really good :)

Monday, July 2, 2012

Basic Home-Made Pizza

I'm crazy.

I made pizzas over the weekend. Not just one day, but I made pizzas on both Saturday and Sunday for lunch! Haha... But Max didn't get bored over it. Infact, he really loves it. Oh yes! I serve it in a healthier way. A generous amount of fresh salad.

I'm gonna post both pizza separately.

So, upon request, this is my 1st pizza post. It is a basic home-made pizza recipe here. I think this is the easiest method if you wanna make home-made pizzas from scratch. If you have mixer at home, it is even more stress free :)


As I mentioned earlier, I purchased my Pizza pan last week. I don't intend to use it so soon. Not until September actually. But then, upon Max request on a home-made pizza. Since I'm well equipped at home, I think, I shouldn't reject his request.
  

This is not the 1st time I emphasize that fresh ingredients are really important. You'll will certainly taste the difference. I just popped by the nearest Supermarket and get some fresh white buttons, tomatoes, sausages and cheese. And here I go...


This is not the 1st time I make my own pizza crust. The previous attempt wasn't that fantastic. This time, I just googled the easiest pizza crust recipe that I could get. Although this is not the best pizza crust, but it's decent and workable.

This recipe makes a good 12' Inch (30cm) Pizza, cut into 6 generous slices. It could feed 3 adults easily. The measurement on the original ingredients is ounce and cups, which some basic bakers (especially asian) might have problem converting it just like that. So, I did a slight modification here.

Ingredients
(Recipe source : Quick and Easy Pizza Crust at allrecipes.com)

Pizza Crust
  • 8 g Package active dry yeast
  • 1 tsp Sugar (Fine or Castor)
  • 1 cup (236ml) Warm water (110 degrees F/45 degrees C)
  • 2 1/2 cups (350g) Bread Flour
  • 2 tbsp Olive oil - I used Truffle Infused Olive Oil.
  • 1 tsp Sea Salt
Pizza Topping (Triple Cheese)
  • 1 Fresh Tomato
  • 2 Sausages of your choice - I used pork sausage. 
  • 5 White button mushroom 
  • 1 tbsp Canned tomato paste
  • 1 tbsp Olive Oil - I used Truffle Infused Olive Oil.
  • Paramesan Cheese
  • Mozarella Cheese
  • Camembert Cheese (Optional)
Before I proceed to the steps of making this pizzas, this part, you really want to take note here....

According to the original recipe, it quoted "This is a great recipe when you don't want to wait for the dough to rise. You just mix it and allow it to rest for 5 minutes and then it's ready to go!! It yields a soft, chewy crust". Sounds convincing eh? You know what? I followed blindly!!!

Seriously, I never felt so dumb before. I don't know what is wrong with me. I really go and follow exactly what is written there leh! Bread dough only need 5mins proofing? I don't know. Maybe it works on others. But........ This sounds really silly. I wanna stab myself loh!

Anyway, I modified it. So, if you were to follow what I write here, you will be safe. I promise.

Method
  1. Preheat oven to 230 degrees C (bottom heat, switch on the fan). In a bowl, dissolve yeast and sugar in warm water. Let stand until creamy, about 10 minutes.
  2. In a mixing bowl, add flour, salt, oil and pour in the creamy yeast mixture. Beat until smooth. I used KA Mixer, bread dough hook. Beat about 5mins should be fine.
  3. Stick some bread flour on your palm, take the dough out, just give it a quick roll and form the dough into a round shape. Then, oil your palm, and give your dough a roll again. And there, your dough will get a thin layer of oil.
  4. Once your dough is oiled, put the dough back to the mixer bowl, let it rest and proof till double the size, or at least 30mins. Your dough is oiled, so, it won't stick to the mixing bowl. It can be removed easily later on.
  5. Turn dough out onto a lightly floured surface and roll into a round shape. Transfer crust to a lightly floured pizza pan.
  6. Spread with desired toppings and bake in preheated oven for 20 minutes, or until golden brown.
  7. Let baked pizza cool for 5 minutes before serving.
See! This is the dough that only proof for 5mins. It looks really dense. I don't like it. The dough looks okay on the picture, but it's really not what I'm looking for. This is not okay for me!!! :(


Ok. Let's move on. No point crying over spilt milk.

For the fillings.... You will have 30mins to prepare while your dough is proofing. I prefer buying Mozarella and Paramesan cheese in block. I felt that they are fresher and better in texture somehow. Although I need to grate the cheese myself. But I think it's fine. Good food need abit of effort here :)


For the topping, spread a layer olive oil, and then, a layer of tomato paste.


This is my favorite part. Hehe...

Add in all the topping and of course, sprinkle a generous amount of Cheeseeeeeeeeeeee....


If you read my list of ingredient again. I actually used 3 types of cheese. Aside the common Mozarella and Paramesan cheese, I added Camembert Cheese on my pizza. However, it is optional.

I love Camembert. It has the unique savory taste that Mozarella and Paramesan cannot give. The texture of Camembert is soft and not easy to handle. What I did is that I throw the Camembert into freezer, to let the cheese set firm, and this is how I can do my cutting, peeling and even grating easier. It prolong the shelf life too.


Incase you don't know where to get it, Cold Storage, Carrefour, The Market Place at Raffles City or NTUC Finest outlet should have. I don't think neighbourhood supermarket (eg. General NTUC, Sheng Siong) carry this. I never seen it before. I got mine from Carrefour. It cost me about S$15.00.


It's done! I sprinkle some parsley flakes on top. Hehe..


Cut them into 6 portion... I don't like the crust. Although it looks good in the picture. But it's dense, chewy and not fluff.


In overall, I'm satisfied with the taste of this basic home made pizza. If I were to proof the dough, I will give this pizza 8/10! No. I don't blame anybody. I just blame myself for being dumb.

But please don't worry. You can follow this recipe. You just make sure that you MUST Proof the dough :) 


Comin' up next... Quadruple Cheese Pizza! Stay tuned!

Random : Bundt Cake Pan and Pizza Pan - My new toy!

I'm supposed to post this over the weekend. But I totally forgotten.

It's GSS (Great Singapore Sale) period. TANGS is having 20% GSS discount on bakewares. I don't think I will give it a miss.

I purchased a Pizza Pan from TANGS Vivo City last Monday. I remembered I only paid less than S$10 for that. I'm happy with it. It works well for pizzas and it can be a non-stick baking pan too.

Then, my friend told me that there's Nordicware cast iron Bundt cake pan is having 20% discount too! I was like... "OMG! I wanna go!!!". Max drove me to TANGS Orchard after work, and I purchased two Bundt cake pan at one go. Hehe... I felt abit too much to splurge on this. But, it's really very hard to control lah! I had been wanting to buy Nordicware cast iron Bundt pan since 2 years ago.


Here's my purchase...


The price?

S$60.00 each. TANGS 20% GSS discount = S$48.00.
On top of that, TANGS Member enjoy additional 6% rebate discount. So, I only paid S$45.12 each.


LEFT : Heritage Bundt Pan - The swirling design of this Bundt pan yields a unique cake that adds elegance to any occasion. Simply love it!

RIGHT : Platinum Fleur De Lis Bundt Pan - A lily design creates a dessert fit for royalty.

Happy! :D

I promise, I'm gonna come up with nice creation soon.

Sunday, July 1, 2012

Black Glutinous Rice Chiffon Cake

It couldn't be simpler to whip up a cake with all the ingredients readily available in my cupboard. It's just another weekend. I thought I should bake something simple, but welcoming.

Black Glutinous Rice Chiffon Cake!

Awww.. Look at the color of my chiffon cake. It's greyish and not appealing. Using Black Glutinous Rice Flour? It doesn't sounds right too. Is this what is in your mind now? Well, this is the recipe anyone hesitant about it's tastiness and appearance should really try.


It taste really good and fills the kitchen with that aroma during baking, which is the natural atmospheric setting for the domestic goddess! Seriously, I'm really impressed by this cake.

I've got some large and fresh eggs at home, and my Indonesia colleague Ms.Lia brought me a pack of Black Glutinous Rice Flour from Jakarta, and I don't know what should I do with it. I never use this before. 1st time in my life that I'm holding a pack of this.


My colleague suggested me to bake Black Glutinous Rice chiffon. The moment I hear her suggestion, I knew it should work. Because I love glutinous rice desserts. A bowl of sweet black glutinous rice topped with some fresh coconut milk. This sounds really good.

I adapted this chiffon cake's recipe from Wendy's blog. I saw her chiffon turned out really good. So, I just follow without even reading other people's recipe.

(adapted from Wendy's BGR Chiffon Cake Recipe)


Ingredient A

5 Egg Yolks (95gm)
35gm Sugar
30gm Corn coil
110gm Fresh Coconut Milk (Wendy's recipe stated 100gm only)
1/3 tsp Salt
67gm Black Glutinous Rice Flour
33gm Cake Flour
½ tsp Baking powder

Ingredient B
5 Egg Whites (190gm)
85gm Sugar
1/3 tsp Cream of Tartar

I was hoping to achieve a more moist texture. So, I increased the coconut milk from 100gm to 110gm. It's really up to your individual preference.

Method
  1. Preheat oven to 180 Degree. You could use 22 to 25cm chiffon tube pan. I'm using 21cm here. I only have one at home. Sigh!
  2. Mix egg yolks, sugar and oil together. Add in coconut milk and salt.
  3. Combine Cake flour, Black glutinous rice flour and baking powder. Sift directly into the yolk mixture. Mix until well combined. Set aside.
  4. Egg whites into a clean bowl, beat on low speed until it froths. Add in cream of tartar and continue to beat at high speed until soft peaks. Add sugar at 3 intervals and beat until stiff peaks.
  5. Fold ¼ of egg whites into the batter. Repeat with another ¼ of egg whites.
  6. Pour batter into remaining egg whites and fold until well combined.
  7. Pour batter into a clean pan, lightly shake it left and right to level cake and bake for 45 to 50 minutes. I increased the baking time to 55 minutes.
  8. Remove cake from oven immediately and invert to cool down completely before removing from pan and slicing.
See! My chiffon cake cracked!!! I know, cracked chiffon is normal. But I'm just... hoping that it won't crack of course.


Cake turned upside down, it looks pretty okay. I still see a patch of egg white on top. Obviously it's me who didn't fold the batter well. But I don't bother. I'm not baking this for living. While everybody struggle to produce the perfect cake, I thought home baked cakes should have slight flaws. This makes it looks more "home-made" perhaps?


My heartbeat pumped so fast when I cut the cake. Because Wendy mentioned that her Black Glutinous Rice Chiffon tasted like sawdust and has gritty grainy feel. Although I'm not using the same brand of Black Glutinous Rice Flour as Wendy's one. Still, I'm abit worried here. 1st attempt on new flavours, nervousness is a norm. Haha... 

The texture looks reasonably good and the chiffon cake smells really nice.


Give it a bite, and it taste really good!!! It has really mild grainy texture compared to other ordinary chiffon cake, but this is really minor. It doesn't affect me. No existence of sawdust feel. The moist level is perfect to my liking, but dry enough for the cake stand tall and proud.

Max swallowed 1/3 of the chiffon cake. My MIL brought half chiffon to share with her colleagues. They really love it and they find it interesting. I'm really glad.


Here's the verdict. There is absolutely nothing wrong with a chiffon cake with Black Glutinous Rice flavour. I reckoned it was a special or rather... nostalgic? Well, I know and I can assure you that you won't normally get this outside. Unless you are making a special order from your bakery shop.

You are nodding your head when you read this. I knew it. Because I knew you wouldn't agree with me more. Hahaha...

Well, I don't want to nominate favourites, but even so, I have to say this is the flavour of a chiffon cake I'm ecstatic about. Perhaps, it is because this chiffon cake gives me the nostalgic feel that other cake normally don't.