Showing posts with label Special Occasion. Show all posts

Tuesday, February 27, 2018

Gordon Ramsay's Perfect Scrambled Eggs (Perfect Brunch)

I adapted this recipe from Gordon Ramsay's Youtube Video. It's delicious, and it needs a little effort to make this happen. This is without doubt THE BEST recipe for perfect scrambled eggs I've ever cooked at home. The Creme Fraichè is gives them a wonderful creamy texture. Thanks to Gordon Ramsay for the recipe and tips. I think I will just stick to this.


I love having brunch at home. But we have very little opportunity tho. So, weekend brunches might end up in a cafe or local hawker fare or something. Not all cafes make good scrambled eggs.


I make mine really simple. I get a store-bought brioche, slice it thickly, apply a layer of good french butter and give it a grill.


This Le Creuset Cast Iron Square Skillet Grill (20cm) Classic (Flame) is a gift from Alan. I'm lovin' it every single time when I'm using it. It fits 4 slices of thick brioche nicely. Of course, you could use some good store-bought sourdough, slice it generously and pop it into the toaster.


Meanwhile, in another cast iron skillet, I'm roasting my button mushrooms and tomatoes with vine on. Just a drizzle of olive oil, season with salt and pepper.  Just let the mushrooms and tomatoes sit in the pan on medium low heat and it will cook well on its own.


Fresh large eggs, Creme Fraichè, chopped chives, butter, salt and pepper. That's all you need.


This recipe serves 2 greedy adults. This will make you feel full for hours.

Ingredients for the scrambled eggs

  • 6 Large Eggs
  • 1 knob of butter, cold and cubed (around 25g)
  • 1 tablespoon Creme Fraichè
  • 2 tsp Chopped Chives 
  • Fresh ground pepper to taste
  • Sea Salt to taste

Something to go along with the scrambled eggs, you will need :
a good slice of Brioche or Sourdough,
Tomatoes preferably with vine on,
some button mushrooms or portobello
I've got a handful of salad
and any other stuffs that you think it will make your brunch looked sexier.

Method 

  1. Medium low heat fire, break eggs into a non-stick pan. Use spatula to whip in quick motion to break the yolks. Don't season it now, otherwise the egg will starts to turn watery. 
  2. Add the cubed butter into the pan, continue to whip in quick motion to induce air into the egg to achieve fluffier eggs. 
  3. Still on medium low heat, continue to stir and whip until the eggs start to cook. Remove from heat, continue stirring the eggs for about 20 seconds, and return to heat again. Continue this motion until the eggs clumps, but soft.
  4. Remove from heat and add in Creme Fraichè. Return to heat, stirring in Creme Fraichè.
  5. Season with freshly ground black pepper, gently salt it, and garnish with a sprinkling of chopped chives. Give it a stir to combine everything and serve with toast. 


It's important to add butter right at the beginning because it will give the scrambled eggs a very nice velvety finish. The general rule of cooking a successful scrambled eggs is take it off the heat, go back to the heat, take it off the heat, go back to the heat, and it repeats. And treat it like a risotto. You can't stop stirring.

Always use a non-stick pan with a wooden spatula or a good silicone spatula designed to withstand heat for best results and easy cleaning. But of course, you could use ordinary stainless steel saucepot.

The eggs should have the texture of soft curds. It's best not to cook for more than 3 portions in one go as you will overcrowd the pan and the eggs wont cook as good. For larger numbers, cook in two pans rather than one.


Wake up your loved ones with this amazing scrambled eggs on toast. It's easy and absolutely delicious!

Thursday, January 14, 2016

Hong Kong Royal Chicken / 香港贵妃鸡

Happy New Year to everyone! It's a brand new year for 2016 and CNY is just around the corner. I think it's the right time for me to share my Hong Kong Royal Chicken recipe.

Tender chicken piece with some gelatinous layer in-between. Salty, with a hint of angelica root. The existence of Cekur, Turmeric and Spring Onion on the water bath injected all the flavors into the chicken and gives really good flavor. A dish that looked simple, but yet requires every details to be followed to ensure it's success.


Chinese New Year is just a month away and I would like to share with you Hong Kong Royal Chicken (香港贵妃鸡) recipe which I think it is ideal as part of the CNY dish served during Chinese New Year dinner.


During my previous trip to Hong Kong last year Jan'15, I had Gui Fei Chicken in Hong Kong Tasty Congee Noodle Wantun Shop 正斗粥麵專家, it was really good. I like it. So, I decided to replicate it at home. But the one in Hong Kong is dried version. The one I've re-created is with sauce. I like the idea of having sauce. If you are unsure with the sauce, you could always serve the sauce separately.

The chicken dish on the picture above is showing half chicken only. I save the other half for the next meal.

My mom did this once, many years back. She gave me quite a number of tips to ensure I didn't go wrong. These are the tips :
  1. Cekur (沙姜 Sand Ginger) is a must. Do not replace with Cekur powder or ordinary ginger. They are different. 
  2. Turmeric (黄姜) is also a must. Do not replace with Turmeric powder. 
  3. Choose a nice chicken for this dish. Even if you have to pay more for the chicken.
Ingredients
(Source : Harvest Rich Recipe Book, with modification)
  • 1 Fresh Chicken, preferably Kampong Chicken (est. 1.3kg) 甘榜鸡
  • 60g Cekor Ginger 沙姜
  • 15g Turmeric 黄姜
  • 5g Angelica Root 当归
  • 2.4L Water, or more 水
  • 75g Sea Salt 海盐
  • 2 + 2 tbsp Rose Wine 玫瑰露酒
  • 1 tsp Sugar 糖
  • 1 Sprig Spring Onions 青葱 
  • 5g Goji Berries / Wolfberries 枸杞子
Turmeric is easily available at the wet market. But not all wet market sells Cekor Ginger. I got mine at Tekka Market, where they sell all sorts of spices to cater for Indian and Malay cooking. I love Tekka Market :)

For the water, you just need to make sure that you have enough water to cover the chicken, Probably 2.3L to 2.5L, depends on the size of your pot.

Method
  1. Wash and trim away visible fats from the chicken. Chop away the chicken feet. Set aside for later use.
  2. In a slim and tall pot that can fit in a chicken nicely, fill with water, dissolve salt in water, add in Cekor Ginger, Turmeric, Angelica Root, 2 tbsp Rose Wine and Sugar, Bring to boil. Switch to low heat and continue boiling for 15mins.
  3. Once water is boiled for 15mins, the water should have been infused. Hold the chicken head (refer to photo), soak the chicken body into the boiling water. With your hand still holding the chicken head, lift the chicken up, and soak it into the boiling water again. Do this for 4 times before you release the chicken head and let the chicken submerge into the water completely. By doing this, water will go into the chicken cavity, and hence, the whole chicken will be well cooked. Water level must completely cover the chicken.
  4. Immediately turn the fire into dead low and slow, lids on, and leave it there for 5mins. Remember to set timer. Do not go over 5 mins. 
  5. After 5 mins, heat off. Leave it there untouched. Set timer for 50mins (for 1.3kg chicken). Walk out of the kitchen and go watch your TV show. If your chicken is 1.7kg or anything bigger, please make it 1 hour and 10mins or so. You have to gauge the time yourself. For 1.6kg chicken, it would be about 1 hour.
  6. Use a pair of chopsticks, carefully and gently remove the chicken from the pot and place the chicken to the big tub, and fill with running tap water to cool down the chicken. Try your best not to bruise or tear the chicken skin. We need the chicken to have nice appearance.
  7. When the chicken is cooled down abit on the surface, put the chicken into a tub of ice-cold water to further cooling process until chicken turned room temperature inside out. Drain.
  8. Chop chicken accordingly and arrange it nicely on a plate.
  9. For the sauce, pour 2 tbsp Rose Wine and add Goji Berries into half bowl of stewed soup (the water that you used to cook the chicken), pour it on a separate saucepot, bring to a boil. Give it a taste to ensure the saltiness is right, or adjust it accordingly. Thicken the gravy with tapioca starch. Pour the gravy on the chopped chicken. Garnish with Spring Onions and serve.
You don't have to remove the skin for both Cekur and Turmeric. It is fine to leave the skin on, just remove the dirts if any. Shaving off the skin is just for cosmetical appearance only.
 

I used 菜园鸡 (Veggies Farm Chicken), which is widely available in Malaysia. I'm happy with it.


As advised by my mom, I adapted the recipe from a recipe book "Harvest Rich" by Choong Su Yin, and modified it accordingly. This is how the chicken dish looked like in the recipe book. The chicken looked really yellow, which I don't think the amount of Turmeric indicated on the recipe book gives this result. And the recipe book asked for 150g Salt that makes my jaw dropped.


Anyway, I'm happy with the result. My husband love this dish. Although this dish is not difficult to make, but there's quite a number of steps needs to be noted and not to be missed.


I hope you like this dish.

祝大家新年快乐,万事如意!

You may also like : Hakka Steamed Salted Chicken / 客家蒸盐鸡

Tuesday, December 15, 2015

Strawberry Peppermint Tart

There are times when all that matters is creating something glamorous. A little red dress instead of a black ones. Abit of lace peeking out, that sparky eye-shadow and lots of lip gloss. 

You might not know what I'm talking about, but when you look at this picture, I know you do. I'm talking about this Sexy Strawberry Peppermint Tart.


It's Christmas, and I thought, this is the right time to share this recipe. Christmas is about Red, and that little Green in-between. 

I've come up with my own version of Strawberry Peppermint Tart that I adore recently. It's light, refreshing and with that sweetness in-between the tang. I've spent quite sometime to come up with this favorite combination tart of my own and I come to a realization that different individual appreciate different type of layering combination.

I'm anal. I prefer mine. Sexy. Delicious!


When I create this Strawberry Tart, I imagined that I want my Strawberry Tart to have the kind of Strawberry overload succulence explodes in my mouth, the cheese layer melts away in my mouth like butter. And oh, I want that cakey layer too, but not heavy, and the combination taste must be nothing short of heaven. 

So, here, with all my cookbook readings and online readings, I've come up with my own favorite Strawberry Peppermint Tart. But I won't pretend to tell you that this is easy. The difficult part is not the tart making. The difficult part is to gather all the ingredients and to get the nicest Strawberries for the tart. 

I used 6 Inch Tart Tin (Gobel Brand), Made in France. Got it from Tott Store at S$26. If you are making bigger tart, you can double up the recipe accordingly. 

Ingredients

for the Tart Crust
  • 90g Cold Unsalted Butter, cubed
  • 150g Cake Flour
  • 45g Icing Sugar
  • 2 Egg Yolk
  • Pinch of Salt
for the Almond Filling
  • 40g Unsalted Butter
  • 30g Icing Sugar
  • 1 Egg
  • 1/2 tsp Corn Starch
  • 40g Almond Powder
  • 1 drop of Vanilla Extract
for the Cream Cheese Layer
  • 125g Cream Cheese, room temperature
  • 20g Unsalted Butter, room temperature
  • 25g Icing Sugar
  • 15g Fresh Lemon Juice
  • 50g Creme Fraiche
  • 4 tbsp Good Quality Strawberry Jam
for the Strawberries Layer
  • 30 to 35 Fresh Strawberries (I used Organic Strawberries from USA)
  • 4 tbsp Mirror Gel 
  • 3 tbsp Water
  • Few drops of Peppermint Extract
  • Some Fresh Mint Leaves
Method - for the Tart Crust & Almond Filling
  1. Blitz Tart Crust ingredients in a food processor till crumbly. Pour the crumbs on a double layered clingwrap, wrap them up into a ball shape. Use your hand, give them a few press until the crumbs are well combined into a pastry dough. Do not overwork the pastry.
  2. Roll the pastry into a round 8 inch shape with the aid of the clingwraps to prevent pastry from sticking to the rolling pin and working top. 
  3. Wrap rolled pastry well with clingwrap, and put the pastry into the fridge for 1 hour. 
  4. Remove pastry from fridge, remove the clingwrap, press the tart crust into the tart mold evenly with your fingertip. Do not panic if the pastry cracked. Just cut the excess pastry at the side of the tart and patch it on the cracked side. It's like playdoh. This tart crust pastry is very forgiving. Just shape the tart crust until you are happy with the thickness and prick the tart crust bottom with a fork to finish. 
  5. For the almond filling, combine all almond filling ingredients in a food processor. Blitz until everything comes together, and it is ready to spread on top of the tart crust. 
  6. Bake the tart crust with almond filling in the pre-heated oven at 175 Degree Celsius for about 23 to 25 mins. Remove from the oven and let the tart cool down. 
Method - for the Cream Cheese Layer 
  1. In a big bowl, mix all Cream Cheese layer ingredients together until combined. Spread the cream cheese mixture on top of the cooled tart. 
  2. Spread a layer of good quality strawberry jam on top of the cream cheese layer. if you are lazy, you can also mix the strawberry jam with the cream cheese. But your cream cheese layer will be softer. 
Method - for the Strawberries Layer
  1. Ensure Strawberries are washed, hulled and dried with kitchen towel. 
  2. To glaze, mix Mirror Gel, Water, and Peppermint Extract in a big bowl. Put the Strawberries in and give it a toss. Ensure Strawberries are all well coated with the glaze.
  3. Arrange glazed strawberries on top of the tart evenly. Make sure strawberries are standing straight, tall, and proud. Make sure strawberries are arranged to the rim of the tart. Make it full!
  4. Brush more mirror gel mixture on top of the arranged strawberries to give it a nicer gloss. Put the tart into a container, covered well, and let the tart sit in the fridge to set for about 4 hours. 
  5. For finishing touch, arrange some fresh mint leaves on top before serving. 
I've did quite a few attempt. I tried to remove the almond filling layer, and double up the Cream Cheese filling. It's a crowd pleaser! But tart crust might crack during baking process. To salvage it, Alan recommend me to apply a layer of chocolate on the tart crust to secure it. Like that, my Strawberry tart will be fully cream cheese base and with that hint of chocolate. It's nice. Many people loves it.  

But I personally still prefer the version with almond filling in it. Because almond filling gives another level of distinctive flavor to the overall taste of the tart. And also, with the almond filling, I have no worries if my tart crust will crack or not during baking process. It will hold together. Very safe. 

Do take note that different type of strawberries gives different results in overall taste. My take is, if you are putting in so much effort to make this Strawberry Tart to impress your loved ones, you don't be stingy. Good ingredients gives you good quality tart. 

Now, let's take a look at the layers. It has thin layer of tart crust, a layer of almond filling, a layer of cream cheese filling, a layer of strawberry jam, and then, the fresh organic strawberries coated with peppermint glaze, and oh... that touch of green mint leaves. 


The tart has it's refreshing Peppermint moist, that cakey almond layer, and that creamy richness, while the strawberries are plump and juicy. One bite on it, it all mixes together to make a decadent scrumptious slice of heaven. 

Before you complaint about how expensive those ingredients are to make this Strawberry tart, ask yourself. How much are you willing to pay for a slice of Strawberry tart that looked like this at Fruit Paradise? Think again :)


I think I've had enough of describing how much I love Strawberry Peppermint Tart. It's Christmas! It must be Peppermint! 


When I'm looking at my Strawberry Tart, it's like, that little red dress fits you oh, so perfectly.


It's pure indulgence, pure pleasure. And this is the kind of pleasure you can create at home freely and share the joy with your friends and relatives. 

I hope you like it. And Merry Christmas to everyone!

Sunday, April 5, 2015

TeowChew Png Kueh / TeowChew Glutinous Rice Dumpling (潮州饭粿 / 潮州红桃粄 )

Beautiful pink hue rice flour skin wrapped with flavorful glutinous rice. Pressed on a nicely designed peach shaped wooden mould, and then steam the dumpling to perfection. You can eat it freshly steamed, or pan-fried. It's up to you.


I have a long list of kuehs' and dumplings to make. But first, I wanna make TeowChew Png Kueh.

Max told me that he doesn't really fancy Png Kueh. He felt that it is a super thick skinned tasteless kueh. I frowned when I heard how he described it. But I just braved myself to do it, even though I knew he probably won't appreciate it.

In Tradition, almost every TeowChew family will make Png Kueh for festive season and also part of the religious offering. There are white and pink version of peach dumpling. White is commonly used as offering to the ancestors, pink is used during religious praying session. In Malaysia, there's still certain TeowChew family practicing the Png Kueh's color differentiation for different purpose. But in Singapore, white colored Png Kueh almost doesn't exist anymore unless they are making it on their own at home.

This lovely pink peach shaped dumpling has two versions, differentiating different clans.

The TeowChew version's pink peach shaped dumpling is wrapped with flavorful glutinous rice filling, called 潮州饭粿 / 潮州红桃粄. The HorPor Clan (河婆) version's pink peach shaped dumpling is wrapped with crushed toasted peanuts with sugar, and this sweet dumpling is identified it as 桃粄.

Max like it pan-fried. The crusty layer of skin gives aroma, served with sweet dark soy sauce, some toasted sesame, I personally preferred to add some chopped coriander and chillies for richer in flavor. Yummm!!!


It's quite a challenge for the first time, without anyone guiding me. I need to factor in the overall taste of the Png Kueh as a whole. The skin is almost tasteless. The glutinous rice filling is savory. Both skin and filling will be eaten and chewed together in my mouth. And so, the filling must be more salty than the savory glutinous rice that we usually cook for plain eating. And this is how we balance the overall taste.

I also imagined that the Png Kueh to be pan-fried, serve with sweet black soy sauce and chilli. Sweet black soy sauce has slight saltiness, and so does chilli sauce. Hence, the saltiness of the Png Kueh itself cannot be over-powered, but at the same time, it must be flavorful, robust and aromatic. In Singapore, yes, we eat it this way. But in other places, maybe they eat it plain. If you love it in plainly steamed Png Kueh rather than pan-frying, I'd suggest you to add another half tsp of salt on your glutinous rice seasoning.

This Png Kueh is lightly pan-fried. The skin is not as thick as those selling out there. The filling is firmly pressed during wrapping, and hence, filling is fully packed, to ensure every chew gives mouthful of flavored glutinous rice. Max is totally sold by my Png Kueh. He says he'd changed the way he feels about Png Kueh. Hahaha...

You want a bite?


For Png Kueh, you need to plan ahead. Glutinous rice and chinese dried mushrooms need to be soaked overnight. So, here, I will tell you my preparation process to shorten your actual day's chore.

DO NOT get freaked out by my long writings. I'm just trying to give you as much details as you probably need. This recipe makes 20 to 22 dumplings. But it also depends on the size of your dumplings, and how thick or how thin your dumpling skin is. My dumpling skin is 45 grams each dough, and wrapped up 40 grams of glutinous rice filling.

Ingredients 
(Source : Authentic Chinese Dumplings published by Famous Cuisine Publishers, with modification) 

The Skin Dough
  • 400g Rice Flour
  • 80g Tapioca Flour
  • 1 tbsp Caster Sugar
  • 560ml Boiling Water
  • ½ tsp Salt
  • 2 tbsp Cooking Oil
The Glutinous Rice Filling
  • 360g Glutinous Rice, soaked overnight
  • 60g Chinese dried mushrooms, soaked overnight
  • 25g Dried Shrimps
  • 12 Shallots
  • 1 can of Canned Braised Peanuts
Seasoning
  • 1 heaped tbsp Premium Oyster Sauce
  • ½ tsp Sesame Oil
  • 3 tbsp Light Soy Sauce
  • 1½ tsp Sugar
  • ½ tsp Salt
  • 1½ tsp White Pepper
  • 6 tbsp Water
Serving Suggestions
  • Sweet Dark Soy Sauce
  • some toasted sesame seeds
  • some chopped coriander
  • some chilli sauce or sambal or whatever chilli you prefer
Note : The original recipe ask for 600g Rice Flour and 100g Tapioca Flour. But at the end of the day, I have 20% dough leftover, and no more filling left. So, I discarded the remaining dough. And so, if you are like me, prefer thinner skin and thicker filling, this recipe above gives you the right amount of dough with the right amount of filling. But if you prefer thicker skin just like those store-bought dumpling, do add 20% of everything for your dough recipe.

Preparation (The night before) 
  1. Walk to the supermarket and get everything I need. 
  2. Wash and soak glutinous rice. Do the same to the chinese dried mushrooms. 
  3. Peel shallots, rinse, pat dry with kitchen towel, pack it in a plastic bag. Throw it in the fridge. 
Preparation (Actual Day) 
  1. Rinse and soak dried shrimps for 10mins. Chop up dried shrimps using chopper.
  2. Snip away mushrooms stems, discard. Cut mushrooms into small pieces. 
  3. Chop up peeled shallots using chopper. 
  4. Open up a can of braised peanuts. Discard the braised sauce. We only need the peanuts. 
  5. In a bowl, mix all the seasoning together. 
  6. Drain soaked glutinous rice, place it on a large plate, steam it for 25 minutes. Uncover the lid and splash some water on the glutinous rice every 10 mins steaming interim. Set aside.

To cook the Filling
  1. In a pre-heated wok, 4 tbsp cooking oil, saute shallots and dried shrimps over low heat until fragrant. 
  2. Add in mushrooms, stir fry briskly over until well combined and heat through. 
  3. Add the steamed glutinous rice, turn to low heat. With your spatula, break the lumpy glutinous rice.
  4. Pour in seasoning, stir and toss well. Ensure all glutinous rice is well coated with the seasoning. Stir in braised peanuts. Stir well.
  5. Dish out. Transfer the glutinous rice to the steamer and steam another 10mins.
  6. Remove from steamer and leave to cool. Cover it up with a wet towel to prevent the top layer of the glutinous rice from drying out.     
Steaming, stir-frying, and steaming... This process is to ensure glutinous rice is evenly flavored, evenly cooked, bouncy, chewy, and yet not overly cooked. I don't like mushy glutinous rice. It is easy to over cooked it. But it is not easy to cook it just right. Some people choose to let the rice cooker to do the job. I'm anal quite particular. So, do it the way my mother taught me, and it never fails me so far, although there are more steps to follow.

You can get braised peanuts from supermarket. I used Narcissus brand. I think it taste pretty good.


To prepare the Dough
  1. In a mixer, add in rice flour, tapioca flour, sugar and salt. Mix well. 
  2. While the mixer is still moving, add in boiling water and cooking oil in the flour mixture in two intervals. Half boiling water, mix, half cooking oil, mix. And then, half boiling water, mix, half cooking oil, mix. And when I said boiling water, use boiling water. Don't give me warm water and expect it to work. You need boiled water to "pre-cook" the dough here. 
  3. Add a drop of red coloring, mix. Observe the change in color for your dough while mixer is doing the job. Is that the pink hue you want? If yes, continue to let the mixer to mix. If no, add more coloring. Do remember to add coloring abit at a time. You don't want to over-power the color. 
  4. Continue to let the mixer mix until the dough turned entirely pink. 
  5. Transfer the pink dough into a big bowl, and this is where you need to do it manually. Knead the dough with both palm until dough is smooth. 
  6. Evenly divide the dough into small portions, cover it with wet cloth to prevent dough from drying. My individual dough is about 45g each.

To wrap and form the dumpling
  1. Form the dough into ball shape, then, make a hole, flatten it with your fingers, to create a "bowl" shape. 
  2. Spoon in some glutinous rice filling, wrap well. My filling is about 40g for each dumpling. Firmly press the rice filling abit, so that they are packed together and you will be able to do the wrapping easier. If there's holes here and there, patch it with some extra dough pieces. It's fine. Patches would be hardly seen because it is steamed dumplings. Do it the way you prefer.
  3. Dust the mould with a little tapioca flour, knock the excess tapioca flour out of the mould. Dust the wrapped dumpling with a little tapioca flour too if you want. Dusting the mould is tedious. I only dust the wrapped dumpling. It works also. 
  4. Put the wrapped dumpling into the mould, press it firmly with your palm and invert the dumpling. 

To steam and serve
  1. Arrange dumplings on a greased steaming tray or a plate.
  2. Steam the dumpling under medium heat for 10mins or until it is cooked. If your dumpling is bigger in size, steam it for another 1 or 2 minutes. 
  3. Transfer steamed dumpling into a plate and leave it cool abit, then, grease the dumpling with some cooking oil on top to prevent them from sticking to each other. 
  4. Serve the dumpling hot from the steamer or slowly pan-fry it to achieve crust on the skin, accompanied with sweet dark soy sauce, toasted sesame seeds, and some chilli sauce if you prefer.  

The recipe request it to be steamed under high heat. And yes, usually, some people do that. But I realized that steaming the dumpling over high heat will probably over-steamed it and eventually, the dumpling will somehow disfigured. The beautiful flowery pattern on the dumpling will "melt-away". I believe you've seen disfigured store-bought ang ku kueh before don't ya?

This is my peach shaped wooden mould. I got it from taobao, the china shopping website. I love it and it is probably one of the nicest peach shaped mould I've found so far.


Look at the result. Isn't it lovely? It has nice round sexy butt! Max says ... "我的饭粿有屁股的!!!" Hahaha..


The medium heat steaming gives good result in retaining the nice flowery pattern on the dumpling. Absolutely lovely! However, the skin will turn abit hardened when dumpling is cooled. Just re-steam it before serving, and the skin will turn soft again.


For this first attempt, the result was satisfactory, although I do prefer the skin to be slightly softer. But again, it depends on what's your expectations on the end result. I'm quite happy with it for now. But I will continue to seek improvement. When it comes to cooking, imaginations do comes in.


TeowChew, Hor Por, Hakka, GuangDong and HuiZhou. They are so near to each other. That probably explains why there's a similarity in their traditions and cuisines. Not only the peach shaped dumpling. For example, Hor Por style Mochi 河婆客糍粑 and Hui Zhou style Mochi. They are the same. But in different shape. In Singapore, we identified it as "Muah Chee" 麻糍, in Japan, it is Mochi.

There are so many types of kuehs, dumplings and small eats to learn and explore. I'm quite into it. Are you one of them?

Update : There are people commented that this recipe doesn't give soft png kueh skin. Neither do I mention that this recipe will give you soft skin. The skin will turn harder when png kueh is cooled. But if you want the skin to be soft again, do resteam it. Pls take note of that.

Friday, February 13, 2015

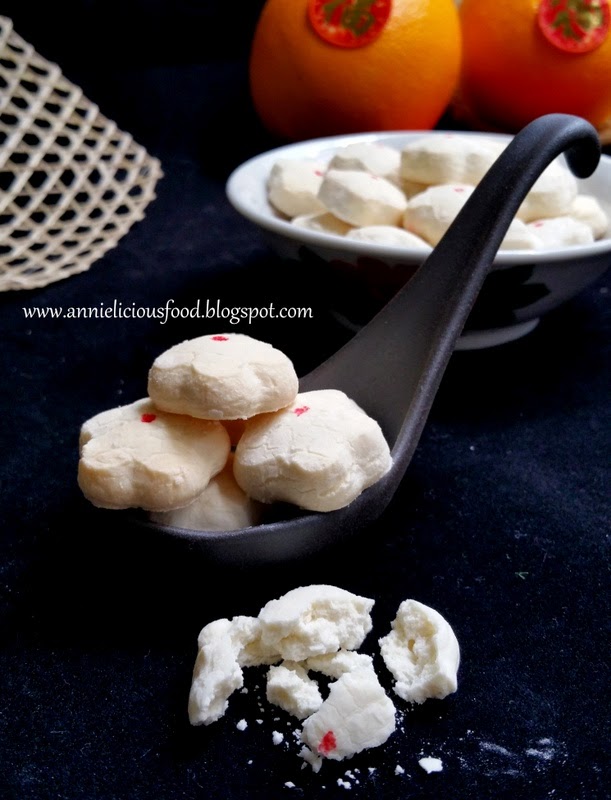
Kueh Bangkit (Melt-In-Mouth Coconut Cookies)

Max asked for Kueh Bangkit this year. When I asked him to describe what kind of specific bangkit he wants, he says "You know? That sweet-powdery softness and warms your mouth with the fragrance of pandan and packed with coconut flavor?"

Ohh,,, he has a specific request!


Ever since I started learning baking, Kueh Bangkit was never on my to-bake list. Not until Max asked me to do so. Kueh Bangkit is one of his favorite Chinese New Year cookies. Obviously (refer to above on how he describe that)

In my childhood memory, my faint recall was that Kueh Bangkit is sweet, chalky, packed with coconut flavor, and melt-in-mouth. When I said melt, it really melts IMMEDIATELY in the mouth. The moment the cookies touches the tongue, it melts. Yes. That's the one! 


When I grew up, moved to Singapore for work, everything has turned commercialized. Unlike my home-town Kampar that sells home-made cookies during my childhood times. They do, still have some in Singapore, but really good ones? You've got to be lucky to find one. I started to dislike Kueh Bangkit ever since store-bought bangkits invaded the market. Bangkits displayed on the supermarket or neighbourhood bakeries didn't attract me at all. This is where I stopped having interest on Bangkit. 

I tell myself, if I want to make, I will make the one that makes me find back at least 70% of my faint childhood feel (probably). If not, I won't consider my bangkit a success. So, this post is to share with you my experience on my attempts on Kueh Bangkit.  


As usual, before I start experimenting something, I will make sure I do some reading. I flipped through some cookbooks, check out the online recipes. Comparing the liquid and dry ingredients ratio, I finally settled with fatboo's recipe that sounds really convincing. 

Some people tells me that Kueh Bangkit is easy to make. But mind you, they are easy to fail too. So, becareful on that. To ensure my first attempt a success, I followed the recipe obediently without tweaking it. This also means, I followed the particular ingredients (and the brand) mentioned on the recipe. Only on the 2nd and 3rd attempt, I then tweaked the recipe abit. So, please... be good. For best chances of success, just follow as I said. 


This recipe ask for Ayam Brand Premium Coconut Cream and Sago Flour. Max hunt these two ingredients up and down for me and it is not avail. We managed to found Sago Flour at Sheng Siong Clementi. For the coconut cream, he is so smart enough to call Ayam Brand Singapore to ask for it. Later, we learnt that Ayam Brand Premium Coconut Cream is named as Pure Coconut Cream in Singapore. So, same content, different name I guess. According to Ayam Brand staff, this particular Coconut Cream gives the most similar quality as the freshly squeezed coconut milk in the market. It contains nothing else except coconut cream (no stabilizer).  

DISCLAIMER : This is NOT a sponsored post. Because this Coconut Cream really brings out its good flavor. I feel that I should credit and recommend this coconut cream to you guys to ensure higher chances of success in attempt. And please remember, this recipe ask for coconut CREAM, not coconut milk. Becareful. 


Ingredients
(Source : Fatboo, with modification after my 3rd attempt)
  • 800g Sago Flour (2 packs of 400gm)
  • 10 to 12 Pandan Leaves (Screwpine Leaves)
  • 240gm Ayam Brand Pure Coconut Cream
  • 300gm Icing Sugar (Originally ask for 200gm) *See Note
  • 3 Egg yolks (medium sized eggs 50 - 55g)
  • Drops of Red coloring (optional)
Note : 
  1. I increased Icing sugar from 200g to 300g Icing Sugar on my 2nd and 3rd attempt, and I swear that it does taste better! The existence of Sugar enhances the coconut flavor.   
  2. This recipe makes approx. 330 Bangkits, depends on the cookies thickness. I've got 220 out of this recipe. So, I assume that my cookies is thicker than Fatboo's one. 
  3. The existence of red coloring is to add some festive feel to the overall look of the bangkit. It's absolutely optional.  

Flour Preparation

10 - 12 Pandan Leaves : Wash and wipe with paper towels till dry. Cut into desired lengths. 

800g Sago Flour : In a big wok, fry sago flour over low heat for 10 mins. Stirring all the time to ensure the flour is not burnt. The initial frying stage would be lumpy and hard to stir. 

Cut Pandan Leaves : Add it into the flour and continue to fry another 10mins till flour is light and the pandan leaves are dried and crinkled. The flour will become dry and flies up when stirred. This indicates that the flour is ready. 

Note : 
  1. You may not be able to finish the Sago Flour at the end of the baking process. But it's better to prepare more as some will be used for managing the dough, flouring the pastry board and so on. Read on, experience it, and you will know. 
  2. You can prepare the flour one day in advance (or upto 5 days in advance), as the flour needs to cool down completely before you can use them. 
  3. It is highly advisable to leave the fried sago flour overnight to ensure that it is completely cooled. Once it is cooled, sift and store the prepared flour in air-tight container.


Pastry Preparation

1) In one bowl, stir 240gm Coconut Cream and 200gm Icing Sugar with hand whisk till sugar dissolved and mixture turned semi-greyish thick sugary solution.

2) In another bowl, whisk 3 Egg Yolks and the remaining 100gm Icing Sugar under high speed till creamy white and sugar is dissolved.

3) Lower speed, add in (3) coconut sugar solution and whisk till well mixed.

4) With a wooden spatula, add in 560gm Fried Sago Flour, still till well mixed. *See Photo

5) Cover the dough with a piece of wet cloth to prevent pastry from drying out, let the dough rest awhile.


You only need to mix 560gm Fried Sago Flour into the wet mixture. The rest of the fried sago flour is for you to dust the working top, adding more flour to the sticky dough, dust the rolling pin, and everything else. The pastry is VERY STICKY. In my first attempt, I thought somewhere went wrong, I was worried through the entire experiment as it's not easy to handle.


Rolling and Cutting the Pastry

1) Line pastry board with a piece of clingwrap to prevent it from sticking.

2) Working with a cake scrapper, cut out 1/3 portion of the sticky pastry, sprinkle some fried sago flour over, knead in. You need to add in flour bit by bit till pastry is smooth, soft and pliable.

3) Flour worktop, place pastry on it, roll dough out to to your desired thickness. For all my 3 attempts, I conclude that 6mm thickness is ideal for my personal preference.

4) With cookie cutter, cut out the bangkit, place it on a lined baking tray.

5) Using a skewer or a toothpick, put a tiny dot of red color on the bangkit to give this cookies an overall festive feel.


Baking

Bake in pre-heated oven at 160 degree for 10mins. This initial 10mins is to allow the bangkit to set the design.
Then, reduce the temperature to 130 degree, and continue to bake for a further 10 to 15 mins or till Bangkit is very light beige in color. Keep an eye on it. Gauge it yourself. Your oven and my oven temperament might not be the same.

In the original recipe, it mentioned 160 degree for 10mins and 130 degree for 20mins. I tried, but I think 10mins + 10mins is sufficient. So, always feel it yourself. Because your bangkit thickness might be different from mine.


And this is how it looked when it is out of the oven, The hairline cracks on top of the cookies looked quite nice tho. And the little red dot makes the whole bangkit looked nice. I like!


It takes me 3 attempts to understand certain tricks. I learn new things in every baking experiment. For this bangkit, here's my sharing ...

My 1st attempt : Followed the original recipe obediently. Taste and smells good, but not sweet enough to my liking. Fragile cookies, definitely need alot of tender-loving-care. And it does melt-in-the-mouth very quickly as promised. I'm satisfied, and I consider this a success. Max says this gives him childhood feel. I don't know how true.

My 2nd attempt : I tried tweaking the recipe by using 80% sago flour and 20% tapioca flour, and increased sugar from 200g to 300g. The result, taste and smells better with the enhancement in sweetness. But cookies texture is not what I expected. The cookies is 'crunchy'! And yes, it does melt-in-the-mouth, but it melts VERY slowly... Duh! I don't know why, but I consider this is a failure because the cookies texture is not what I wanted. My MIL literally 'promote' it to her friends who came to our house. And I also don't know why this failed bangkit is a crowd pleaser. *face-palm*

My 3rd attempt : This is the recipe written as above. 100% sago flour, 300g sugar. Result was satisfactory. Cukup lemak, cukup wangi, cukup manis (literally means enough of coconuty, enough of sweetness, and nice fragrance in Malay). Although the cookies is still on the fragile side, they are better than the 1st attempt. But to be honest, you can't expect tough cookies to give you melt-in-the-mouth feel. Usually fragile cookies does. That's the logic I guess. I found the 'feel' on my 3rd attempt. And also, I'd say this is a success!


Kudos to this recipe. These cookies are good and well received. Definitely better than store-bought. I guarantee you this for sure. And yes, I repeat myself again, it does melt-in-the-mouth quicky! I have to say, I love this recipe, I really do.

But is this the perfect recipe? Maybe yes to me, but maybe no to others. I will continue to search for a perfect ones. If you do have one, please do share with me. Ok?


And a quick tips for you. When you arrange the cookies into the container, use chopsticks to do the work, With my clumsy fingers, I just couldn't control it well, I damaged a few cookies during the process. And I quickly use chopsticks to do the rest of the cookies arrangements.


I hope you like this recipe. And if you do, please go ahead and share this recipe with your friends and relatives.

In this New Year, may good luck and prosperity follow everyone of you. Happy New Year everyone!!!

Thursday, June 12, 2014

Hakka Abacus Beads (客家算盘子)

I love Hakka Abacus Beads (客家算盘子). Not only that, I love everything else that has springy and chewy food. If you are as much of a taro fans as I am, then, you will find these an absolute delight in a way they're served.

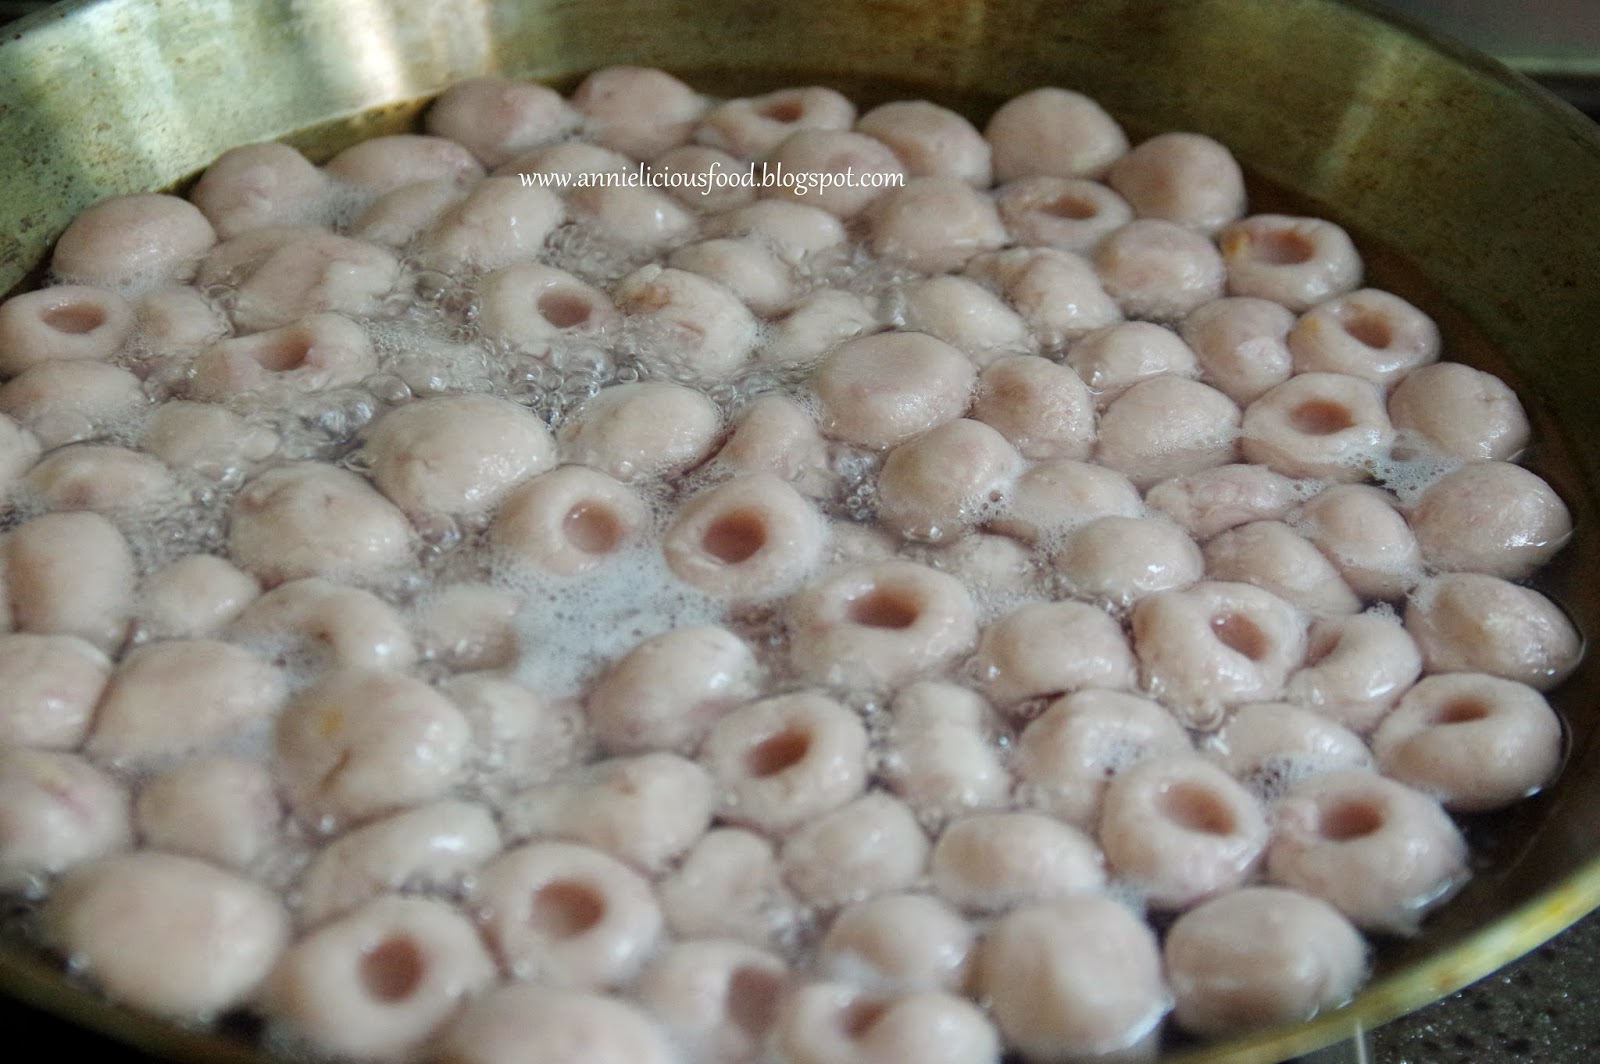
Abacus Beads, literally Taro Gnocchi, with a dimple in the centre resembles abacus beads shape. This dish has symbolic wealth meaning and Chinese loves to prepare this dish during Chinese New year. When abacus beads stir fried with other ingredients and condiments, the dimple in the middle also helps contain the ingredients that flavour it. This traditional is really delicious.


Last year's Chinese New Year, I wanted to make this dish. But you know, CNY task is overwhelmed and I barely have time to rest. So, I only get to cook this dish about 2 months ago. 

If you have eaten Hakka abacus beads or you know how to make them, you will know that this dish requires alot of manual labour and patient. But, when you see your family dig in with their happy smile, I think it is all worth-while.


Ingredients are easily available at the market. You don't have to worry too much. Most Hakka family will add pork into the stir-fry. I want to keep it simple and I didn't wan't to make it a heavy meal. So, I'd just go along with the basic ingredients. If you choose to use pork, you may remove caipu  (菜谱). The sweetness of caipu is to replace the missing minced pork.

Of course, you can add or take away any stir-fry ingredients which you don't like. But for abacus beads recipe, please try to stick to it. It's abacus beads. We use taro for the gnocchi. Pls don't ask me questions like "Hi, can I use sweet potatoes instead?" or "Hi, I don't like taro. What about using Potatoes as a substitute? Do you think it works?"

Sorry ah. To me, traditional is traditional. I never try fusion style before. As much as I could, I will try to stick to original way. And I love originals. In olden days, no minced pork were added due to less resource in the village. Minced pork were added for enhancement only at the latter.


This recipe serves 2 as lunch, or upto 3 as a starter or tea-break snack. But if you see the pictures on this post, I double up the recipe portion during cooking.

For the Abacus Beads
  • 330g Taro
  • 100g Tapioca Flour
  • 70g ~ 80g Hot Boiling Water (estimation)
  • 1/4 tsp Fine Salt
For Stir-Frying
  • 4 Garlic Cloves, minced
  • 3 Shallots, minced 
  • 1 tbsp Cai Pu / Choi Po (菜谱)
  • 20g Dried Shrimps, soaked, minced
  • 8g Dried Cuttlefish, cut into thin strips, and soaked till soften 
  • 4 pieces Dried Mushrooms, soak till soften and sliced 
  • 10g Wood Ear / Dried Fungus, soaked, julienned 
  • pinches of Salt and Pepper to taste
For Garnishing
  • 1 Red Chilli, julienned
  • some Coriander 
  • some Spring Onions
Method - For the Abacus Beads
  1. Taro - Skinned, washed, cut into cubes. Steam the taro for 15mins until they are soft and well cooked. You may use a chopstick to poke through the taro to check if it is cooked or not.
  2. Once taro cubes are cooked, transfer the taro cubes into a large mixing bowl, add in few pinches of salt and with your quick motion, roughly mash the taro with the potato masher. I didn't mash my taro thoroughly. Because I want to remain the "bite" taro texture for my abacus beads.
  3. Add in half the tapioca flour, continue to mash and mix them while the taro is still hot.
  4. You will soon realized that it's getting tough to mix it with potato masher. This is the time when you need to use your palms into it and give it some mixing and kneading.
  5. Add half amount of boiling water, continue the the kneading, add in the remaining tapioca flour, knead, add remaining boiling water, knead so as to form a nice dough.
  6. Make dough into small but even balls. Use your tiniest finger to make a dimple in the centre of each ball to resemble abacus beads. My finger is rough and big. So, I use the edge of the sieve as a tool to create those nice dimples on the dough to achieve evenly sized and can be evenly cooked later.
  7. Boil a large wok / pot of water. Slowly and gently, dd the abacus beads into the boiling water, VERY gently, stir to prevent them from sticking together. Boil for about 15mins to 20mins or until the batch floats on the boiling water.
  8. Prepare a pot of ice cold water. Remove the cooked abacus beads from the boiling water with a strainer, put the abacus beads into the cold water.
  9. Drain the abacus beads with a colander. Coat the abacus beads with 2 to 3 tbsps of cooking oil to prevent sticking. 
Method - Frying the Abacus Beads
  1. Heat cooking oil in wok on high heat
  2. Add garlic, shallots, dried shrimps and dried cuttlefish, stir fry until fragrant. 
  3. Add Cai Pu, mushrooms, wood ear and continue to fry for 2 to 3 minutes until fragrant. 
  4. Add salt and pepper to taste and give it a quick stir. 
  5. Add in the abacus beads and gently stir-fry for about 2 minutes. 
  6. Add in half portion of spring onions, coriander and red chilli. Stir through for another minute. 
  7. Taste and adjust salt and pepper if needed. Stir through. 
  8. To serve, dish abacus beads in a shallow serving dish or casserole. Garnish with the remaining chilli, spring onions and coriander.
Note : The success to make the abacus beads is to mix and knead it while it's hot. I know kneading the abacus dough while it's hot may be challenging. But when you get the hang of it, your hand will somehow immune to the heat and you will be able to do it pretty fast.

Step 6 - Make dough into small but even balls. Use your tiniest finger to make a dimple in the centre of each ball to resemble abacus beads. My finger is rough and big. So, I use the edge of the sieve as a tool to create those nice dimples on the dough to achieve evenly sized and can be evenly cooked later.


The texture of the abacus beads that I'm trying to achieve is springy, but with the starchy fragrance of taro on every bite. My abacus beads looked rough, as I only roughly mash my taro. This is how I maintain the taro "bite" texture for each gnocchi.


Step 7 - Boil a large wok / pot of water. Slowly and gently, dd the abacus beads into the boiling water, VERY gently, stir to prevent them from sticking together. Boil for about 15mins to 20mins or until the batch floats on the boiling water.


Stir fry the abacus beads as per instruction. Remember - Keep it simple. DO NOT add too much condiments or any ingredients that has heavy flavour. Or else, you won't be able to fully savour the fragrance of the taro when you eat them. Fish sauce is a good condiment to this dish if you wants to do some changes to it.


On a side note, do not let the cooked abacus beads stand in the cold water for too long. For best texture and flavour, stir fry the cooked abacus beads as soon as possible after they have been boiled. My friend told me that I can store cooked abacus beads in airtight container, keep it refrigerated until I need to stir fry them. I have not tried keeping them in refrigerator before. But I think it probably works.

Max loves it. He asked if I can cook this more often when I'm free. I think, his request could tell how good this dish is.


This dish is an absolute textural delight. The lightly chewiness of the abacus beads, loads of flavorful goodness and mushrooms and the sudden burst of crunchy freshness from the greens. I don't have to say more.