Tuesday, August 6, 2013

How to prepare Small Pork Intestines (如何处理猪小肠)

Ah... I know lots of modern people don't take intestines nowadays. But intestines is a common food to me. It's like, another meat dish. Such small pork intestines can be fried, steamed, or braised. They can be served as a dish on it's own, eat with noodles, rice or even porridge.

I love intestines. I love it's sweet taste, it's bouncy texture and it's chewiness. And did you see how attractive the braised sweet intestine is? They are not ordinary small intestines. They are STUFFED!

8 Layers!!!!


And for the 1st attempt, I only did 4 layers. You can take a look at the difference.


Earlier on, I shared how to prepare pig stomach. This time, it's gonna be small pork intestines.

It may sounds tedious, but if we wants to enjoy this nice meaty small intestine, it's unavoidable. Unless you want to eat outside :)

The saddest part about this stuffed small intestine is that, it is almost impossible for you to get this type of stuffed small intestine easily. Simply because it is just too much work for people to do it for business. I knew there are some authentic Chinese restaurant does, but they are super high priced. One very small (almost pathetic) portion of braised stuffed sweet intestine could easily cost S$9.90. Oh well, but if you are not fussy, Kway Chap is everywhere around the hawker center. They do have sweet intestines, but they are not stuffed for sure.


This is the 1st time I did this. But I'm glad that I did it. When I called my mom and tell her I wanna  cook small pork intestines, I get 'piang'ed by my mom with her first sentence "Aiyahhhh... You don't know how to prepare one lahhh!!!"

You know? It's like, confidence level gena flushed down by one big pail of ice-cold water? Haiss...  But nevermind. Anyway, it's okay. It's part of my learning stage. Based on my mom's description through phone, courageously, I learn to do it myself :)

I bought some really nice small intestine and some ribs, because I planned to braise them (recipe will be out soon). For some people who don't know where does these small intestines comes from, here, this photo could gives you a clearer picture, although not in detail. The part in red. That's the small intestine (小肠) that I'm talking about. Some people called it pork intestine, some people recognize it as sweet intestine as usually major supermarts will label it as "sweet intestines".


Photo Credit : Westpol

But please do not mixed up. To my understanding, sweet intestines is the first portion of the small intestines called duodenum, also known as 粉肠, which is usually much more pricier than small intestines as it is not easy to get. Unless you are the butcher's good friend, and that should be easier :)

One of the nicest thing of eating intestines is that, we consume every part of the animal instead of wasting it. It's absolutely desirable to make good use of every part of the intestines and turn them into nice dishes. They have different structures and taste.

Cleaning Sweet Intestine method

1. First, snip away the inner layer of whitish skin-look-alike thing that originally joint together with the intestine. You don't need those. Once snipped away, your small intestine will then turned into a looooooong and straight piece.


2. Prepare bowl of salt and a bowl of corn flour (or tapioca flour). 

NOTE : For hygiene reason, DO NOT take your salt straight from your salt container with your bare hand and just rub it on the intestine, and then take the salt again! Urgh! This is really not hygiene. Please pour the salt on a bowl. If you can't finish those salt in the bowl after you cleaned the stomach, discard. Your finger touches the stomach, and then the salt, and then the stomach again... You still want to keep those salt? Hahaha...Anyway, this same applies to the corn flour / tapioca flour.

3. Apply a handful of salt on the intestine surface, give it a good rub. Leave it there for awhile and then rinse with running water. By now, you should get rid some of the slimy and greasy residue and smell. Rinse with running water. Repeat this at least twice to ensure they are well cleaned. 


4. . Once it's done,  flip the intestine inside out and wash the inner part. Refer to below photo, we just kinda stuff one side into the other side, and then you will be able to flip the inner part over. Once it's done, repeat the step 3 washing until they are well cleaned. 


5. Rinse with water until water runs clear and drain it.


They are now cleaned and drained. Looks like I have alot of them yea. Read on, and you will know that they are not alot actually.


6. Next, we will need to stuff the intestine into layers (4 layers or more if you want). Decide how many layers you want your sweet intestine to be. 4 layers? Cut them into 4 equal length. You want more? Divide accordingly. Don't forget. You need to divide them into equal length :)


7. Just use two fingers to expand one end of the intestine into a big hole, stuff in one layer. Once done, you get 2 layers of sweet intestine. With the double layered sweet intestine, take another intestine, expand the other end and stuff it in again. Like that, you will have 3 layers. Repeat the step for the 4th layers and if you want more, just repeat the steps again until you finished up the intestine. 


Because the intestine itself is smooth and slimy in texture, it will be able to slide in on it's own pretty well. Do it gently. Once you get the flow right, it's actually quite fun to do it :)

6. Once 4 layers are done, use a toothpick to poke on both ends. This is to secure the position of the stuffed intestine. And you could see from the photo.  They are expanded into bigger size.

This one... 4 layers.


This one..... 8 layers!!!


7. Boil the intestine in a boiling water for 5 minutes. The five minute boil will set it's shape and it also cooked away the slimy impurities. Once the stuffed intestine contact with hot water, it will shrink. And this explains the reason why we need to use toothpick to secure it's position. With this, it won't affect the stuffing effort that you just did.


8. Dish up the stuffed intestine and put them into tap water to let it cool down. There may be some impurities water might trapped inside the intestine. You may want to gently press the intestine to release the impurities water.

And after stuffing them, I only have that much of intestine for braising. Not alot actually.


Once stuffed intestine is completely cooled, remove the toothpicks at both end and it is ready to use/cook. With such stuffed intestine, it is usually used as braising. You could do this a week or two ahead, and stock up in your freezer! No fuss at all. 


This is my braised small intestine. Take a look at this! Look at the nice layers of intestine. Isn't it pretty? And no! it doesn't only gives you pretty look. It's yummy too! By stuffing the small intestines into multi-layers, it could gives bouncier and chewier texture. It makes you wanna eat more because they are so so so nice to chew! And the the braised sauce trapped in every layers, it gives every mouthful of intestine chew and flavor too!

I really love the delicate taste, the soft, smooth and yet bouncy texture. I simply couldn't tell you how much I love this! And I hope you are sold by now :D


For those who don't take intestines, I urge you to give it a try again. As long as you wash the intestine clean and prepare it well, you will learn to appreciate it.

For braising of small pork intestine, you may refer to this recipe :

Kampar Braised Pork Ribs Platter (金宝 "马来王" 卤排骨) - (MFF - Perak)


Happy cooking!

Sunday, July 21, 2013

Petaling Street LuoHanGuo Longan Drink 罗汉果龙眼雪 - (MFF - KL/Selangor)

This Petaling Street Luo Han Guo Longan drink may seems ordinary. Ingredients are easily available. No big deal. But this drink will makes you goes "Wooohooo!!!" and then making the 'slurp slurp' sounds when one is eating, and it gives you brain freeze too!

I had this once, and that was about 9 to 10 years back then. I remembered I waited under the hot sun beside the air mata kucing stall (literally longan drink stall), waiting for my turn to collect my bowl of ice cold drink. And when i savor it, I starts to "oohhh~ahhhs~woohh~!!!". It's so concentrated, so sweet, so cold, so refreshing, so smooth and satisfying! It's under the hot sun, and my hand is holding that metal bowl. My palm's heat melt the ice even faster. This kind of experience is really priceless!


So, here's the thing. I'm trying to replicate the original Petaling Street luo han guo longan drink. Since it is the effort of replicating, I must make sure it taste as close to the original as I could lah. And for it's originality sake, I intentionally used a metal bowl to take a photo of this. It looks kinda quite alike! Hahaha...

There's a way to savor this longan drink. The whole idea is to cook up a pot of luo han guo and longan infused essence, with mad sweetness. And then, pour the infusion over to a bowlful of ice. Let it melt away, and slowly savor. You could argue that it is just too sweet, or it is more convenient to just add more cold water in it to make it faster instead of waiting the ice to melt away. But well, you know? Original one is like that mahhh... :D


If I wanna dilute the infused essence with water, I might as well boil a big pot of luo han guo and longan water loh. What makes it so special? Correct? This one is different. This is the super "kaw" (thick and strong) version of luo han kuo longan drink. They are much more "kaw" than the Kopi-kaw selling at your neighborhood kopitiam. They are like... espresso shot! Woooh!!!

I discussed with my mother about this longan drink. She argued that there's candied melons and melons flesh strips in there! I looked at her with my amazed look. Cos she usually doesn't even remember what she had last week! And now she tells me she remember all these donkey years back thingy?! Hahaha..

So, to kill the curiosity of the cat, I decided to add a handful of candied melon in. Oh well, it's a copycat version la. We can't be having the exact recipe from the stall. Whatever they display at the stall and whatever can be found in the bowl of longan drink can be the possible ingredients. So, anything is possible!

Ingredients (Serves 8 to 10, with bowlful of ice)
(Source : Wendyinkk, with modification)
  • 400g Fresh Winter Melon
  • 100g Candied Melon
  • 3 Luo Han Guo
  • 100g Dark Longan Flesh
  • 250g Rock Sugar
  • 2.2L Water

Method
  1. Discard the winter melon seeds, give the skin a good scrub. Cut them into big chunk (skin on), and set aside. 
  2. In a pot, bring water, winter melon chunks and candied melon to a boil. Lower the fire (the lowest fire) and let it simmer for 2 hours. I'm lazy, I cooked mine for 1.5 hours only. I just can't wait. 
  3. Wash the luo han guo. Crack them. Put them into the pot together with rock sugar and let it continue to boil for another hour. 
  4. Strain the infusion. Pick up some winter melon flesh and candied melons from the strained remainder. You don't have to pick up all of them. Just abit will do. Chop them into small piece, or into strips. 
  5. Put dark longan flesh and chopped melon flesh into the strained infusion and boil it for another 20mins. You should be getting about 1 litre of concentrated infusion at the end.
  6. Let it cool down completely. Chill them in the fridge if you are making it for the next day. 
  7. Take a FULL bowl of ice, scoop some infusion over. Let them melt for 5 mins and slowly savor it. 
Note : There's still alot of flavor on the strained remainder. You can add another 2L water to boil it again. It will give you flavorful longan drinks too. But it's just not as concentrate as the infusion that we had earlier.


This is the dark longan flesh that I got from the chinese medicine hall. They taste really sweet and smells good. If you are replicating this longan drink, I'd highly encourage you to use this type of dark colored longan flesh instead of the lighter color longan, which is usually dehydrated.


This luo han guo and longan infused essence is VERY concentrated and sweet. But when it melts with the bowl of ice, the sweetness is just nice. I serve a bowl to my MIL. For the 1st sip, she complained. But after I explained, and ask her to drink it slowly instead of gulping the bowl of longan drink like a Garfield, she then slow down and let the ice melts away. And after she finished the 1st bowl, she asked if she could have another bowl. Haha..

One of the feature of this drink is the generous presence of longan flesh is not only making it a thirst quencher, but also a bowl of nice dessert too. When the ice started to melt away and it's just nice to drink em'.


So, do you prefer the metal bowl photo that gives more originality look? Or this tauhuay bowl that is arguably better looking?


No matter what, taste is still the most important. Do give it a try! :)


I am submitting this post to Malaysian Food Fest KL Selangor Month hosted by Shannon of Just as Delish.

Thursday, July 11, 2013

Passion Fruit Tofu Cheesecake (百香果豆腐芝士蛋糕)

Ahhh... This is easy. This is one of my favorite cheesecake, and this recipe is going to be in my collection. But at the same time, if I don't share this good recipe, I feel that this recipe wouldn't worth anything. I won't want good recipes to be another buried treasure.


I had been wanting to make cold-set cheese cake for the longest time. Not because I like it. It's because I just feels like doing it. I'm not a fan of cold-set cheesecakes. Reason is because they are tad too rich to my liking, and to the extend that I sometimes find it bored. Another reason is because I knew I never able to finish a slice of cheesecake on my own over hi-tea. Never. This also makes me hesitate in making cheesecake at home, unless I can get something light in both texture and taste. Like this.... tofu cheesecake :)


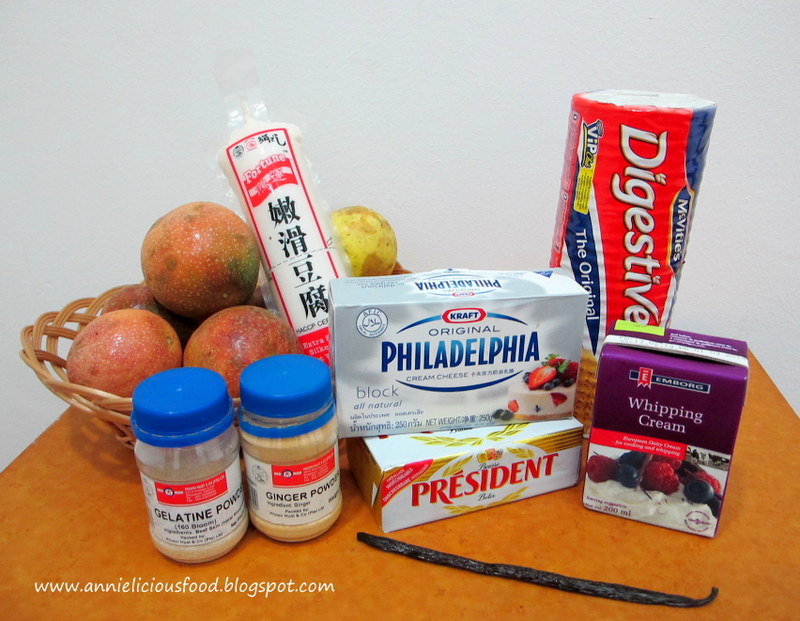
Ingredients
(Source : Zen Can Cook, with modification)

For the base crust
  • 10 pcs Digestive Biscuits, crushed into crumbs
  • 110g Unsalted Butter, melted
  • 4 tbsp Castor Sugar
  • 1 tsp Ground Ginger
  • ½ tsp Fine Salt
For the cheesecake
  • 400g Silken Tofu
  • 500g Cream Cheese, at room temperature
  • 3 tbsp Passion Fruit Juice from fresh and ripe Passion Fruit
  • 1 Vanilla Bean, slit and scrapped (I used Madagascar Vanilla Bean)
  • ½ cup Heavy Cream or Whipping Cream (about 120ml)
  • 3 tsp Powdered Gelatin
  • ¾ cup Castor Sugar (about 85 grams)
For the jelly topping
  • Passion Fruit Juice from 5 fresh and ripe Passion Fruit
  • 1 tsp Powdered Gelatin 

Note : 
1. DO NOT get mixed up between silken tofu and silken egg tofu. They are two different type of tofu. If you get the silken egg tofu, you will ruin the whole cake.

2. Some of you might face problem in melting the gelatin powder evenly. Some will end up with lumps. If you are worried that you can't handle the gelatin powder well, here's the tips. In a small bowl, add a tablespoon of water (at room temperature), and then add in the gelatin powder. Wait for the gelatin powder to bloom and it will bloom into soft texture. Then, you could add these soft gelatin into the hot cream / hot passion fruit juice. Of course, you have to continue to stir it until it dissolved.


Method

For the base crust
  1. Preheat oven to 175 degree. Butter an 8 inch baking dish or ring. I used 9 inch instead. It's up to you. If you are using a ring, line the bottom with aluminium foil and place on a baking tray. 
  2. Put digestive biscuits crumbs in a bowl, add in castor sugar, ground ginger and salt. Mix well with a fork. Add the melted butter and mix until combined. 
  3. Transfer crumbs mixture to the prepared baking tin and press it down. Ensure it is being well pressed evenly. Bake it in the oven for 10 to 15 minutes or until golden. Let it cool completely. 
For the cheesecake
  1. Silken tofu and 3 tablespoons of passion fruit juice into the processor. Blend until smooth. 
  2. Heat heavy cream / whipping cream in a small saucepan under low fire, until cream is warm to the touch. Add powdered gelatin bit by bit and stir until dissolved. Remove from heat and let it cool. 
  3. In a mixing bowl, add in softened cream cheese, sugar, salt and vanilla seeds. Mix until fluffy. 
  4. Fold in the cream and passion fruit tofu mixture until incorporated. 
  5. Pour the mixture into the crust and refrigerate until set. At least 7 hours. 
For the jelly topping
  1. Strain the passion fruit juice and place it in a small sauce pan
  2. Heat strained passion fruit juice in a small saucepan under low fire, until juice is warm to the touch. Add powdered gelatin bit by bit and stir until dissolved. Remove from heat and let it cool. 
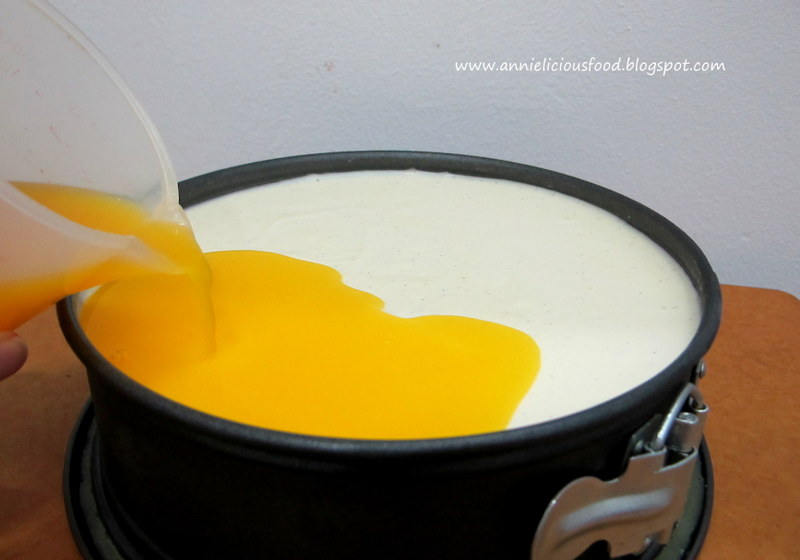
  3. Gently pour the cooled passion fruit mixture on top.
  4. Rinse some passion fruit seeds and place on top of the set cheesecake. Let it set in the refrigerator for at least 2 hours before you gently unmould it by wrapping the side of the cake with a piece of hot towel (or use blow torch if you have), and serve. 

Do not judge it's taste by it's look. Ripe passion fruit might looked deceiving on the outside. But you won't know the goodness until you cut it. Look at this... Isn't it beautiful?


Gently pour the cooled passion fruit mixture on top.


Add some passion fruit seeds on top and let it set in the fridge for at least 2 hours.


For the 1st time when I looked at tofu cheesecake recipe, I was like... "Huh?? Tofu?? Really??". But after I tried this soft, light, sweet and with a hint of tang on this tofu cheesecake, I totally changed the way I feel. The taste is very characteristic. It was creamy, fruity, with a hint of vanilla. This is the kinda cheesecake I like :)


Look at this. They are soft and delicate. The existence of vanilla beans gives really good flavor to the cheesecake. With the crumbly base, taste sweet and light salty, it really gives every mouthful an awesome experience.

Do try it out!

Additional Note : Incase if you are concerned if this cake would heavy tofu taste. Rest assured that it won't. It will only gives you a hint of tofu taste, as if you are eating soft and light cheesecake with the existence of soya bean taste. If you can accept eating soya bean pudding, yes, that's the taste. But the soya bean taste is much much milder. Because you have the richness of cream cheese, good flavour of vanilla and the tang of passion fruit taste blended together.


Monday, June 24, 2013

Kuih Bengka Beras (肥豬肉) - (MFF - Penang)

I missed last month's Malaysian Food Fest (MFF) fun due to hectic school assignment. This month I told myself that I really can't miss it. This kuih looked unattractive and pale looking. But it taste really nice and bouncy with the existence of coconut milk, pandan leaves and rice flour. Coconut milk and pandan are good friends. It will never goes wrong.

I remembered I ate this kuih in Penang when I was 8 yrs old. The memory is so fresh that I could still remember how I bite the delicious kuih and it dropped the other half on the floor, and I cried because there's no more left. Hahaha...
 
Why bengka beras and not other Nyonya kuih's? That's because last month Max randomly picked one of my cookbook, and he pointed at the recipe, asking me if I could make this for him. He say this is one of his favorite nyonya kuih. I ignored his request. Later, I decided to bake kuih bengka beras after I get a confirmation from this website, showing that bengka beras is actually the Nyonya Kuih in Penang.  
 
 
Oh no. Please don't misunderstood me. I didn't say this kuih is originated in Penang. Infact, this kuih is widely selling in Malaysia, particularly in Penang, as there's alot of Nyonya kuih's available there.
 
Kampar do sell bengka beras too. And we called this kueh "fei-jue-yoke" 肥豬肉, literally pork fats in cantonese. This kuih looked really like a thick slab of pork fats. Probably that's why they named  the kuih based on it's appearance resembles it? I'm not sure.
 
All I could remember is, my late father is madly in love with this bengka beras. Whenever he goes back to hometown, he will want to buy this, and he can swallow 5 pieces at a time! Now, when I see Max eating the bengka beras that I baked, makes me remind of my late father, holding a slice of bengka beras with his satisfaction smile. Priceless!


I adapted my recipe from a cookbook called Nyonya Traditional Kueh, Snacks and Desserts, written by Chef Ricky Ng. He's nothern nyonya descendants. His recipe ask for 8 x 8 inch square pan. But I didn't wanna make that much kuih, as I knew I won't be able to finish it. So, I reduce the recipe ratio by 24% just to fit into a 7 x 7 inch square pan instead.
 
Ingredients
(Source :  Nyonya Traditional Kueh, Snacks and Desserts cookbook, by Chef Ricky Ng, with modification)
  • 153g Rice Flour
  • 42g Green Bean Flour
  • 12g Tapioca Flour or Sago Flour (I used Sago Flour)
  • 500ml Coconut Milk
  • 500ml Water
  • 150g Sugar
  • 3 blades of Pandan Leaves, tie knot.
  • a pinch of salt
 
Method
  1. Grease a 7 inch square pan with some oil, and pre-heat oven to 220 degree.
  2. Mix all ingredients together, except pandan leaves. Stir till sugar has completely dissolved and strain.
  3. In a heavy based pan or pot, add in mixture and pandan leaves knot. Cook under low flame and stirring continuously till mixture begin thickened.
  4. Discard pandan leaves and pour the mixture into the greased tin. If your mixture has lots of lumps at this point of time, do consider to strain it when you pour them into the greased tin.
  5. Bake bengka beras for 30 to 35 minutes, and then switch to 240 degree and let it grill for 5 mins, or until top of kuih turns dark brown.
  6. Let it cool completely before cutting the kuih.
 
 
This is my bengka beras just out of the oven.
 
 
Unmoulded. Nice charred color! I like! But if you compare with those shop-bought ones, they are not as charred as this. This is the best thing about home-made stuffs. I like the way I want :)
 
 
Once kuih completely cooled, trim away the charred sides and cut into slices.
 
 
Take a look at this... They are soft, bouncy and fragrant!
 

If you had this kuih before, you won't need me to further elaborate it's addictive yumms. If you never had this before, give this a try. It's really simple to make.
 
 
I am submitting this post to Malaysian Food Fest, Penang Month hosted by Alan of Travellingfoodies

Sunday, June 16, 2013

BEST Double Chocolate Walnut Brownies

I absolutely love the result of this double chocolate walnut brownies! It's moist and taste amazing!

These were easy to make and the results were absolutely satisfying! I put in some chocolate chips and it tasted really good. If you don't like walnuts, you could opt out or replaced with macadamia.


I don't intend to blog this recipe so soon. But upon Henny and Linda's request, I just post it for them.

I love brownies. But I refrain from baking it due to it's sinfulness. But then, recently I got myself a new pro-ceramic brownies baking pan at a discount price! So, I have a reason to bake it! And at the same time, I'm a little nervous about baking brownies.

Believe it or not? This is the 2nd time I bake brownies. The 1st time didn't turned up well as I just started pick up baking back then. I over-baked it, and I followed online recipe blindly. The brownies turned up to be an overly-sugared chocolate bar. Now I think back, this really makes me laugh at myself. Hahaha..

This might be the Brownies recipe that you are looking for, but this might not! But allow me to share with you, Max is the one who named this brownie. Max gave me his review about this brownies. He says "Ohhh!!! This is one of the BEST brownies that I'd ever tasted!" ..... Oh! I have to agree with him. Because I really love this brownies too. He said I should name it BEST double chocolate walnut brownies. And there you go! He name it!

But I won't wanna shout to the whole world that this is the BEST! No... I won't wanna debate nor claim this is the best brownies in the world or something like that. Because different people has different expectation on brownies.


There are many types of brownies recipe out there. There's fudgy, chewy or cakey brownies types of brownies. Fudgy brownies is dense, moist, packed with intense chocolatey interior. Cakey brownie has a moist crumb and a slightly fluffy interior. Chewy brownie is moist, but not quite as gooey as fudgy one.

The thing about fudgy brownies is "gooey", though what it really is ... should be like a gummy bar if I were to describe em'. No. I'm not making fudgy brownies this time.

My brownies is cakey and chewy. Not fudgy. If you are looking for fudgy brownies, skip this recipe.

Ingredients
(Recipe Source : Hershey's Kitchen with modification)
  • 200g All Purpose Flour
  • 80g Cocoa Powder 
  • 1/2 tsp Baking Soda
  • 75g + 75g Unsalted Butter, melted
  • 120ml Boiling Water
  • 70g Semi-Sweet Dark Chocolate, melted 
  • 2 Large Eggs
  • 350g Castor Sugar
  • 1tsp Vanilla Extract
  • Pinch of Salt
  • 120g Semi-Sweet Dark Chocolate Chips
  • 50g Chopped Walnut, lightly toasted. 
I adapted this recipe from Hershey's Kitchen. But I modified the recipe based on my personal feel. I decreased 80g sugar from the original recipe. I just can't convince myself to use so much sugar. But if I decrease sugar, I will affect the moisture of the brownies. So, I increased the butter to add more moisture. I increased the flour ratio, and added melted dark chocolate too. And of course, I added walnuts!

Method
  1. Lightly grease 13 x 9 inch Brownie baking pan. Or TWO 8 x 8 inch square baking pans if you don't have standard (13 x 9 inch) brownie baking pan. Line baking pan with baking sheet. Or lightly grease them with oil. I personally prefer to line the pan tho. It's much easier to remove the brownies from the pan later. 
  2. Pre-heat oven at 175 degree. Fan OFF. 
  3. In a large bowl, combine cocoa powder and baking soda. Stir in 75g melted butter and boiling water. Stir until mixture thickens.
  4. Stir in sugar, eggs, melted chocolate and remaining 75g melted butter. Stir until mixture turned smooth.
  5. Add flour, vanilla extract and salt. Mix until all ingredients well blended. 
  6. Stir in half portion of chocolate chips and half portion of chopped walnuts.
  7. Pour the mixture into the prepared pan. Sprinkle the rest of the chocolate chips and walnuts on top and bake for 35 to 40 mins for rectangular pan. 30 to 35 mins for square pan. Or until brownies begin to pull away from sides of pan. Brownies are done when toothpick comes out with a few moist crumbs still clinging. It's okay for the pick to look moist, but if you see wet batter, keep baking.
  8. Cool completely in pan on wire rack. Once brownies completely cooled, cut into squares and serve. 
TIPS : 
You could make this ahead. Once the brownies are well baked and completely cooled, wrap them nicely and freeze them. Brownies freeze well. Just thaw to room temperature and serve. But I personally would suggest you to serve the brownies warm. Just microwave it awhile before serving. It makes really perfect match with vanilla ice cream! :)


Eggs is the ingredient that pack everything together and make it deep, intense and chewy richness. 


The chewiness of the brownies seems to come from a couple of different factors. More on all-purpose flour, whose proteins provide "bite". You could use cake flour or super-lite flour too. But the result would be much lighter and it might turned out to be chocolate cake. No, I don't prefer that. I want those "bite".

This is just out of the oven. It looked slightly bumpy. I kinda slightly over-baked them. I confess, I throw the brownies into the oven and I forgotten about it. And this is NOT the 1st time I repeat this bad habit. Hahaha... So, this has caused the brownies crack at the side.


Once brownies completely cooled, it will go turn flat and nice. My advice is not to attempt to cut warm brownies. Because this brownies is cakey and crumbly it might turned messy if you cut it while it's warm. Let the brownies sit inside the pan for few hours (I leave it there for 8 hours) before I remove it.


Look at this dark beauty... It's moist, soft, cakey but yet chewy. This is absolutely rich and delicious! The thin crust at the top makes the brownies looked really sexy!


I gave some to Soke Kuan (who came all the way from M'sia to Singapore) and Meng Teng too. They looked so happy when they sees my brownies. Their facial expression? ...... Priceless! :D

Happy baking!

Monday, June 10, 2013

Lye Water Rice Dumplings / 鹼水粽 (aka Kee Zhang)

Oh! I just couldn't tell you how much I love this! Cantonese called this Gan Sui Joong (鹼水粽), also known as Kee Chang in Hokkien is one of the most basic rice dumplings during the Chinese Rice Dumplings Festivals. But I also knows that this lye water rice dumpling is the least favorite to most modern people nowadays. Some don't even wanna look at it.

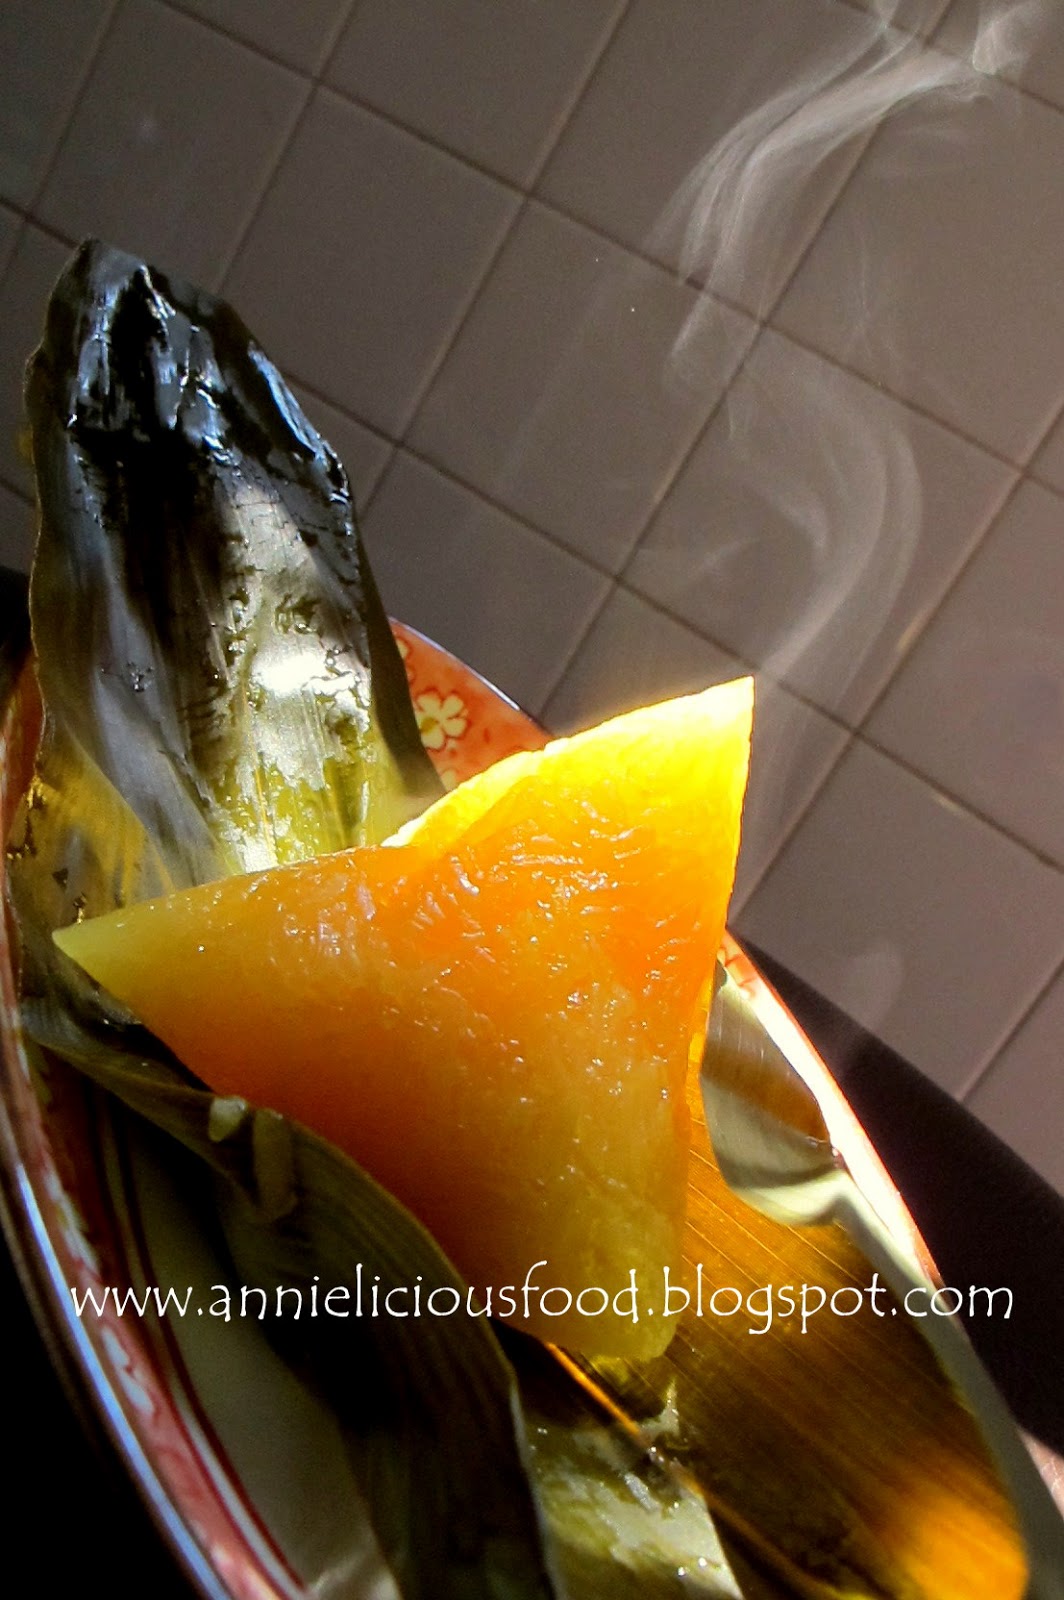
But Woohhhh!!! Look at my Kee Chang! The smokey effect! Hehehe...


Last year, I posted My Mama's Savory Rice Dumpling (我妈妈的咸肉粽) recipe and Nyonya Rice Dumpling (娘惹粽子) recipe. This year, I'm gonna post Lye Water Rice Dumplings (鹼水粽) recipe.

This rice dumpling may appear to be boring and taste bland. But hey! When you get the dipping right, you will fall in love with it! It can be anything sweet! I love to dunk my Kee Chang in Gula Melaka (Palm Sugar), or Kaya (Coconut Jam), or some really good Honey, or even just plain fine grain white sugar! One dumpling, but many ways of enjoying it :)


I want my Kee Chang to have golden effect. So, I used some really nice Honey to do the photography work :)

This recipe makes about 35 to 40 rice dumplings. Depends on how big you want your rice dumplings to be. I've got 37pcs if I'm not wrong. If you are not feeding a village or giveaway, half of the recipe will do :)

Ingredients
  • 1 kg Glutinous Rice
  • 1 Lye Rock (鹼水头)
  • 40 to 50pcs of Dumpling Leaves (or more, incase some leaves are not in good shape)
  • some grass strands to tie the dumplings

Method

  1. Prepare dumpling leaves. Boil the dumpling leaves for 20mins or upto 30mins if you are boiling alot of leaves. Remember to add in the grass strands and boil together. Let the whole pot of leaves cool down on it's own. Use water to kinda gently wash them, drained. Use a cloth to wipe the leaves piece by piece. Set aside for later use. 
  2. Use mortar pestle to break the lye rock into small pieces. Add broken lye bits into a bowl of water, stir until dissolved. Some people says it will speed up this process if hot water is used. I never try it before. I just use room temperature water. It worked fine. It dissolves well.
  3. Wash glutinous rice for few times until water runs clear. Add enough water to cover the rice by 5cm or so. Pour in the bowl lye water into the rice and give it a good stir. Make sure it is mixed evenly. Leave it soaked overnight thoroughly.
  4. The next day, drain the rice using colander. Once rice well drained, you could start wrapping the dumplings. 
  5. Once dumplings are wrapped, using a big pot, cook half pot of water. Once water is boiled, add in the rice dumplings and let it cook for at least 2 hours (if you have 20+pcs in the pot), or upto 3 hours or more (if you have more dumplings in the pot).
  6. To check if dumplings are done, simply dish up one dumpling, unwrap it and check if the inside of the dumpling is soft enough. If it is hard or bitter, continue to boil for another 20 or 30 mins. 
  7. Once dumplings are cooked, remove dumplings from water and hang it up. Let it air dry and cool down for at least 1 hour before eating. 

The most painful part about making nice Kee Chang is the rice picking work. Nope! I'm not asking you to go to the paddy field to harvest glutinous rice yourself. But you have to pick the jasmine rice out of the bag of glutinous rice! For dunnowot reason, glutinous rice available in Malaysia and Singapore somehow mixed with a little bit of jasmine rice. I hate it! And this is where all the "rice-picking" work came in. You could skip this step if you are feeling lazy. But in order to make some really good Kee Chang that gives you every good mouthful of gooey and waxy feel, you really have to do this "pain-in-your-arse" work if you want quality Kee Chang. Last year, I get my MIL and Max to help me. This year, I've got Henny and Linda! Haha :)


This is the lye rock 鹼水头 (a.k.a Kee in Hokkien). Easily available at any grocery shops or even supermarket during rice dumpling festivals. It should cost about 20cts to 30cts per piece. If you are staying in Malaysia, usually they sell lye water instead. After soaked for 2 hours. The lye water gives really nice color to the glutinous rice. But NO... 2 hours isn't enough. You got to soak this overnight! :)


Ooohhhh!!! Look at this sexy shiny and waxy looking Kee Zhang! Yumms!!!


If you intend to learn how to make rice dumplings, Kee Chang is the 1st rice dumpling you should try making. They are the easiest of all and they are the best rice dumpling for you to practice wrapping because if you failed to shape your dumpling, you could always re-wrap it again and again as long as the dumpling leaf is still in good shape. And yes! Henny and Linda picked up rice dumpling skills through wrapping Kee Chang too!

Don't forget to take a look at My Mama's Savory Rice Dumpling (我妈妈的咸肉粽) recipe and Nyonya Rice Dumpling (娘惹粽子) recipe too!


Happy Rice Dumpling Festival everyone! :)

Sunday, May 12, 2013

Steamed Fish with Fermented Bean Paste (豆瓣酱蒸鱼)

Good quality taucheo 豆瓣酱 (aka Fermented Bean Paste) is very fragrant and umami. It could bring out the sweetness of the fish. Fresh tasting fish like Red Snapper or Threadfin works well with taucheo as they taste milder, and not as fishy as fishes like big head carp.


I love using Malaysian made taucheo. They are more fragrant, flavorful and not as salty as those imported from other place. Somehow, I'm quite particular. Am I too used to the taste? Or I had a cursed tongue? No. Probably I just love the taste. Haha..


I'm having problem here. I actually don't know what is the Chinese name of Red Snapper. Until I asked around, then I came to realized that the scientific name of Red Snapper is 红鲷, and fellow Hokkiens called Red Snapper as 红鸡. Now I learnt new words :)

I'm lucky. I've got myself two slice of nice and fresh Red Snapper fillet at the Supermart. So, I'm gonna steam it! FYI, incase you are buying at the wet market, market price for Red Snapper is about S$20 to S$22/kg. So, don't get cheated by fish monger! :)


Ingredients
  • 2 slices of Red Snapper Fish Fillet (mine is 380gm in total)
  • 1 tsp Salt, to rub on the fish
  • 1 tbsp Corn Flour / Tapioca Flour, to rub on the fish (optional)
Condiment
  • 75g Fermented Bean Paste, a.k.a 豆瓣酱 / 豆酱 "Tao-Cheo"
  • 1/2 tsp Sugar
  • Ginger, julienned
  • 1 tbsp Soy Sauce
  • 1 tbsp Hot Shallot Oil 
Garnishing
  • Fried Shallot
  • Spring Onions
  • Coriander Leaves

Method

  1. Clean fish, pat dry. Rub salt on the fish, and then pat some corn flour on it.
  2. Place some ginger on a steaming dish, place fish on top. 
  3. Apply fermented bean paste on top of the fish. Just like spreading peanut butter on your bread, generously. Sprinkle sugar on top.
  4. Bring water in the steamer to a boil and steam fish over high heat for 7 minutes. 
  5. While the fish is steaming half way, heat shallot oil and soy sauce in a pot and bring to a boil.
  6. Remove fish from the steamer, pour away excess steaming liquid.
  7. Drizzle hot shallot oil and soy sauce mixture over. Garnish and serve!


You must be wondering why I rub some corn flour on the fish before I steam it. Very simple. I'm steaming fish fillet here. The logic is to "lock" the juices from the fish meat. If you are steaming whole fish, you may skip this part.

These two slices of fillet is from big fish, and it has big bones. Difficult to cook, especially at the bone side. So, I steam it for 7 minutes. But please please please always bear in mind. When I mentioned the steaming time, I do expect the fish is in room temperature. If your fish is cold and right out of the fridge, please increase the steaming time.


Steamed fish must be eaten right after it's out of the wok. It won't taste nice if the steamed fish dish turned cold. Hence, whenever I blog about steamed fish, I fought my way through the rush hour try to make all the garnishing and photo taking as fast as I could. Because at another side, my family is waiting for me and the steamed fish to start the dinner.

This explained that my steamed fish has no strict rule on how this dish supposed to looks like, nor it looks neat. This is a home-cooked dish. The messier it is, the more home-cooked it looks like! Agree?


I hope you like it!


Do visit my other steamed fish recipes too :)

Prosperity Steamed Cod (富贵鳕鱼)

Canto Style Steamed Red Grouper (清蒸红石斑)

Hong Kong Style Steamed Cod Fish (港蒸鳕鱼)

Saturday, May 4, 2013

Nutella Cake / Torta Alla Gianduja

This cake is fabulously easy and yummy! It's moist, light and DELICIOUS! you won't regret baking it. It's Nigella Lawson's Torta Alla Gianduja. Simply Nutella Cake.


Another reason for you to bake the cake, it's Mother's day soon. The hazelnuts on top somehow gives it a burnished, ceremonial and yet home-made look. I'm sure your mom will feels so proud of you if you baked this for her :)


Max is a huge fan of Nutella. Or I'd say, he's obsessed! He can eat almost everything with Nutella and even the Nutella alone! Urgh! Nutella Monster! Anyway, he's happy when I told him I wanted to bake Nutella cake. And when I complained that hazelnuts are expensive, he said he sponsor it. But he end up didn't even pay me. And neither did he mention that he wanna sponsor that big jar of Nutella. Sigh!

The ingredient is simple. This cake is not the ordinary cake. If you notice, this cake doesn't have flour, baking powder and sugar. Fret not. It will be okay. The cake will collapse. But this is what it should be.


I use shop-bought lightly roasted hazelnuts. Brought home, toast it on the pan. Grind half of it, and keep the remaining half for decoration. And also, if you have Frangelico (hazelnut liqueur) at home, use it. If not, use rum. If you have none, don't scream. Just use water. I don't have Frangelico, and my bottle of Rum gone missing for no reason. So, used Bourbon instead. And I kinda like it :)

Ingredient
(Source : Nigella Lawson's How To Be A Domestic Goddess book)

For the Cake
6 Large Eggs, separated
pinch of Salt
125g Soft Unsalted Butter
400g Nutella
1 tbsp Frangelico, Rum or Water (I used Bourbon)
100g Ground Hazelnut
100g Dark Chocolate, melted. (I used Valrhona)

For the Icing
100g Whole Toasted Hazelnuts
125ml Double Cream (I used Whipping Cream)
1 tbsp Frangelico, Rum or Water (I used Whisky)
125g Dark Chocolate

Don't worry about the cream part. The difference between double cream and whipping cream is in the concentration of fats. For this cake, I used whipping cream because I can't get double cream. I'm fine with it.


Preparation

1. Toast 200g Hazelnut in a dry frying pan until the aroma wafts upwards and the nuts are golden-brown in parts. Keep shaking the pan so that they don't burn on one side and stay to pallid on others. Transfer to a plate and let it cool completely. If they go on the ganache while hot, it'll turn oily. So, be patient. Let it cool first. You may want to consider to make this a day ahead.


2. Grind 100g of the cooled Hazelnut. And I just can't tell you how much I love my Cuisinart mini food processor! It makes my cooking and baking so so so much easier! :)


3. Melt chocolate using double boiling method, to allow it to melt over gently under indirect heat. Once chocolate begins to melt, stir it gently with plastic spatula. When almost all of the chocolate is melted, lift up the bowl from the saucepan and set it on the counter. Stir continuously until it is shiny, smooth and completely melted. Set aside and leave it cool before use.


Okay, let's start baking!

Method

For the Cake

  1. Prepare a 9 inch springform tin, greased and lined. 
  2. Preheat the oven to 180 degree.
  3. In a large clean bowl, whisk the egg whites and salt until stiff, but not dry. 
  4. In a separate bowl, beat the butter and Nutella together, and then add the Frangelico (or whatever you are using), egg yolk and ground hazelnuts.
  5. Fold in the cooled melted chocolate, then lighten the mixture with large dollop of egg white, which you can beat in as roughly as you want, before gently folding the rest of then in a third at a time. Just like the way you make chiffon cake. 
  6. Pour into the prepared tin and bake it for 40 mins or until the cake's beginning to come away at the sides.
  7. Let the cake cool on a rack completely before you un-mould them carefully. This is a damp cake, you might find it abit difficult removing it from the tin.


My cake cracked badly, because I forgot to adjust my oven rack. I just dump the cake in and let it bake while I enjoy my favorite TV show at the living room. I'm a bad baker! Hahaha.

Well, as I said, the cake will collapse abit once it's cooled. But because mine cracked badly, so, it sank like a Titanic! But I'm not worried at all. I'm gonna ice it anyway.


For the Icing

  1. In a heavy-bottomed saucepan, add the cream, liqueur (or whatever you are using) and chopped chocolate, and heat gently under low fire. 
  2. Once the chocolate's melted, take the pan off the heat, leave it cool down abit and whisk until it reaches the right consistency to ice the top of the cake. 
  3. Ice the top of the cake with the chocolate icing, and dot thickly with the whole toasted hazelnuts.
  4. Set the cake aside and let it rest (or in the chiller) for an hour. This will allow the icing set and sit nicely on top of the cake when you cut. Or incase you want to bring the cake to a party or something. It would avoid mess. But if you are only eating it at home and you'd want some sexy and runny icing effect (just like mine), you don't have to let the cake rest that long then.
Here's the tips. You could prepare, and bake the cake a day ahead. And then, ice the cake on the 2nd day. This delicious chocolate cake keeps very well. 


So, how good is this cake? Max swallowed ate 1/3 of the cake AFTER our dinner! OMG! Can you imagine that? He just had his dinner, and this cake supposed to be his dessert. But.... when he's allowed to freely cut his portion of cake, he greedily cut 1/3 of the cake! He doesn't feels guilty at all! And I witness him eating the cake happily and kept saying "oh~yumm" while he nom it.

All in all, this recipe is indeed a keeper. And it's gluten free!


Happy Mother's day to my mom, my mother-in-law and all the mothers out there! Happy Baking! :)