Showing posts with label Stew n' Slow Cooking. Show all posts

Monday, April 18, 2016

Red Wine Oxtail Stew / Oxtail Bourguignon (紅酒燴牛尾)

Fresh and meaty oxtail, red wine, rosemary, garlic, onions, tomatoes. By reading the list of ingredients, you know this makes a great french stew.

This slow-cooked oxtail meat is so soft and melting, and drenched with rich red wine sauce. This insanely delicious comforting food is absolutely perfect for parties and family gathering!


Be it Red Wine Oxtail Stew or Oxtail Bourguignon, or French oxtail stew, they are technically the same, although some could argue that they are different. Each family has different style of cooking Oxtail Stews. List of ingredients may vary. Some prefers more spices, some prefers basic flavors. French braise them with red wine and mushrooms, and it can be beef or oxtail or veal.


There's no lack of Oxtail Stew recipes online. But mine has shorter list of ingredients tho. So, it's easier to achieve. Everything is available in Cold Storage. But it does not means that this stew is effortless. Mashed potatoes would make the perfect side dish to complement oxtail stew.


Although oxtail is regard as cheap cuts in some country, but in Singapore? No. Not really. Oxtail is expensive in Singapore. In some restaurants in other countries who serves this dish in a peasant way, especially French, and slowly going into haute cuisine. But not yet there, and we're not sure if they will be there or not, unlike Beef Bourguignon.

Ingredients
  • 1.5kg Fresh Oxtail
  • 3 tbsp Plain Flour
  • 4 tbsp Cooking Oil
  • 2 Large Yellow Onions
  • 4 Cloves Garlic
  • 2 Fresh Tomatoes
  • 2 cans Whole Peeled Tomato
  • 2 sprig Rosemary
  • 400ml Red Wine
  • 400ml Beef Stock
  • some Spanish Chorizo chunks, about 7 inches long (Optional)
  • 2 tsp Ground Black Pepper 
  • 2 tsp Salt (or more to taste)
  • 2 tbsp Tomato Ketchup 
  • some coriander leaves as garnishing
Method
  1. Coat oxtails with 3 tbsp of plain flour evenly. In a french pot, heat up 4 tbsp oil, and give oxtail a nice sear until brown on every side. Remove oxtail and set aside. 
  2. Throw in chopped onions, and garlic into the same pot. Saute until onions are soft. Add in fresh tomato wedges and whole peeled tomato can. Fry for another few minutes until tomatoes slightly softened.
  3. Add in browned oxtails, arrange them nicely on the pot, ensuring each piece is at the bottom, while the tomatoes is on top. 
  4. Add in carrots, rosemary, red wine, beef stock, spanish chorizo and ground black pepper. 
  5. Let it simmer on the stove for 30mins, and transfer the pot into a baking tray, and send the pot into pre-heat the oven to 170 Degree Celsius for 1.5 hours. Do check for splatters and spillage. Reduce to 160 Degree Celsius if there's a need. 
  6. Leave oxtail stew aside and let it age for a night. Remember to reheat it before going to sleep. 
  7. On the next day morning, add salt, reheat the stew pot and let it simmer for another 30mins or upto 1 hour. 
  8. Scoop away the top layer of fats. Add in tomato ketchup and give it a stir before taste test. Adjust saltiness accordingly, and the stew is ready to eat.
  9. Optionally, for more presentable looking stews (like mine); Extra effort is needed - Transfer all oxtails, carrot chunks and chorizo chunks from the stew juices. Stew juices will then be strained, and then reduced under flame until stew juice achieved desired thick consistency. Pour thick stew juice over oxtail, and reheat oxtail stew under flame before serving. Don't forget the coriander leaves :)
Here's the complete pictorial guide for your easy reference. I'm sure this series of pictorial guide could complement the method in writing and so as to achieve better understanding. 

Step 1 : Dust oxtail with flour and pan-sear it till brown color. This gives really good flavors to the oxtail stew. 


Step 2 : Be very sure that you do not wash the pot after searing the oxtail. We need those brown patchy mess! Just throw in onions, garlic, tomatoes, and give it a good stir fry.


Before you even start cooking, do select the right flameproof casserole french pot size for your dish. The pot size should be able to fit all oxtails in just nicely with little leeway for other ingredients to fall down to the bottom of the pot except liquids. Like this, you don't have to tie kitchen string around each oxtail piece to hold the meat on the bone which I find it extremely tedious.

Step 3 and 4 : Add in oxtails, ensuring oxtails are at the bottom. And then, add the rest of the ingredients except salt.


Max bought me some real good Spanish Chorizo from Spain sometimes ago. I added Spanish Chorizo into the stew. Why? Because Spanish Chorizo has its distinctive smokiness and deep red color from dried smoked red peppers. It gives really nice flavor to the stew. You may argue that this isn't French stuff. It's optional. You don't have to follow exactly the same. No strict rules here. You also may add some paprika for extra heat if you prefer.


I'm quite regretful for using 22cm french pot for this dish. When I send the pot into the oven, it splatters and spills. So, I transfer to a 24cm french pot after that. So, selecting the right pot size before you cook is really important.

Leaving oxtail stew to age overnight is the key to success. The flavors will infuse all over during aging process. And Le Creuset french pot hold heat amazingly. It still 'cooks' during the cooling down process.

Step 8 : This stew will gives you a thick layer of fats floating on top. Don't get freaked out. Don't remove those fats on the first day. Because fat layer on top prevents air going into the stew, and this also explains the stew keeps well overnight without keeping it in the fridge. Fats will only be removed on the day you consume the stew.


This dish can be done in a rustic way. It can stop at step 8, or boil a little longer if one wish. Or like me, you may proceed to put in extra effort to go to step 9. This also means you have to wash extra pot, sieve, and utensils.

Step 9 : Stew juices needs to be strained, and reduced under flame until desired thickness has reached before pouring over the oxtail stew. You may also do another taste test after the sauce is reduced, just incase you want to do any further adjustment. Tomato ketchup would be a good compliment to the stew juice.


Look at the end result. My oxtail stew will have a nice gloss with the reduced stew juices poured over. And sprinkle chopped coriander leaves over oxtail stew gives another level of attractive look.


Although steamed rice is a good option as a side dish, but I assure you, Oxtail stew is best eaten with mashed potatoes as a side.

My mashed potato recipe is very simple. Some Russet Potatoes, good slab of butter, some fresh milk, and season well with salt and pepper. And oh! don't forget to prepare some salad too!


Cooking method for this dish requires slowly simmering the oxtail in wine, tenderizing the meat that would have been too tough to cook in any other way. Total cooking time of my Red Wine Oxtail Stew is 3 hours, not counting cooling time, and aging time. The meat fall off the bone nicely, but still remain some chew. I'm absolutely satisfied. It's insanely delicious!!!


Thou this dish needs abit of patience to cook, but I assure you that this is worth every effort. Do give this dish a try. I'm sure you will love it.

Sunday, August 23, 2015

Beef Brisket Clear Soup Stew / 清湯牛腩

Beef Brisket Clear Soup Stew is a very popular Cantonese dish. Sweet and beefy in taste, soft and tender meat and clear soup with hints of spices. It may looked like a normal dish, the scent and fragrance of the soup from hours of simmering is lip-smackingly delicious.

Undeniably, the clear beef brisket soup has such a strong umami flavor that you cannot resist but finish it to the last drop.


In my hometown Kampar, we do have this soup serve alongside with dry noodles. In Hong Kong, this dish is easily available, especially the famous Kau Kee Beef Brisket Soup Noodles. Asians have plenty of ways of cooking their version of 'beef stew' or 'beef soup', while Cantonese prefers this clear soup version. However, different family will have different preference in the type of spices added into the soup.


I stewed this pot, and I served 6 adults along with fluffy white rice. Yumms!

Ingredients
(Source : Chinese Food Recipe with modification)
  • 650g Beef Brisket 牛腩
  • 200g Beef Shin 牛腱
  • 6 Water Chestnut (Optional) 马蹄
  • 10 Beef Balls (Optional) 牛肉丸
  • 1 White Radish 白萝卜
  • 1 tbsp Shao Xing Wine 绍兴酒
  • 2 stalks Spring Onions 葱
  • 40g Old Ginger, sliced 老姜
  • 2500ml Water 水
  • Sea Salt to taste 海盐
Spices for the soup
  • 1 Bay Leaf 香叶
  • 10g Rock Sugar 冰糖
  • 1/2 tsp Fennel Seed 小茴香
  • 1/2 Szechuan Pepper 川椒
  • 1 Cinnamon Bark 桂皮
  • 4 Cloves 丁香
  • 2 Star Anise 八角
  • 1 piece Licorice Root 甘草
  • thumb sized Sun-Dried Tangerine Peel 老陈皮
Method
  1. Preparation - Cut meat into pieces and white radish into big chunks. Give the spices a quick rinse. Soak tangerine peel till soft, scrape off the whitish part. 
  2. Bring a large saucepan of water to the boil. Add brisket and shin into the boiling water, simmer for 5 minutes. Remove from the heat, drained, rinse the beef pieces and the saucepan to get rid of the scums. 
  3. Heat a pan with some oil, fry sliced gingers till fragrant. Add in the rest of the spices, shao xing wine, rock sugar, beef brisket and beef shin. Stir well. Add in water and bring to a boil. 
  4. Turn the heat to low and simmer for 30mins, scoop the scums away (if any) and add in 1 stalk of spring onions. 
  5. Add in white radish and beef balls, continue to simmer under low fire for another 30mins (or more), covered. Check the tenderness of the beef brisket and beef shin to your likeliness
  6. Turn off the heat, add salt to taste. Let the soup continue to 'cook' under it's own temperature, for another 30mins.
  7. To serve, reheat the soup, scoop onto the bowl, sprinkle spring onions and serve with fluffy white rice.
This recipe is very forgiving. You can choose to use only beef brisket if you doesn't like beef shin. I added some beef balls into the stew because my big boy Max would love to have em'. Water chestnut can add extra sweetness to the stew. I happened to have some at home, so, I just conveniently add some in there.


I got my beef brisket, beef shin and beef balls from Chinatown wet market. Beef brisket cost S$10 per kg. Good deal eh.

The variety of spices I used is quite alot. But if you don't have all of them in the list, you can opt out some of them. However, ginger, spring onions, szechuan pepper, rock sugar, tangerine peels are essential. Otherwise, you won't be able to get even the right flavorful taste of the broth.

I didn't remove the ginger skin. Ginger and ginger skin has health benefits. I'm sure very little people knows that leaving the skin on your ginger is better for you. Ginger skin doesn't only makes the dish taste better, it aids in digestion by improving absorption of essential nutrients and helps to break down the proteins in your food. Of course, for some cosmetic reasons on certain dishes, I will still remove the ginger skin :)


Fusing with the lean meat into one, the brisket has generated a heavenly consistency. I brewed the soup for 30mins, and the flavor of the spices is all over the soup. I don't the spices to over-powered and covered the beefy taste, because beefy sweetness is eventually what we want. So, I removed the strong flavored spices star anise, cinnamon bark, cloves and licorice root from the soup. You can also do the same or if you prefer stronger spices flavor, you can leave the spices in the soup all the way.


Now, I am able to make this beef brisket clear soup stew at home anytime. To me, the best part about cooking is that you are willing to make something from scratch, and your loved ones enjoy eating it.


I find this soup absolutely suitable for all-year-round dish. The soup is clean, slightly sweet, intensely beefy. Surely will cook it again in near future.


What's next for me to explore? I don't know. I shall think about it :)

Happy cooking!

Thursday, August 8, 2013

Kampar Braised Pork Ribs Platter (金宝 "马来王" 卤排骨) - (MFF - Perak)

It's the month of Perak for Malaysian Food Fest! I'm so excited!

Kamparean, I'm sure you somehow know this. If you are Kamparean between 70's and 80's generation, you definitely know Ma Lai Wong's (马来王) stall in Wing Lok Yuen. This Kampar braised pork ribs platter a simple and yet classic braised dish that always goes together with prawn noodles as a side.


Since this month's Malaysian Food Fest is Perak, I'm going to feature my replication of my hometown's dish, focusing on Kampar's Wing Lok Yuen's good-old-days specialty; prawn noodles, braised pork ribs, claypot chicken rice and hopefully I could get the CB chicken biscuits recipe right too.

Some background of this dish : Wing Lok Yuen (永乐园茶餐室) is one of the legendary coffee shop in Kampar, Perak founded since 1947 by a local Kampar based family. This coffee shop is famous with it's prawn noodles, braised pork ribs ("马来王"虾麺+卤排骨), claypot chicken rice (庆记瓦煲鸡饭) and it's traditional confectioneries - especially Chicken biscuits (CB 鸡仔饼).


(Photo Credit : Asia Explorers)

Ma Lai Wong (马来王) is the original prawn noodles and braised pork ribs stall owner in Wing Lok Yuen during the olden days. Ma Lai Wong's prawn noodles and braised pork ribs is one of the "must-try" food in Kampar back then. However, as time passes, Ma Lai Wong has moved, and setup their own prawn noodles coffee shop instead. They no longer renting a stall in Wing Lok Yuen coffee shop anymore. And now, I someone else took over the prawn noodles stall in Wing Lok Yuen.

A month ago, I make a trip back to my hometown Kampar, and I visited Wing Lok Yuen coffee shop to look at their current prawn noodles stall. My intention is to taste their noodles and ribs and see if I could still find back the childhood taste. I'd say, the existing prawn noodles stall continues the same way Ma Lai Wong sell their noodles, serving braised ribs as a side. And as expected, the good-old-days taste is no longer there. It's salty. It's disappointing. But well, time has changed. People changed too.

I took a photo of the braised pork ribs platter to show you guys how it looks like. And yes, Ma Lai Wong's serving style is the same as this. One bowl of prawn noodles and a small plate of braised pork ribs platter, with the combination of pork ribs, eggs, pressed tofu. And even pig's tail if you request for it.


To kill my curiosity, I get my mom to hunt for Ma Lai Wong coffee shop's current location a month ago. Sadly, everything has changed. The cook has changed, and the taste has changed too. The only thing remain is the name Ma Lai Wong hanging on the signboard.


My mother knows how to replicate this braised pork ribs platter. I have my full trust on her, because she do sell prawn noodles and braised pork ribs platter too when I was 5. I ate them almost everyday. The taste of my mom's noodles and ribs is pretty close to Ma Lai Wong's one. My mom said, they used to call it "Kampar style" during the back old days. The only difference is that Ma Lai Wong's name is somehow more famous and has become a kind of recognition by the locals.

(Disclaimer : Please correct me if I'm wrong, as all these info's are provided by my mom and also my aunt who stayed in Kampar long enough to tell me these old-wives-tales.)

Ingredients
(Source : My Mother - Mdm. Chai)
  • 600g Pork Prime Ribs 龙骨 (Cost est. S$15.00)
  • 2 Pig Tails 猪尾 (Cost est. S$3.30)
  • 600g Small Pork Intestine 猪小肠 (Cost est. S$8.40)
  • 3pcs Pressed Tofu / Tau Kwa 豆干
  • 4 Hard Boiled Eggs 熟鸡蛋
  • 6 tbsp Light Soy Sauce 酱清 / 生抽
  • 1 tsp Dark Soy Sauce 黑酱油 (optional) 
  • 4 tbsp Oyster Sauce 蚝油
  • 2g Dried Tamarind Peel 甘皮 (about 4 x thumb size visually)
  • 1 whole bulb of Garlic, bruised 蒜头 (about 50g)
  • 15g Rock Sugar 冰糖
  • 1 tsp Salt 盐
  • 800ml Water 水
Some additional info here. These are the market price for the ingredients at major supermart and wet market. Just incase you worried you will get chopped "carrot-caked" by the butcher.
  • Pork Prime Ribs : S$21.00 to S$23.00 per kg.
  • Pig Tails : S$1.70 to S$1.90 per kg.
  • Small Pork Intestine : S$1.30 to S$1.50 per kg.
Preparation
  1. For preparation of small pork intestine, refer to here. But of course, you can choose not to stuff the small pork intestines as it is pretty tedious. 
  2. Cook up some hard boiled eggs.
  3. Deep-fried pressed tofu / tau-kwa. Set aside.
  4. Soak up dried tamarind peel till soft. Scrape away the whitish inner line. 
Method 
  1. In a pot, add in small pork intestine, soften tamarind peel, rock sugar, garlic and water. Bring to a boil for 15mins. By then, small pork intestine is slightly soften.
  2. Add in light soy sauce, oyster sauce and prime ribs, cook for another 20mins.
  3. Add in hard boiled eggs, tau-kwa, pig tails. Then, add salt, and dark soy sauce (if you prefer darker color). Lid on and under very low fire. Let it slowly simmer for another 20mins, or more, or until the pig tails is soften enough. Give the meat few turn in-between. Leave this pot of braised goodness overnight for more flavorful result.
  4. The next day, heat up the pot of braised goodness. Dish up some ribs, and eggs. Chop tau-kwa and pig tail into pieces. Pour some braised sauce over. Serve hot. Preferably with a bowl of Kampar prawn noodles (Recipe is here). 
This is the pork prime ribs that I've got from Giant. Pretty nice cut. But well, prime ribs are always expensive. Especially I'm getting Aussie ribs.  


Pig Tails and Sweet Intestines. Looking at it alone, you know they are really fresh.


I got this Ampang Tau Kwa at Giant. Comes with a pack of 3, and I deep-fried it nicely, and then I use it for braising later.


Look at this pot of goodness. The braised sauce is actually very little and concentrate. The water is just enough to cover the braising stuffs. If more water is added, it will turn too diluted and looked like a pot of soup. However, if you prefer more braised sauce, do add more water and add more condiments accordingly. I always emphasized that cooking is all about individual preference.


This is the result. It is nice! Max loves it!


This is my 1st attempt. It's good, but I didn't adjust the taste well. I added too much rock sugar, and I kinda didn't get the right feel of it. The taste and feel that I'm looking for is the good-old-day's taste. The authentic one that I ate during my childhood time. The one when Ma Lai Wong is the cook. Not the latter version.


For the 2nd time, it's much better and the taste is very much closer to Ma Lai Wong's one.


Do give this a try. I'm sure you will love it :)


I am submitting this post to Malaysian Food Fest Perak month hosted by WendyinKK of Table for Two….or more.

Tuesday, August 6, 2013

How to prepare Small Pork Intestines (如何处理猪小肠)

Ah... I know lots of modern people don't take intestines nowadays. But intestines is a common food to me. It's like, another meat dish. Such small pork intestines can be fried, steamed, or braised. They can be served as a dish on it's own, eat with noodles, rice or even porridge.

I love intestines. I love it's sweet taste, it's bouncy texture and it's chewiness. And did you see how attractive the braised sweet intestine is? They are not ordinary small intestines. They are STUFFED!

8 Layers!!!!


And for the 1st attempt, I only did 4 layers. You can take a look at the difference.


Earlier on, I shared how to prepare pig stomach. This time, it's gonna be small pork intestines.

It may sounds tedious, but if we wants to enjoy this nice meaty small intestine, it's unavoidable. Unless you want to eat outside :)

The saddest part about this stuffed small intestine is that, it is almost impossible for you to get this type of stuffed small intestine easily. Simply because it is just too much work for people to do it for business. I knew there are some authentic Chinese restaurant does, but they are super high priced. One very small (almost pathetic) portion of braised stuffed sweet intestine could easily cost S$9.90. Oh well, but if you are not fussy, Kway Chap is everywhere around the hawker center. They do have sweet intestines, but they are not stuffed for sure.


This is the 1st time I did this. But I'm glad that I did it. When I called my mom and tell her I wanna  cook small pork intestines, I get 'piang'ed by my mom with her first sentence "Aiyahhhh... You don't know how to prepare one lahhh!!!"

You know? It's like, confidence level gena flushed down by one big pail of ice-cold water? Haiss...  But nevermind. Anyway, it's okay. It's part of my learning stage. Based on my mom's description through phone, courageously, I learn to do it myself :)

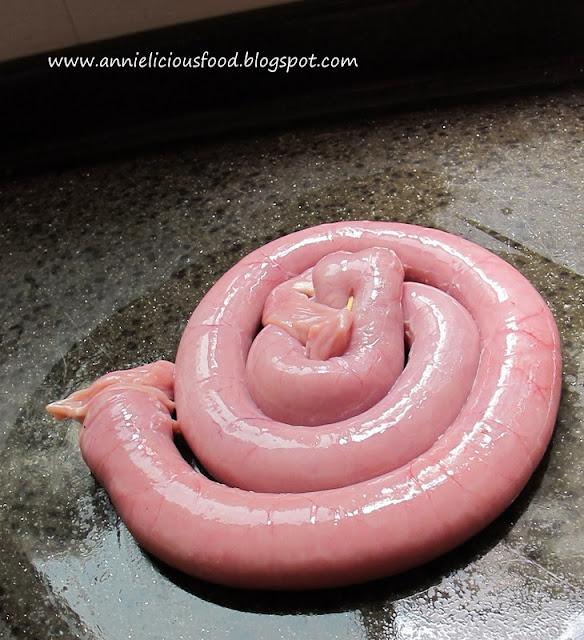
I bought some really nice small intestine and some ribs, because I planned to braise them (recipe will be out soon). For some people who don't know where does these small intestines comes from, here, this photo could gives you a clearer picture, although not in detail. The part in red. That's the small intestine (小肠) that I'm talking about. Some people called it pork intestine, some people recognize it as sweet intestine as usually major supermarts will label it as "sweet intestines".


Photo Credit : Westpol

But please do not mixed up. To my understanding, sweet intestines is the first portion of the small intestines called duodenum, also known as 粉肠, which is usually much more pricier than small intestines as it is not easy to get. Unless you are the butcher's good friend, and that should be easier :)

One of the nicest thing of eating intestines is that, we consume every part of the animal instead of wasting it. It's absolutely desirable to make good use of every part of the intestines and turn them into nice dishes. They have different structures and taste.

Cleaning Sweet Intestine method

1. First, snip away the inner layer of whitish skin-look-alike thing that originally joint together with the intestine. You don't need those. Once snipped away, your small intestine will then turned into a looooooong and straight piece.


2. Prepare bowl of salt and a bowl of corn flour (or tapioca flour). 

NOTE : For hygiene reason, DO NOT take your salt straight from your salt container with your bare hand and just rub it on the intestine, and then take the salt again! Urgh! This is really not hygiene. Please pour the salt on a bowl. If you can't finish those salt in the bowl after you cleaned the stomach, discard. Your finger touches the stomach, and then the salt, and then the stomach again... You still want to keep those salt? Hahaha...Anyway, this same applies to the corn flour / tapioca flour.

3. Apply a handful of salt on the intestine surface, give it a good rub. Leave it there for awhile and then rinse with running water. By now, you should get rid some of the slimy and greasy residue and smell. Rinse with running water. Repeat this at least twice to ensure they are well cleaned. 


4. . Once it's done,  flip the intestine inside out and wash the inner part. Refer to below photo, we just kinda stuff one side into the other side, and then you will be able to flip the inner part over. Once it's done, repeat the step 3 washing until they are well cleaned. 


5. Rinse with water until water runs clear and drain it.


They are now cleaned and drained. Looks like I have alot of them yea. Read on, and you will know that they are not alot actually.


6. Next, we will need to stuff the intestine into layers (4 layers or more if you want). Decide how many layers you want your sweet intestine to be. 4 layers? Cut them into 4 equal length. You want more? Divide accordingly. Don't forget. You need to divide them into equal length :)


7. Just use two fingers to expand one end of the intestine into a big hole, stuff in one layer. Once done, you get 2 layers of sweet intestine. With the double layered sweet intestine, take another intestine, expand the other end and stuff it in again. Like that, you will have 3 layers. Repeat the step for the 4th layers and if you want more, just repeat the steps again until you finished up the intestine. 


Because the intestine itself is smooth and slimy in texture, it will be able to slide in on it's own pretty well. Do it gently. Once you get the flow right, it's actually quite fun to do it :)

6. Once 4 layers are done, use a toothpick to poke on both ends. This is to secure the position of the stuffed intestine. And you could see from the photo.  They are expanded into bigger size.

This one... 4 layers.


This one..... 8 layers!!!


7. Boil the intestine in a boiling water for 5 minutes. The five minute boil will set it's shape and it also cooked away the slimy impurities. Once the stuffed intestine contact with hot water, it will shrink. And this explains the reason why we need to use toothpick to secure it's position. With this, it won't affect the stuffing effort that you just did.


8. Dish up the stuffed intestine and put them into tap water to let it cool down. There may be some impurities water might trapped inside the intestine. You may want to gently press the intestine to release the impurities water.

And after stuffing them, I only have that much of intestine for braising. Not alot actually.


Once stuffed intestine is completely cooled, remove the toothpicks at both end and it is ready to use/cook. With such stuffed intestine, it is usually used as braising. You could do this a week or two ahead, and stock up in your freezer! No fuss at all. 


This is my braised small intestine. Take a look at this! Look at the nice layers of intestine. Isn't it pretty? And no! it doesn't only gives you pretty look. It's yummy too! By stuffing the small intestines into multi-layers, it could gives bouncier and chewier texture. It makes you wanna eat more because they are so so so nice to chew! And the the braised sauce trapped in every layers, it gives every mouthful of intestine chew and flavor too!

I really love the delicate taste, the soft, smooth and yet bouncy texture. I simply couldn't tell you how much I love this! And I hope you are sold by now :D


For those who don't take intestines, I urge you to give it a try again. As long as you wash the intestine clean and prepare it well, you will learn to appreciate it.

For braising of small pork intestine, you may refer to this recipe :

Kampar Braised Pork Ribs Platter (金宝 "马来王" 卤排骨) - (MFF - Perak)


Happy cooking!

Wednesday, January 23, 2013

Braised Mushroom and Pig Trotter with Sea Cucumber (香菇海参焖猪脚)

What are comfort foods? They are foods that soothe the psyche, mostly are those food that reminding us of comforting childhood memories. For most of us, these foods are far from gourmet and generally epitomize home cooking. They invoke feelings of nostalgia, safety, and security. Did I hit the spot? Yes? Haha...

Braised Mushroom, Sea Cucumber and Pig Trotter. This is actually one of my childhood dish that I will only get to eat once a year during Chinese New Year. Since I said it is my childhood dish, of course, this is also my mother's recipe.


I cooked this about 8 months ago I think. But I wait till now then I post this recipe up. My mother passed this recipe to me, and I just do it accordingly. No more, no less. With that, I whipped up the dish that is exactly the same as the one my mother cook.

This dried seafood dish is expensive. Ingredients are costly. And probably because of it's high cost, we only get to eat it once a year.

Here, these are the ingredients that you need. You can get all of them from Chinatown wet market.
 

Ingredient
  • 2 Shop-bought roasted pig trotter 烧猪脚, about 880gm (you could use raw pig trotter also)
  • 1pc Sea Cucumber 海参, buy pre-soaked one at the market, about 250g
  • 10pc Dried Chinese Mushroom 香菇
  • 1pc Dried Cuttlefish 鱿鱼干 / 铞片, about 25g
  • 10pc Dried Oysters 耗干, about 50g
  • 10pc Dried Scallops 干贝, about 50g
  • 40g Garlic 蒜头 / 香蒜  (I used fragrant garlic)  
  • 50g Ginger 姜
  • 2tbsp Lee Kum Kee Premium Oyster Sauce 李锦记特制耗油
  • 1tbsp Dark Soy Sauce 黑酱油
  • 1tbsp Sugar 糖
  • 1/2 tbsp Salt 盐
  • 1L Water 水
  • Corn Starch (est. 1tbsp corn flour / tapioca flour 薯粉 / 钛白粉 + 3tbsp water 水)

Note :

1) You could get roasted pig trotter at wet market. I got mine from Chinatown. I know it's difficult to get it over Chinese New Year. Try to get it in advance. Bring home, wrap it nicely and you could freeze it and cook it a week later. I did it. No problem at all. Oh yes! Remember to get them to cut into big chunk for you. If not, you will have hard time to chop it yourself at home.

2) If you can't get roasted pig trotter, you could use raw pig trotter too. But you have to blanch it before you use. But of course, roasted pig trotter gives better taste in overall.

3) Pre-soaked sea cucumber too, you could get it from wet market. Available at tofu and fishballs stall. Price usually slightly more expensive during Chinese New Year.

4) Try to use Lee Kum Kee Premium Oyster Sauce if you could. Especially for this dish. Yes, this is more expensive. About S$6.50 during promo and it should be S$6.85 at a normal price at NTUC. But I swear that this taste the nicest of all.


Preparation
  1. Soak dried mushrooms the night before. Drain and and squeeze away the water. 
  2. Rinse dried cuttlefish, give it a good rub, snipped into pieces.
  3. Dried oyster washed and soaked. Discard the water once the dried oyster soaked till swollen.
  4. Dried scallops washed and soaked. Take away the scallops from water once scallop size expanded. Keep the water. We can use it for cooking later.
  5. Ginger and Garlic - Skinned off, and bruised.
  6. Cut pre-soaked Sea Cucumber into big pieces. 
This is how it looks like, and it's ready to cook.


This is the Sea Cucumber that I got from the wet market. This cost me about S$12 per piece. I'm not feeding the whole village. I only need 1 piece. I don't have to soak dried sea cucumber on my own. If I do, it takes 3 days to do so. This is too time consuming. 


Cut them into big chunks. Don't cut them too small. Because once you braise it later, sea cucumber will "melt" abit. If the sea cucumber too small, it might end up gone vanished! Hahaha...


Method
  1. In a big wok, heat up 2 tbsp cooking oil. Fry garlic and ginger till fragrant. 
  2. Add in pig trotter pieces, cuttlefish and mushroom, fry for a minute. 
  3. Add sugar, salt, oyster sauce and dark soy sauce. Fry for another 5 minutes or so. Until you smell the fragrant. Heat off. Prepare a pot (I use slow cooker).
  4. Dish up pig trotter pieces and put it at the bottom of a pot as 1st layer. 
  5. Pour in the mushrooms and cuttlefish on top of the pig trotter as 2nd layer.
  6. Add in 1L Water, and also the flavorful water that you used to soak the scallop, put dried scallops on top as 3rd layer. Water level should cover the mushroom level nicely. Not too much, not too little. If not enough water, add more. Do take note, you are not cooking a pot of soup. If too much water, it will affect the taste of the dish.
  7. Bring to a boil, reduce to low heat and braise it for 45 to 50mins. DO NOT disturb or flip the dish during braising! After 45 to 50mins, mushrooms should be soft and flavorful by now.
  8. Add in sea cucumber pieces as 4th layer. Continue to braise for another 10 to 15mins, or once sea cucumber soften, it is ready. If your sea cucumber is bigger piece, it might need to braise slightly longer. You just have to eyeball it yourself. 


To Serve
  1. Gently scoop the sea cucumber and scallops aside. Scallops are now soft and fragile, try not to break it. If you break it, it won't looks nice in appearance. And this is why I said, DO NOT flip or disturb the dish during the braising process. We wanna maintain the ingredient in nice piece. If you flip it, you will break the scallops into pieces, and it won't looks nice anymore. Pig trotters are soft, and it will also torn into pieces. 
  2. Dish up the rest of the ingredients, arrange them nicely on a plate. Leaving the sauce behind.
  3. Put scallops and sea cucumber on top of the dish.
  4. Now, strain the sauce. Try not to skip this. Straining the sauce gives you nice and clean looking sauce in appearance. 
  5. Reheat the strained sauce in a saucepan. Taste. Adjust to your preferred saltiness if necessary. But to me, not necessary.
  6. Once the taste is right and it's heated, add in some corn starch to kinda slightly thicken it. Eyeball it yourself. If you want thicker sauce, you just add more corn starch. 
  7. Pour the thickened sauce on top of the dish. It will give the dish a beautiful glaze look. 
  8. Garnish, and serve immediately with steamed rice.

Step 5 : Reheating strained sauce.


While I'm writing this post, my tummy actually rumbling so loudly. Look at those golden brown color yummy pieces of dried seafood, I really feel like eating it now. How I wish I could turn this photo into real dish in just a click! Hahaha...


Urgh! My plate too small. I know. This is the only large plate I have back then. So, I just make do with it la.


It is a time consuming dish. But this is the most significant dish in my family's reunion dinner! I'm so so so proud of my mama for this dish. I just can't help sharing this recipe to everybody :)

I'm gonna cook this again over Chinese New Year. Yumms! :)

.
.
.

I am submitting this post to Chinese New Year Delights 2013 hosted by Sonia aka Nasi Lemak Lover.


UPDATE : This is my recent photo that I cooked for my MIL's guests who came over to our place for dinner. Do you like it? :)