Thursday, January 31, 2013

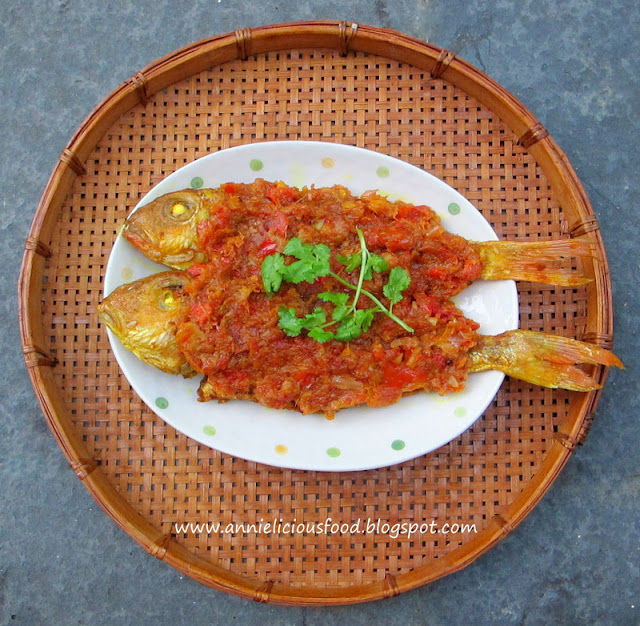
Ikan Goreng Bercili / Fried Fish with Chillies - (MFF N9)

This is a very last minute submission for Negeri Sembilan's month for Malaysian Food Fest (MFF). Hody is the host for this month. I wanna support her so much and I tell myself I must create something for Negeri Sembilan!
 
Ikan Goreng Bercili - The minang cuisine from Minangkabau people.
 
 
The Minangkabau people of Sumatra came to settle down in Negeri Sembilan in the 15th century. And that is why, Minangkabau people has become part of the population in Negeri Sembilan. Their staple ingredients are usually rice, fish, coconut, vegetables and chilli. Yes! Chilli! Spiciness is a characteristic of Minangkabau food. The most commonly used herbs and spices are chilli, turmeric, ginger and galangal.
 
I fought my way through the rush hour right after work. Telling myself that I must make this dish tonight. From buying fresh fish, prepare ingredients, to cooking and cleaning. With the time limitation, it's really not easy. Not that the dish is difficult. Time limitation is always the challenging part you know. But I did it!
 
 
I wanted to use Tilapia for this dish actually. But no luck today. I couldn't get fresh Tilapia. By the time when I knock off and rush to the super mart, I already quite late. Not much of a choice tho. I make do with Sea Bream instead. Sea Bream is cheap and taste good too. This two fishes cost me less than S$4.00. Infact, you can use any fish you want for this dish. It's really up to individual.
 
Ingredient
(Recipe Source : Wendyinkk & Atie Aizam with slight modification)
 
  • 1 Sea Bream or Tilapia or any other fish. 
  • 1 tsp Turmeric Powder 
  • 1/2 tsp Salt
  • 1/2 tsp Sugar (optional)
  • 1/2 cup Cooking Oil 
 
Chilli Paste
 
  • 4 Red Chillies
  • 3 Bird's eye chillies (you could use green or red color)
  • 1 Red Onion
  • 1 inch Ginger
  • 4 cloves Garlic 
  • 1 heaped tsp Tamarind Paste + 2 tbsp Water
 
You could adjust the ratio of your chilli paste. You want it more fiery, add more bird's eye chillies. I didn't strictly follow their recipe. I just take it as a reference and adjust to my preferred taste. Max can't take too fiery food. He will complain. So, I reduced the amount of bird's eye chillies drastically. I'm glad that he didn't complain. He said the spiciness is ok for him to accept.
 
Method
 
  1. Clean and scored the fish. Use kitchen towel to pat dry.
  2. Marinate fish with salt and turmeric powder. Rub all over and inside out. 
  3. Pound the chilli paste ingredients together. You could use grinder to coarsely grind it too. But the result would be different. Pounding definitely gives better result.
  4. Rub tamarind paste with 2 tbsp of water. Discard the seeds, and pour the tamarind juice on the chilli paste. Mix well. Set aside.  
  5. Heat a frying wok, add in cooking oil. Once oil is hot enough, put in the fish. Immediately turn the heat to medium low, fry both sides until golden brown. Once the fish is done, dish up and set aside.
  6. Pour the oil (that you used to fry fish) on a bowl. You will see some residue at the bottom of the wok. Discard them. Give your wok a wash, and dry it with kitchen towel.
  7. Return the wok to the stove. Heat up the oil that you used to fry fish. Saute the chilli paste and tamarind juice until fragrant and glossy. Taste, and season with salt (and sugar if needed). 
  8. Spread the cooked chilli paste on both side of the fish. Garnish and serve. 
 
Note :
  1. I only used 2 tbsp water to rub the tamarind paste. Reason is because I don't want too much liquid. I only want the flavour of the tamarind. So, very minimum water is used to rub the tamarind paste.
  2. Pouring the oil on a bowl, discard the residue at the bottom of the wok, and washing the wok sounds tedious. But if you skipped this step, and straightaway pour your chilli paste to fry, your chilli paste will mix with unwanted residues that left behind after frying the fish. Look at the picture. My bowl of oil is clean even though it is used to fry fish earlier.
  3. Sugar is to neutralize the spiciness of the chilli paste. I prefer to add some. But it's up to you.
  
Step 2 - Marinate fish with salt and turmeric powder.


Step 3 - Pound the chilli paste ingredients together.


And now, the fish is well fried. Pour the oil on a bowl, discard the oil's residue at the bottom of the wok, and you will see clean oil on the bowl. Use this clean oil to sautee the chilli paste and tamarind juice later.


This dish requires much lesser effort compared to my Ikan Gerang Asam that I cooked for Melaka Month. So, to me, this dish is pretty easy! And this dish looks pretty impressive too.


Don't get freaked out by the thick chilli paste spreaded on top and thinking that this would taste too fiery. When you are cooking it, you could adjust your own fiery level. It's all about individual preference! :)
 
 
.
.
.
I am submitting this post to MFF Negeri Sembilan month hosted by Hody Loh of Cook For You & Me.

Wednesday, January 23, 2013

Braised Mushroom and Pig Trotter with Sea Cucumber (香菇海参焖猪脚)

What are comfort foods? They are foods that soothe the psyche, mostly are those food that reminding us of comforting childhood memories. For most of us, these foods are far from gourmet and generally epitomize home cooking. They invoke feelings of nostalgia, safety, and security. Did I hit the spot? Yes? Haha...

Braised Mushroom, Sea Cucumber and Pig Trotter. This is actually one of my childhood dish that I will only get to eat once a year during Chinese New Year. Since I said it is my childhood dish, of course, this is also my mother's recipe.


I cooked this about 8 months ago I think. But I wait till now then I post this recipe up. My mother passed this recipe to me, and I just do it accordingly. No more, no less. With that, I whipped up the dish that is exactly the same as the one my mother cook.

This dried seafood dish is expensive. Ingredients are costly. And probably because of it's high cost, we only get to eat it once a year.

Here, these are the ingredients that you need. You can get all of them from Chinatown wet market.
 

Ingredient
  • 2 Shop-bought roasted pig trotter 烧猪脚, about 880gm (you could use raw pig trotter also)
  • 1pc Sea Cucumber 海参, buy pre-soaked one at the market, about 250g
  • 10pc Dried Chinese Mushroom 香菇
  • 1pc Dried Cuttlefish 鱿鱼干 / 铞片, about 25g
  • 10pc Dried Oysters 耗干, about 50g
  • 10pc Dried Scallops 干贝, about 50g
  • 40g Garlic 蒜头 / 香蒜  (I used fragrant garlic)  
  • 50g Ginger 姜
  • 2tbsp Lee Kum Kee Premium Oyster Sauce 李锦记特制耗油
  • 1tbsp Dark Soy Sauce 黑酱油
  • 1tbsp Sugar 糖
  • 1/2 tbsp Salt 盐
  • 1L Water 水
  • Corn Starch (est. 1tbsp corn flour / tapioca flour 薯粉 / 钛白粉 + 3tbsp water 水)

Note :

1) You could get roasted pig trotter at wet market. I got mine from Chinatown. I know it's difficult to get it over Chinese New Year. Try to get it in advance. Bring home, wrap it nicely and you could freeze it and cook it a week later. I did it. No problem at all. Oh yes! Remember to get them to cut into big chunk for you. If not, you will have hard time to chop it yourself at home.

2) If you can't get roasted pig trotter, you could use raw pig trotter too. But you have to blanch it before you use. But of course, roasted pig trotter gives better taste in overall.

3) Pre-soaked sea cucumber too, you could get it from wet market. Available at tofu and fishballs stall. Price usually slightly more expensive during Chinese New Year.

4) Try to use Lee Kum Kee Premium Oyster Sauce if you could. Especially for this dish. Yes, this is more expensive. About S$6.50 during promo and it should be S$6.85 at a normal price at NTUC. But I swear that this taste the nicest of all.


Preparation
  1. Soak dried mushrooms the night before. Drain and and squeeze away the water. 
  2. Rinse dried cuttlefish, give it a good rub, snipped into pieces.
  3. Dried oyster washed and soaked. Discard the water once the dried oyster soaked till swollen.
  4. Dried scallops washed and soaked. Take away the scallops from water once scallop size expanded. Keep the water. We can use it for cooking later.
  5. Ginger and Garlic - Skinned off, and bruised.
  6. Cut pre-soaked Sea Cucumber into big pieces. 
This is how it looks like, and it's ready to cook.


This is the Sea Cucumber that I got from the wet market. This cost me about S$12 per piece. I'm not feeding the whole village. I only need 1 piece. I don't have to soak dried sea cucumber on my own. If I do, it takes 3 days to do so. This is too time consuming. 


Cut them into big chunks. Don't cut them too small. Because once you braise it later, sea cucumber will "melt" abit. If the sea cucumber too small, it might end up gone vanished! Hahaha...


Method
  1. In a big wok, heat up 2 tbsp cooking oil. Fry garlic and ginger till fragrant. 
  2. Add in pig trotter pieces, cuttlefish and mushroom, fry for a minute. 
  3. Add sugar, salt, oyster sauce and dark soy sauce. Fry for another 5 minutes or so. Until you smell the fragrant. Heat off. Prepare a pot (I use slow cooker).
  4. Dish up pig trotter pieces and put it at the bottom of a pot as 1st layer. 
  5. Pour in the mushrooms and cuttlefish on top of the pig trotter as 2nd layer.
  6. Add in 1L Water, and also the flavorful water that you used to soak the scallop, put dried scallops on top as 3rd layer. Water level should cover the mushroom level nicely. Not too much, not too little. If not enough water, add more. Do take note, you are not cooking a pot of soup. If too much water, it will affect the taste of the dish.
  7. Bring to a boil, reduce to low heat and braise it for 45 to 50mins. DO NOT disturb or flip the dish during braising! After 45 to 50mins, mushrooms should be soft and flavorful by now.
  8. Add in sea cucumber pieces as 4th layer. Continue to braise for another 10 to 15mins, or once sea cucumber soften, it is ready. If your sea cucumber is bigger piece, it might need to braise slightly longer. You just have to eyeball it yourself. 


To Serve
  1. Gently scoop the sea cucumber and scallops aside. Scallops are now soft and fragile, try not to break it. If you break it, it won't looks nice in appearance. And this is why I said, DO NOT flip or disturb the dish during the braising process. We wanna maintain the ingredient in nice piece. If you flip it, you will break the scallops into pieces, and it won't looks nice anymore. Pig trotters are soft, and it will also torn into pieces. 
  2. Dish up the rest of the ingredients, arrange them nicely on a plate. Leaving the sauce behind.
  3. Put scallops and sea cucumber on top of the dish.
  4. Now, strain the sauce. Try not to skip this. Straining the sauce gives you nice and clean looking sauce in appearance. 
  5. Reheat the strained sauce in a saucepan. Taste. Adjust to your preferred saltiness if necessary. But to me, not necessary.
  6. Once the taste is right and it's heated, add in some corn starch to kinda slightly thicken it. Eyeball it yourself. If you want thicker sauce, you just add more corn starch. 
  7. Pour the thickened sauce on top of the dish. It will give the dish a beautiful glaze look. 
  8. Garnish, and serve immediately with steamed rice.

Step 5 : Reheating strained sauce.


While I'm writing this post, my tummy actually rumbling so loudly. Look at those golden brown color yummy pieces of dried seafood, I really feel like eating it now. How I wish I could turn this photo into real dish in just a click! Hahaha...


Urgh! My plate too small. I know. This is the only large plate I have back then. So, I just make do with it la.


It is a time consuming dish. But this is the most significant dish in my family's reunion dinner! I'm so so so proud of my mama for this dish. I just can't help sharing this recipe to everybody :)

I'm gonna cook this again over Chinese New Year. Yumms! :)

.
.
.

I am submitting this post to Chinese New Year Delights 2013 hosted by Sonia aka Nasi Lemak Lover.


UPDATE : This is my recent photo that I cooked for my MIL's guests who came over to our place for dinner. Do you like it? :)


Sunday, January 13, 2013

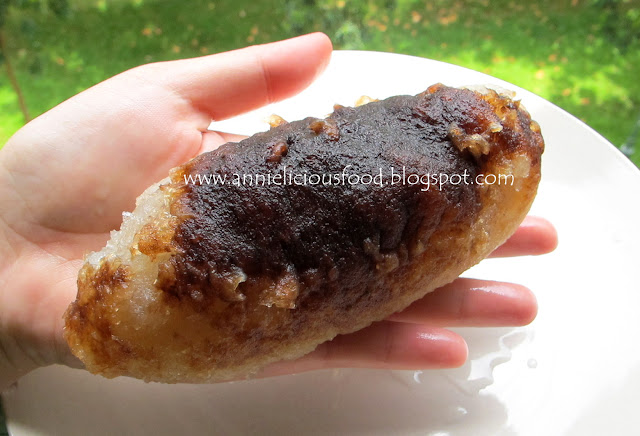
Water Chestnut Cake (馬蹄糕)

Chinese New Year is a season for savoring cakes. Not those typical type of baked cakes like butter cakes. It's like sticky rice cakes (年糕), the most common one. Because the word "cake" (糕) and "high" (高) are both pronounces as 'gou' in cantonese. It is somehow regarded as a simbolic food for bringing 'rising' goodwill.

Water Chestnut Cake is commonly eaten in Hong Kong during Chinese New Year. But not a 'must-have' cake in Malaysia and Singapore on this festive season. Some family does this, some don't. But I'd like to have this at my home during Chinese New Year :)


Since it is not so possible for me to make the super-time-consuming sticky rice cakes at home, I decided to make water chestnut cake instead. It is a cake that is much more easier for you to replicate it at home. It's not time consuming. You can plan to do it ahead and keep it in the fridge for upto a week. Spread the schedule! And you will be able to handle the Chinese New Year feast for your family :)

 These are all you need. It's easy, and not complicated.


Ingredient
  • 220g Water Chestnut Flour (马蹄粉)
  • 1.2L Water (水)
  • 3.5 slabs of Sugar Piece (冰片糖) About 308g (Mine is about 88g per piece)
  • 160g Water Chestnut (马蹄) About 8 pcs (or more if you want)

This cake is easy to make. With all the ingredients ready, I get this done in less than an hour. 

Method
  1. Water Chestnut - cleaned, peeled, chopped into pieces or diced. Up to you. If you are slow, soak the peeled chestnut into the water to avoid turning rusty. Chop it only when you are ready to cook.
  2. Grease a 7 x 7 inch cake tin or a dish that is big enough for your cake.
  3. In a bowl, add in water chestnut powder with 600ml water (cold tap water). Stir until smooth and dissolved. 
  4. In a pot or a cooking wok, boil 600ml water with sugar. Once it's boiled, add in chopped chestnut, boil for another 30second or so.
  5. Take 1/3 portion of dissolved chestnut powder mixture and pour it into the boiling sugar water. Do not stop stirring while you pour them in. Continue to stir it until it thickened. 
  6. Once it is lightly boiled, turn off heat. Immediately, stir in the remaining 2/3 portion dissolved chestnut powder mixture. 
  7. Continue to stir them. This takes some effort here. I stirred mine for about 7 to 10 minutes. This is to achieve lump-free smooth paste.  
  8. Pour the mixture into the greased cake tin or the dish. Use a spatula to flatten the surface. 
  9. Steam it for about 20 minutes. 
  10. Leave it at room temperature environment until it's completely cooled. Cling wrap it and you could keep em' in the fridge for upto a week.

To Serve
  1. Remove the whole cake from the cake tin or dish. Cut them into pieces.
  2. In a non-stick pan, add some cooking oil.
  3. Prepare a bowl of sugar, pat some sugar (a few pinch) on each piece of water chestnut cake, and put them on the pan to lightly fry it under medium heat.
  4. When the cake turns light golden brown, then, it is ready. Dish up and serve. 
Note
  1. Dissolved chestnut powder mixture is like corn starch mixed with water. The powder will settle to the bottom. Do give it a good stir before mixing them into the hot water. This will ensure the dissolved chestnut powder mixture are evenly mixed. 
  2. Other water chestnut recipe won't tell you to pat some sugar on the water chestnut cake before pan-frying. But mine, yes. The sugar gives good caramelized color on each piece of cake. This also explains why the sugar level that I used to cook the water chestnut cake is is lower than other recipe. Because I split up the usage of sugar. 
  3. You could get water chestnut flour at Phoon Huat and other neighbourhood chinese medicinal hall. You could also get sugar slabs from these two place too.
  4. You could substitute sugar slabs with rock sugar. But rock sugar won't gives you the light brown color. If you couldn't find sugar slabs, try to get brown rock sugar instead. This lovely light brown color indeed gives more festive feel :) 
  5. If you are pan-frying the chestnut cake pieces for the first time, do it with a small portion to get the feel of it, and see how it works out in your pan. For the first time, it might cause easy sticking. But if your pan is decently heated, it shouldn't be any problem. 

Take a bite on this warm caramelized, sweet and gooey cake. Chewing on it, the bits of juicy water chestnut add a nice crunch and gives you another level of refreshing sweetness. Wooh!


There are so many Chinese New Year goodies that I wanna make. But I have very limited time. So, I'd probably settle with some basic Chinese New Year food instead of fanciful cooks and bakes this year. Maybe next year, I will make more varieties :)


I hope you like it! 

Sunday, January 6, 2013

Duck Fats Potatoes

I'm not a perfectionist, I'm just somebody ordinary who cook at home. Home-cooked food with flaws is absolutely forgiving. So, you don't have to worry when your home-cooked food doesn't looks like those in the restaurant. It is silly to think that anything less than perfect is a disappointment.

Here, I'd like to introduce you this Duck Fats Potatoes. The perfect roast potatoes!


The original name of this dish is Perfect Roast Potatoes. But I didn't use goose fats. Instead, I used duck fats. Also, I don't think I roast it perfectly as appeared in Nigella Lawson's book. And the main reason why this potatoes taste that welcoming is because of rendered duck fats! So, I named it Duck Fats Potatoes instead.

This is a bottle of Rougie Graisse De Canard - duck fats that I got from Delicia.com at S$12.00 during promotion. You could find it from The Butcher, Jones The Grocer and some other gourmet shops that sells french food supplies.


As stated on Nigella's book, I quote "A good roast potato isn't about showing off or about striving desperately to impress. Nor is it a difficult thing to achieve, but can't pretend it isn't a high pressure zone."

Well, to me, as long as you follow some important steps, I don't know why you will fail.

Ingredients (Serves 5 to 6 as side dish)
(Source : Modified from Nigella Lawson's Christmas Perfect Potatoes recipe) 

  • 1 to 1.2kg Potatoes
  • 160g Duck Fats (Half Jars from 320g bottle), or goose fats if you want
  • 2 tbsp Semolina (or Plain Flour as a substitute)
  • sprinkle of sea salt (optional)

There's nothing further to say. This recipe is most pleasing for it's simplicity.

Method 

  1. Peel and cut potatoes, each one into 3, by cutting off each end at a slant, so that you are left with a wedge or triangle in the middle. 
  2. Pre-heat oven to 250C, top + bottom heat, fan ON. 
  3. Put the potatoes into salted, cold water in a saucepan, and bring to a boil. Letting them cook for 4 minutes. 
  4. Drain the potatoes in a colander, then tip them back into the empty, dry colander, and sprinkle the semolina (or flour) over. 
  5. Shake the potatoes around to coat them well. Give them a good proper bashing so that their edges fuzz and blur a little, this facilitates the crunch effect later. Leave them to rest at this stage. 
  6. Put the duck fats into a large roasting tin and then into the oven to heat up, and get frighteningly hot. You can heat it up over stove if you want. It's up to you. As long as you make sure the duck fats is frighteningly hot. It's like, you could see smokes coming up, and you started to worry that your kitchen is gonna burnt down anytime. Yea. this is the right time to add your potatoes in.
  7. When the fat is as hot as it can be, tip the potatoes carefully into it. Becareful! They splutter terrifically as you put them in, but it's just the beginning part. And roast it in the oven for an hour, but take it out and give the potatoes a flip every 20 minutes. Not necessarily 1 hour, but as long as the potatoes are darkly golden and crispy, you're done.   
  8. When everything else is served up, transfer the potatoes to a large serving dish, sprinkle a pinch of salt over if you want, and bring to the table with pride in your heart!

Step 4 - Sprinkle semolina / flour over.


Step 5 - Shake the potatoes around to coat them well.


Note : I only used half jars of duck fats. If you want really good result, go ahead and use the whole jar. With lots of fats, it cooks well, and minimize the work of flipping the potatoes (at least not that often). But to me, I'd say, it is not really necessary to cook it with that amount of fats when you can take it out and flip the potatoes every 20mins. It works.


Boastfulness and vainglory are not attractive nor would I want to encourage them in you (or myself), but when you've cooked these and see them in all their golden glory on the table, I think you deserves the praises by your guests on how awesome these roast potatoes are. They looks plain and not really appealing. But the first bite, it is sweet and soft inside, and a golden-brown crunch outside. Yumms!!!


Get that right and the rest should follow. No reason why not! Just do it! :D