Monday, October 29, 2012

Moist Banana Cake

I like classic food. This moist banana cake. Simple, easy, yummy and well received.


I adapted the recipe from here, but I did modification to the recipe and twist the method too.

This recipe is for 8 x 8 inch square cake tin. But I didn't want square cake this time. So, I just used a 18cm round cake tin, and a small heart shaped cast iron cake bundt tin.

Ingredient A (to combine and sieve)
  • 250g Plain Flour
  • 1tsp Baking Powder
  • 1tsp Baking Soda
  • ½ tsp Salt
Ingredient B (to combine and mash)
  • 6 Small Bananas, mashed, and it should weight about 240g
  • 1 tbsp Lemon Juice (Optional)
Ingredient C
  • 180g Unsalted Butter
  • 100g Castor Sugar
  • 4 Egg Yolk
  • 40g Brown Sugar
  • 4 tbsp Fresh Milk
  • 1tsp Vanilla Essence (Optional)
Ingredient D
  • 4 Egg Whites
  • 40g Castor Sugar
This is the small banana that I always used for banana cake. Try to get this banana if you are making this cake. It must be very ripe. Or else, the fragrance of your banana cake will not be ideal.


Method
  1. Pre-heat oven 175 degree. Grease and line 8 x 8 inch square cake tin. Or 8 inch round tin if you want.  
  2. Combine flour, baking powder, baking soda and salt, sieve, set aside.
  3. Combine banana and lemon juice, mash, set aside.
  4. Separate egg whites and yolk. In a clean and dry bowl, beat egg whites until soft peaks, gradually add 40g castor sugar and beat until stiff peak.
  5. Beat soft butter, castor sugar and brown sugar on high speed until light and fluffy.
  6. Add in egg yolk one at a time, mix till combined.
  7. Add in mashed bananas, vanilla essence and fresh milk, mix well.
  8. Mix half flour mixture on low speed until incorporated, and another half, mix until just smooth. Don't over mix it.
  9. Put in half the egg whites in and mix on low speed. Pour the balance egg white in and FOLD using your spatula.
  10. Pour batter into pan and level. Bake for 50 to 55 minutes or until skewer comes out clean.

NOTE

1. Adding lemon juice into the mashed banana is to prevent mashed banana from turning unpleasant color while you busy mixing your batter at another side.

2. If you don't have brown sugar at home, you could just use all castor sugar. Brown sugar gives your cake nice brown color. Some people likes to use all brown sugar too. Your cake will turns out darker color then.

3. The cake is really hot once it's out of the oven. I always let the cake cool in the pan for 30 minutes before removing it.

4. Let the cake completely cool before serve. If you could wait, this cake taste nicer overnight! I always bake my cake at night, and serve it in the morning.


The messy batter is now ready...


Cake just out of the oven. Nice! Abit cracked tho.

Left : Max got me this 18cm round loose bottom cake tin from Tokyo Japan. Good quality. I love it!
Right : I bought this cast iron heart shaped mould from Shanghai Street Hong Kong. It cost me S$20.00. I like the size :)


I love my heart shaped banana cake.


The outer layer of the cake browned evenly. When it is out of the oven, the color might looks abit dry. That's normal. Once the cake is cooled, the cake will looks nicer. Moist and brown.


The texture is soft and moist. I really love it. I only used 40 grams of brown sugar. So, the cake turns out not so brownish. I like this color.


This is really ideal for a lazy afternoon tea...


With a cuppa Chamomile honey tea of course! :)


I hope you like it :)

Monday, October 22, 2012

Mdm Chai's Pig Trotter in Vinegar with Ginger (猪脚醋)

I specially dedicate this recipe to my girlfriend Ginnie Lu who's gonna give birth anytime by next week.


Pig Trotter in Vinegar with Ginger 猪脚醋 is an old traditional Cantonese recipe originally formulated for mothers after birth, to keep new mums warm during the first month after birth. In Malaysia, Cantonese families who has new baby will cook a shed load of this, together with some red coloured hard boiled eggs in their shells (红鸡蛋) and some chicken cooked in homemade rice wine (姜酒鸡), all these packed and given to relatives and friends, proudly announcing the arrival of a new baby. Singaporean's usually add hard boiled eggs in this dish and let it stew together. It's optional. You could add it in if you want.

Before anything else, let me share with you where I usually shop for my ingredients. This is my favorite dried sundries store that I usually visit whenever I wanted to buy chinese ingredients and condiments. It is located at the basement of Chinatown Wet Market. But of course, wet markets at other area do have such dried sundries store too. You just get those ingredients at your own convenience.


If you were to visit Chinatown wet market, you could get everything you want for this dish.

Butchery Stall : Pig Trotter
Dried Sundries Store : Vinegar, Brown Sugar, Old Ginger, Shao Xing Wine, Red dates, Sesame Oil.
Vegetable Stalls : Young Ginger

When it comes to vinegar, my mother is very strict. She told me to make sure I buy the right brand if I were to re-create her recipe. She insist to mix both sour and sweet vinegar together. Doggie brand sweet vinegar, and Zhe Jiang sour vinegar is the specific vinegar. No nonsense.


My mother emphasize on using both old and young ginger. She says that this dish need the hotness of the old-ginger, and the aroma of the young ginger. If you used only old-ginger, you might find there's certain gingery aroma is missing. Old ginger do gives gingery aroma too, but young ginger gives you another level of unexplicable fragrance. They are just different.

By the way, the Old-Ginger that I used is from Indonesia. It taste more gingery than Old-Ginger from China. If you could, try to get this instead of China one. Indonesian Old-Ginger definitely taste hotter and better. The top one is washed ginger, looks clean. The bottom one is unwashed ginger. But they are the same.


For Pig Trotter, people usually misunderstood the difference between front feet (猪手) and back feet (猪脚). I'm one of them too. I thought the bigger and meatier ones are the back feet! But it is not! Thanks to the friendly butcher clear my doubt. And here, this picture says it all...


In olden days, this dish originally cooked using back feet 猪脚. Yes! I know, less meaty. That is why in modern days, people prefer this dish to be more meaty. So, it is now usually cooked using front feet 猪手 instead. I can't live without both. I love the back feet, as it gives me lots of thick collagen and smooth trotter texture to chew on.. OMG! Salivating! But Max only appreciate the meaty part. So, both mix together makes perfect dish!

Usually, butcher will to cut pig trotter into pieces for you. You won't be able to do that at home. Your mighty chef knife won't work. Trust me.

Front Feet (猪手) at the left - S$6.00, and Back Feet (猪脚) at the right - S$3.50

.
Ingredient (Source: My mother - Mdm Chai)
  • 1.8kg - 2kg Pig Trotters (1 Front Feet + 1 Back Feet) 猪手 + 猪脚
  • 280g Old Ginger  老姜
  • 280g Young Ginger 子姜
  • 400ml Zhe Jiang Vinegar 浙醋 (长城牌)
  • 400ml Doggie Brand Sweet Vinegar 甜醋 (狗仔牌 - 双料添丁黑醋)
  • 120g Normal Brown Sugar (I used light Muscovado) 黄糖, or adjust to suit your own
  • 4 tbsp Dark Brown Sugar (I used Molasses) 黑糖
  • 10 tbsp Sesame Oil 麻油
  • 800ml - 1000ml Water 水
  • 1½ tbsp Salt 盐
  • 2 tbsp Shao Xing Wine 绍兴酒
  • 5pcs Red Dates 红枣
  • Hard Boiled Eggs (Optional)

Preparation
1. Slice and bruise both old and young ginger. Set aside
2. Blanch pig trotter, and then, rinse with pipe wate. Set aside. 
3. Red dates, seeds removed. Soak red dates with Shao Xing Wine in a bowl, clingwrap it. Set aside. Let it infused for at least 3 hours or even more if you have the time.

Usually, gingers are bruised for this stewed dish. But my family member won't eat bruised ginger. They are too big for them to chew. I don't mind chewing bruised ginger. I love it. But I can't finish all of them, and most of the bruised ginger will gone wasted. So, what I did here is partially bruised, and partially sliced them. So that they will eat the sliced ginger while they eat the pig trotter too. Easier to chew. But you can't slice all the ginger. Because your dish will looks really messy with all the sliced ginger all over. Haha.. Just a suggestion. You could just do it your way.

.
Blanch the pig trotter to remove the cloudy residue. This step is a MUST!

.
Method
  1. Heat wok with 10 tbsp sesame oil. Fry both ginger together till fragrant.
  2. Add in blanched pig trotter, fry till fragrant.
  3. Add in brown sugar, stir well.
  4. Transfer the pig trotter to a pot and add 1L water into the pot. Bring to boil.
  5. Once it is boiling,  reduce to medium low fire, let it boil for 30 mins.
  6. Add salt, vinegar, dark brown sugar, red dates and wine. Adjust taste accordingly. If you want to add hard boiled eggs in, add them in at this time.
  7. Once the taste is right, let it continue to boil under low fire for another 30mins.
  8. After 30mins, heat off, leave it there for at least 3 hours (or more), to allow the flavour to infused into the pig trotter thoroughly. Reheat it before serving.
This stew is a labour of love and will take a long time to prepare. If you just want to rush it and eat within an hour or two, it won't be that nice. If you could, keep and consume the next day. I prepare mine in the morning, finished cooking by 1pm, and eave it there for 5 hours. We consume half portion at night, and keep the other half for next day for better flavour.


Step 3 : Add brown sugar into the pig troter.


Step 4 : Add 800ml Water (or more), just enough to cover the pig trotters. Not too much. You find it way too little water? Fret not! Read on...

.
My grandma use old style seasoned earthen claypot and cooked the dish with charcoal. She told me that this taste way more delicious than the one cooking on stove top using expensive stainless steel pot. I'm now cooking this dish using my grandma's method.


I love this pot. This pot is inherit from my Mother in law. She told me that she got this pot from her friend who had been using it for many years! And my mother in law kept this pot for more than 5 years. So, I think, this pot should be easily 10 years old.

You must be wondering why I named this dish as Mdm Chai's Pig Trotter in Ginger with Vinegar. When my mother told me that "This red dates and wine is the secret recipe!", I think my mother deserves the ownership of this recipe. She told me that this dish is taught by my grandma, and she twisted the recipe abit to suit her own. And throughout her many attempt, the idea of using red dates infused with wine idea popped out of her mind. She just blindly try it and it works really well, and from there, she sticked to this recipe and method for many years.


I used both light brown sugar and dark brown sugar. If you don't have dark brown sugar, use all light brown sugar then. It's okay. But dark brown sugar has heavier flavour, and it gives the gravy really thick dark consistency. So, if you could, try not to skip this. I used Muscovado and Molasses. But not necessary to follow. You could use normal dark and light brown sugar that you could get at the market. They are cheaper. Billington's brand is always more expensive.


Added vinegar in there, the amount of liquid for this dish is gonna be juuuuuust nice! Not too watery. Good thick consistency! You won't want a pot of soup instead of stew yea :)


It's done! I adore this sweet, sour and tasty pork and ginger since I was a kid. My grandma loves cooking this dish during rainy days. Eating a bowl of this vinegary pork trotter will keep us warm. Grandma told me that this dish is good for people who have cold feet too.


If you never had this bowl of goodness before, this bowl of deep brown looking soft and succulent pig trotter flavoured with a gingery sweet vinegar is really irresistably good. The ingredients are simple. Just massive amount of vinegar and ginger is used to prepare one pot of this.


I wouldn't able to resist this. Seriously!
It's soft, flavorful and melt-in-your-mouth piece of pig trotter!  

.
Look at the heavenly thick black gravy!


My grandma's way of cooking.


My mother's recipe...


Nostalgic!

Friday, October 19, 2012

Canto Style Steamed Red Grouper (清蒸红石斑)

I love this big and beautiful fish!


I got this really fresh red grouper from Chinatown wet market. About 680grams, and it cost me S$13.00 after bargaining. Not bad!


Oh yes! Do take note that the price for Red Grouper and Greasy Grouper (Greyish color) is different. Greasy Grouper is cheaper than Red Grouper. Red Grouper price may vary depends on season. According to the fish monger, the price can be as cheap as S$18.00 per kg or it can be upto S$25 per kg or more.

This recipe won't looks any special, but if you've got really fresh fish from the market and wanted to consume it on the same day, this is the best and simple way to cook your fish. It is ordinary steamed fish with soy sauce and shallot oil. We called it canto style, which means we just steam it without adding much condiment in there. Just the basic ingredients. This, also usually known as 清蒸 in chinese. I always recognise this method of steaming as hong kong style steamed fish. It is the same to me. Haha..


Ingredients
  • 680g Red Grouper
  • 2 tsp salt - To rub on the fish, 1 tsp at each side.
  • 4 thick slices of ginger
  • 1 sprig Spring Onion, cut into 6 inch length
For the sauce
  • 2 tbsp Soy Sauce
  • 2 tbsp Shao Xing Wine
  • 1 tsp crushed Rock Sugar (or just ordinary fine sugar)
  • a dash of pepper
  • 2 tbsp Shallot Oil (1 shallot + 1 tbsp cooking oil)
For garnishing
  • 1 sprig spring Onion, cut diagonally in 2 inch length
  • 3 slices of ginger, julienned
  • some coriander (Optional)
  • some julienned chillies (Optional)
Method
  1. Clean fish, pat dry. Rub 1 tsp salt at each side of the fish. Rub some into the stomach too. And then, put a piece of ginger into the stomach.
  2. On a steaming dish, place the 6 inch length spring onion, followed by 3 slices of ginger. And then, place the fish on top.
  3. Use a small sauce bowl, mix all the sauce ingredient together, except shallot oil.
  4. Bring water in the steamer to a boil. Place the whole bowl of sauce beside the fish, steam fish over high heat for 11 minutes.
  5. While the fish is steaming, prepare your shallot oil by frying 1 shallot with a tablespoon of oil. You can add more oil if you want. Don't leave it there, keep an eye on it and don't burnt it.
  6. Remove fish from the steamer, pour away the steaming liquid.
  7. Pour the sauce on the fish, and then pour the shallot oil over.
  8. Garnish, and serve!

Step 4 : Separate steaming method - the fish and the sauce are separated, but steam together.


NOTE :

1. This is a big fish with thick flesh. So, rub some salt on it would get rid of fishy smell, and gives better flavour. The amount of soya sauce won't give enough saltiness to the dish in overall.

2. Adding spring onion and ginger underneath is to provide ventilation to the underside of the fish and also gives better flavour to the dish in overall. But please try to use a plate that has flatter base. Don't use the one like mine. Mine is more like a bowl that has quite a deep bottom. And for photo appearance, it doesn't looks that good. When I put ginger and spring onion underneath, when I pour the sauce over, the sauce also hiding underneath. And by looking at the photo, it looks way too little sauce for my fish! Darn!

3. I use separate steaming method this time. This method is widely used by chefs at chinese restaurant. Separated the fish and the sauce, but steam them together. I will be able to discard the excessive steaming liquid. Like that, the flavour of the sauce will not get affected, and the sauce will not turn cloudy. Looks better in appearance. But if you are steaming cod fish fillet, you don't have to spearate the steaming. Because fresh cod fish has it's unexplicable sweetness, even the excessive liquid gives you really good flavour.

4. Rock sugar is not easy to melt. You have to ensure rock sugar is finely crushed before using. If not, just use normal fine sugar. But of course, if you go around and ask fellow chinese chefs, they will tell you rock sugar really taste different with the fish.

5. I steamed my fish for 11 minutes this time, because this is 680 grams of big fish. Do adjust your own steaming time based on the fish size. Refer to here for fish steaming time. Oversteam your fish is the last thing you wanna do. You won't want to achieve chewy and hard fish flesh. If your fish is cold (just out of the fridge), add another minute for steaming.

Ok... I'm too lengthy. I know. I should stop. Hehe...

The fresh meat that is so tender and smooth. The sauce is sweet, salty, and it's just umami!!! Red Grouper is my 2nd favorite fish. Cod fish comes 1st of course. But with the price of Cod fish, I don't always get to enjoy such luxury. I think with Red Grouper, I'm very contented :)


Enjoy the freshest fish in a simple way, probably the best of all :)


Do visit my other steamed fish recipes too :)

Prosperity Steamed Cod (富贵鳕鱼)


Hong Kong Style Steamed Cod Fish (港蒸鳕鱼)


Monday, October 15, 2012

Curry Chicken (咖喱鸡)

Curry Chicken - It's another common food in Singapore, Malaysia and other places in Asia.

This bowl of curry chicken is ordinary, but yet delicious. Not too rich with coconut milk, but spicy enough for Max to ask for another bowl.


Unlike those curries cooked by Indians or Malays that asking for a list of never-ending spices which I really have to salute them. But of course, their style of curry is another level and has it's Oomph! 

This is a simple curry that I'm cooking here. It doesn't taste complicated.


Gathering ingredient for such basic curry chicken is not difficult. You just walk to the wet market and you will have everything you want.

  Ingredient
  • 1 whole Chicken (Est. 1 - 1.2kg), cut into big pieces
  • 4 Potatoes, cut into big chunks
  • 150ml Coconut Milk
  • 500ml Water, or more if you want
  • 5 to 6 tbsp Curry Powder
  • 2 tbsp Chilli Paste
  • 10 to 15 leaf of Curry Leaves
  • 5 bulbs Shallots
  • 5 cloves Garlic
  • 1 stalk Lemongrass, bruised
  • 2 to 3 tbsp Cooking Oil
  • 1 tbsp Salt, or more to taste
  • 1 tbsp Sugar, or more to taste

I'd prefer my curry to be more thick and spicy, but not too coconut milky. Too much of coconut milk will makes me not eating another bowl, and the richness of milk taste might over-powered the spiciness of the curry. But without coconut milk, you won't get good curry at least for such version. It's individual actually. Go ahead and increase the coconut milk to 200ml or upto 250ml if you wants your curry to have richer coconut milk taste.

Method
  1. Grind shallot and garlic into paste. 
  2. Mix curry powder and chilli paste with 3 to 4 tbsp (or more) of water to form a smooth paste.
  3. In a large wok, or pot, heat up oil, fry shallot, garlic, curry leaves, lemongrass and curry paste till fragrant.
  4. Add in chicken pieces, sear the chicken pieces, like for 5 mins or so.
  5. Add in water, bring to boil. Once boiled, add in potatoes, mix well, cover up and let it simmer for about 10mins under low heat.
  6. Season with salt and sugar. Add in coconut milk and let it boil. Once boiled, taste. If the taste is right, then heat off, leave it there for 10mins before you dish up and serve. 

The level of spiciness is very much depends on individual. Hence, you probably have to put lesser curry paste if you think you can't take too spicy food. You could buy chilli paste from fellow Indian shops that sell curry powder at the wet market. Or you could grind your own chilli paste using fresh red chillies. Or substitute with chilli powder if you are too lazy for that. It's okay.

Step 3 - Fry all the spices till fragrant, and then Step 4 - add in chicken pieces and sear it.


I always leave my curry there to cool down slightly (10mins or so) before I serve. This tips is given by one of our friendly Indian neighbour during my childhood time. The reason given was... If we are eating piping hot curry, we might not be able to savor the full flavour and richness of the dish properly because our tongue is affected by the hot curry dish. True eh? But well, I do acknowledge this logic since then :)

In Singapore, chinese usually eat curry chicken with bread, usually baguettes, rice or noodles. In Malaysia, curry chicken usually eaten with rice, roti jala / roti kirai, roti canai (we called it roti prata in Singapore), chapatti and other variety of bread.

I serve my curry with Roti Jala / Roti Kirai. 
(Recipe for Roti Jala / Roti Kirai will be out soon)


Due to the layer of oil floating on top, you won't be able to justify how thick the curry sauce is. Right? When you see this curry noodle, you will know. You could see the thick curry sauce in this photo...

This is upon Max request, a bowl of Curry Noodle! I just cook some yellow noodles and beansprout. Pour over the curry, and it's done! One pot of curry, multiple ways of eating!

Do you still remember when was the last time you cook curry at home? Do you prefer runny curry with lots of coconut milk? Or thick and concentrated curry? :)

.
.
.
This post gets featured in Asian Food Channel (AFC) Facebook

Friday, October 12, 2012

Gulai Ikan Tongkol / Spicy Curry Tuna - (MFF - Terengganu)

This dish is very obviously for the sake of Malaysian Food Fest Terengganu month. I'm glad that I did it :)


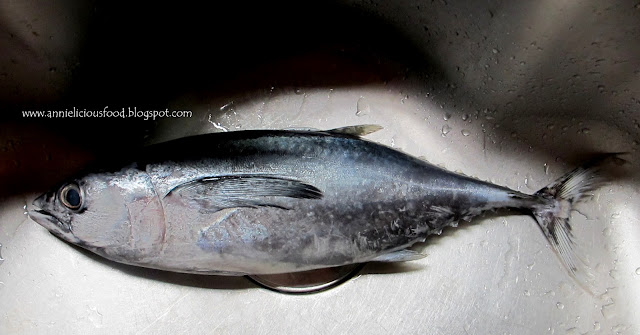
I usually eat tuna fish in Japanese restaurant. Typical sushi or sashimi. I never deal with the fish on my own before. Haha...

Until recently then I realized Malaysia known tuna fish as ikan tongkol or ikan aya. Oh! They have another name called ikan kayu too. Different state has different name. Whatever, I just recognize it as Tuna. Easier.

At 1st, I don't intend to cook this dish for Terengganu MFF at all. Until I saw a very nice tuna fish at the fish stall, and I just can't resist buying it. This fish is about 900grams, cost me S$4.50. Tuna fish has stronger fishy smell than other ordinary fish that I usually buy, but this fish is quite economical. Usually wet market selling at S$5.00 per kg :)


Gulai ikan tongkol means curried tuna fish dish, cooked with buah belimbi. Usually eaten together with nasi dagang. I cook both dish together of course. The dish doesn't cost much. But you require some effort to gather all the ingredient and prepare it.


So, here's the ingredients..

(Source : Wendy, with slight modification to suit my own)

Ingredient A
  • 900g Tuna Fish / Ikan Tongkol
  • 50g Tamarind Paste / Asam Paste
  • 800ml Water
Ingredient B
  • 2 tbsp Coriander Seeds / Biji Ketumbar
  • 1 tbsp Fennel Seeds / Jintan Manis
  • 100g Shallots
  • 2 cloves Garlic
  • 15g Dried Chilli
  • 25g Galangal / Lengkuas
  • 25g Ginger
Ingredient C
  • 200ml Coconut Milk
  • Salt to taste
  • 3 tbsp Palm Sugar / Gula Melaka, grated (adjust to suit your tastebud)
  • 4 Red Bird's Eye Chilli / Cili Padi Merah, lightly bruised
  • 4 Green Bird's Eye Chilli / Cili Padi Hijau, lightly bruised
  • 100g Buah Belimbi. But I replaced it with 3 medium sized Tomatoes.
# Buah Belimbi (Belimbing Buluh) is the right one to use. I couldn't get it. So, I replaced it with tomatoes. If you could find buah belimbi, please use that instead of tomatoes.

NOTE :

1. I want this dish to have thicker sauce. So, I used 800ml water instead. Wendy used 1L water. This is upto individual. You could go ahead and use more water if you wants more sauce. Flexible.

2. If you have asam gelugor, use it. But if you don't, like me, just use asam paste / tamarind paste. No problem for that. 

3. This is a fishy fish to me. So, I decided to increase the amount of galangal and ginger. Original was 20g each. Anyway, 5 grams each doesn't makes much different. So, don't worry about that.

4. When you grate your palm sugar, prepare more. Just incase you need more to adjust the taste.

5. It is always good to prepare everything before you start cooking. For general spices, I always keep stock at home. They are essentials. It will comes in handy.

The essential spices for curry - Shallots, Garlic, Ginger, Galangal, and dried chillies...


Method
(Stage 1) - Fish Preparation
  1. Clean the fish - Cut the fish into 1 inch thick slice. Keep the fish head too. Rinse fish until no more bloody liquid from the fish.
  2. Rub asam paste in 800ml water, strained, discard pulp and seeds. Keep the water.
  3. Bring asam water to a boil. Add in fish and let it simmer for 5mins. 
  4. Dish up fish from asam water, set aside. Keep the fish broth. We need them later. 
(Stage 2) - Spices Preparation
  1. Lightly toast coriander seed and fennel seed in a pan. Grind both together into fine powder.
  2. Grind shallots, garlic, ginger, galangal and dried chillies into paste.


(Stage 3) - Cooking
  1. In a wok, add 4 tbsp cooking oil, add in chilli paste and fry till fragrant. 
  2. Add in coriander seed and fennel seed powder mixture, fry until it looks glossy.
  3. Add in coconut milk, bring to a boil.
  4. Add in fish broth and bring to a boil under high heat.
  5. Season with salt and palm sugar, and let it simmer for another 2 mins.
  6. Add in fish pieces and bring back to boil.
  7. Add in bird's eye chillies and buah belimbi and turn off the heat. If you are using tomatoes, let it boil for another 20 seconds before you turn off the heat. 
  8. Dish up, serve with nasi dagang or plain rice.

Can you see that the coconut milk released all the oil? Beautiful color! It's Ready!


I love it's spicy and sourish taste of the gravy. The color looks attractive too! Unlike those heavy coconut milk curry, it will makes me feels jelak with just a few mouthful. This one is different :)


As I mentioned, this spicy curry tuna dish best eaten with nasi dagang and pickled vegetables. The spicy and sour fish pairing with the chewy bouncy rice... Oh! Yumm~!!! The sourish pickled vegetables is there for a reason too. The sourness of the picked vegetable raises the appetite, while it reduces the feeling of jelak-ness for both rice and fish. Perfect match!

For nasi dagang recipe, please refer here.

For pickled vegetables, ingredient is pretty standard and simple. I just prepare some carrots, cucumber and onions, cut them in match sticks size, mix with some salt, sugar and calamansi juice from 2 large calamasi. Mix everything together and keep it in a tupperware for 1 hour. And there, you have pickled vegetables! I make a batch of 4 serving as a side dish (Refer to photo). If you still don't get the idea on how it should goes about, refer to Wendy's pickled vegetable.


.
.
.

I am submitting this to Malaysian Food Fest, Terengganu Month hosted by Lena of Frozen Wings.

.
.
.
This post gets featured in Asian Food Channel (AFC) Facebook

Wednesday, October 10, 2012

Nasi Dagang / Trader's Rice - (MFF - Terengganu)

This is the 3rd month of Malaysian Food Fest (MFF) and it is the month of Terengganu.

Nasi Dagang is the rice specialty in Terengganu. Since it is a specialty, I'm gonna replicate this as my 1st submission to MFF for Terengganu month.


I never been to Terengganu before. I loooong wanted to go Redang Island, but I don't have the chance yet. Since I never been to Terengganu before, obviously, I never taste the real nasi dagang before. So, I did some read-ups online and then I took up the courage to cook this. The meaning of Dagang in malay means Trading. According to Terengganu Tourism, traders in the olden days pack along the rice while they travel for their trading activities. This is probably why the rice is called trader's rice.

The dish is supposed to do it in a steaming method. But I didn't. I did it using my mighty rice cooker.

Ingredient (Serves 4 adults)
(Reference Source: Nor Zalina's Pondering, Wendyinkk  and Terengganu Tourism with minor changes)
  • 400g Fragrant Rice (Jasmine Rice)
  • 100g Glutinous Rice
  • 5 Shallots, thinly sliced
  • 1 thumb sized Ginger, thinly julienned
  • 1tbsp Fenugreek (aka 葫芦巴 in Chinese, aka halba in Malay)
  • 200ml Coconut Milk
  • 250ml Water
  • 1 tsp Salt
  • ½ tsp Sugar
I did minor changes on the water volume because they used steaming method, which requires soaking rice for 5 hours, and the steaming part sounds tiring to me. So, I did it in a short cut way. I only soak my glutinous rice for 2 hours, soaked my fragrant rice for 30 minutes, and I get it done using my rice cooker, which is much easier. Result is good also.  So, don't worry :)

Method
  1. Wash and soak glutinous rice for 90 mins, then, wash and add in fragrant rice, soak both rice together for another 30mins.
  2. Wash and prepare the ginger and shallot. Rinse fenugreek and set aside.  
  3. Transfer rice into rice cooker, add in 200ml coconut milk and 250ml water and let the rice cooker do the rest of the work.
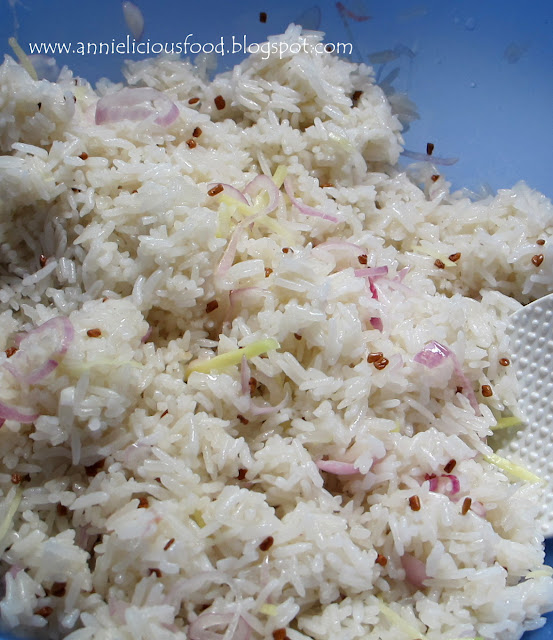
  4. Once the rice is cooked, transfer the rice into a big bowl, or a salad bowl that is big enough for you to toss the rice. Add in fenugreek, ginger, shallots, salt and sugar. Toss to combine.
  5. Transfer the tossed rice back into the rice cooker, let it stay in there keep warm for another 30mins before serving.
  6. Serve nasi dagang with gulai ikan tongkol (Spicy Curry Tuna) and pickled vegetables.

NOTE :

1. If you feel that your rice is not soft enough (which I don't think so), splash some water in while you toss your rice.

2. Use a spatula and a long chopstick to do the tossing. Do not press the rice during tossing, try not to break the rice granules.


This is one of the well known cuisine in Terengganu. If you've been there before and you never had this before, then, you should try cooking this at home.

As I mentioned, Nasi Dagang usually eaten with Gulai Ikan Tongkol (Spicy curry tuna), and pickled vegetables. They are the the perfect pairing :)

Max and my mother in law love the rice! It's chewy and bouncy due to the existence of glutinous rice. The ginger, shallot and fenugreek gives the usual boring coconut rice a whole new pleasant fragrancy! 

If not for MFF, I don't think I will try recreate this recipe at home. I'm glad that I did it. You should too! :)


I am submitting this to Malaysian Food Fest, Terengganu Month hosted by Lena of Frozen Wings.


.
.
.
This post gets featured in Asian Food Channel (AFC) Facebook