Sunday, March 30, 2014

Cheesy Dogs Stuffed in Spicy Wings

Fancy some fun and yummy finger food? What about cheesy dogs stuffed in spicy wings?

This cheesy dog stuffed wings is spicy, delicious, chewy, crunchy and appetizing.

This is a great party food for everyone. I did this a year ago and I only get to post it now. Max asked why didn't I make more. He says 8pcs is miserable. My response to him is "Good thing comes in a small package". Sounds like a diamond shop advert tho. Hahaha...


There are various types of stuffed chicken wings recipe online. Mine is the laziest. You don't have to work hard on the stuffing at all.  Just get a pack of cheesy dogs, and stuff em' into the boneless mid-joint wings. It's effortless! But of course, I won't pretend that this is easy. You have to put in effort to remove the bones from the mid-joint wings.


The only imperfection about this dish is that the cocktail cheesy dogs that I've got from the supermart is not as cheesy as I expected tho :(

To make the wings even more delicious, I mixed some spicy sauce, dumped the wings into a large mixing bowl and give it a toss, so that the chicken wings are well coated with spicy sauce to enhance it's taste.

Ingredients
(Source : Annie of Annielicious Food)

  • 8 pcs Mid-Joint Wings
  • 8 pcs Cocktail Cheesy Dogs

for marinade

  • 1 tbsp Corn Flour
  • 1 tbsp Soy Sauce
  • 1 tbsp Sesame Oil
  • dashes of Pepper 

for frying

  • 1 Egg, beaten
  • 6 to 8 tbsp All-Purpose Flour

for sauce

  • 1 tbsp Nando's Chilli Sauce (I think Thai chilli sauce would be a very good alternative too)
  • 1 tbsp Tomato Sauce
  • 2 tsp Worcestershire Sauce
  • 1 tsp Mayonnaise
  • 1 tbsp Honey

for garnishing

  • Sesame Seed 
  • Parsley
  • Lemon slice / wedge

Note : 
You can adjust your preferred spiciness level - be it mild, medium or even suicidal level by adding some chopped chilli padi. Mine is just mild spicy. Max can't take too spicy food. And I kinda feels bored sometimes :(

Method

  1. Clean mid-joint wings, pat dry with kitchen towels. With a small and sharp utility knife, give a small cut at both end of the mid-joint. Carefully remove the bones from the mid-joint.
  2. Marinade the boneless mid-joint wings with corn flour, soy sauce, sesame oil and pepper for about 30mins. 
  3. Stuff the cocktail cheesy dogs into the mid-joint. 
  4. Dip marinated wings into lightly beaten eggs, and then coat the wings in flour until well coated. Do this one at a time. 
  5. Heat oil in a deep skillet or deep fryer. Deep fry wings until crispy and golden brown. Drain on paper towel. 
  6. In a large mixing bowl, mix Chilli sauce, Tomato sauce, Worcestershire sauce, Mayo and Honey together. Throw in the fried chicken wings and give it a good toss. Ensure all wings are evenly coated. 
  7. To serve, sprinkle some toasted white sesame, some parsley and a slice of lemon to squeeze on top of the wings to give the wings some tang before you eat. 


Removing bones from the mid-joint wings might not be the easiest task. But it's definitely worthwhile when you see your family eating them happily.


Marinade the chicken, and then stuff the cheesy dogs in it. You don't have to cut the cocktail cheesy dogs. The length of the cocktail dogs is about the same as mid-joint wings.


When wings are ready for frying. I'd prefer simple frying coating. Just flour and eggs. I don't even salt my flour, because I knew I'm gonna toss some spicy sauce on top of the fried chicken wings at the later part. If you intend to skip the spicy sauce, do add some salt and pepper on the flour.


By looking at the end result, I knew you would agree that this is definitely convincing :)


If you've tried this recipe at home, ask your kids for review. If your kids tells you they don't like it, they would be lying :)

I hope you like it!

Saturday, February 8, 2014

Fried Nian-Gao Balls / Sticky Rice Cake (炸年糕球)

Bored of eating the usual fried nian-gao every year? What about this new way of enjoying nian-gao? This is it... I make them into nian-gao balls!

It's great and addictive snack for Chinese New Year. It's crispy on the outside, soft and chewy on the inside. Max and my mother-in-law was impressed when I serve them this. Max even says "Ohhumm... I'm eating nian-gao like a boss! This is so good!".... this really makes me cracked up!


I fried nian-gao last year (See recipe here). I sandwiched the nian-gao with sweet potatoes and yam. That's the usual way of frying em'.

This time, I don't do it for a party or something. I just did it for our own consumption. And I'm looking into something something that is easy to eat, less messy and can be kept well. So, I improvised my Fried Sweet Potato Balls (炸番薯蛋) into fried nian-gao balls instead. One side is sweet potato dough, the other side is taro dough. Yummm!!!


This recipe makes 40 balls if it is at the size of a golf ball, or up to 50 balls if it is smaller. Depends on how big you want the nian-gao balls be. I got 50 pcs from this recipe.

Ingredients
(Source : Improvised from my Fried Sweet Potato Balls (炸番薯蛋) recipe)

  • about 500g Sticky Rice Cake 年糕 (use hardened sticky rice cake)
  • enough oil for deep-frying

Taro Dough
  • about 220g Taro 芋头 (I use Thai Taro)
  • 210g Glutinous Rice Flour 糯米粉
  • 1 tbsp Rice Flour 粘米粉
  • 15g Corn Flour 玉米粉
  • 65g Sugar 糖
  • 1/4 tsp Salt 盐 
  • 2 tbsp Corn Oil 油 
  • 2 tbsp Water 水

Sweet Potato Dough
  • about 220g Orange Sweet Potatoes 橙色番薯 
  • 210g Glutinous Rice Flour 糯米粉
  • 1 tbsp Rice Flour 粘米粉
  • 15g Corn Flour 玉米粉
  • 65g Sugar 糖
  • 1/4 tsp Salt 盐 
  • 2 tbsp Corn Oil 油
  • 2 tbsp Water 水

Additional Note : There are readers feedback that the dough is dry. It's very much depends on the moisture level of your steamed potatoes and steamed taro. If your dough is dry, just add more water and oil.

Method
  1. Cut nian-gao into desired cube size. 
  2. Skinned sweet potatoes and taro, cleaned, cut into big chunk. Steam both sweet potatoes and taro until soft. 
  3. In a big bowl, mash the potatoes. And in another bowl, mash the taro.  
  4. For Taro dough - Add in mashed taro and the rest of the taro dough ingredients into mixer bowl. Let the mixer do the work. If you are using hand, mix all ingredients together and knead lightly to form a smooth dough. If you think there's a need, do add another tablespoon of oil to make the dough more smooth.
  5. For Sweet Potato dough - Same. Add in mashed potato and the rest of the mashed potato dough ingredients into mixer bowl and let the machine do the work. If you are using hand, it is the same. Just knead lightly to form a smooth dough. 
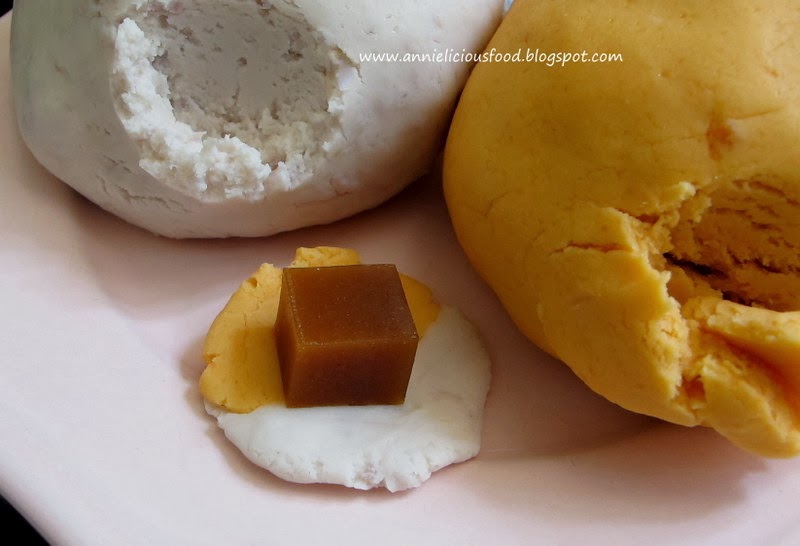
  6. Pinch a small piece of taro dough, and a small piece of sweet potato dough (about 1 tsp each).  Joint them together. With both palm, roll and form into a smooth ball. Flattened the dough and wrap a piece of nian-gao cube at the center. Roll into a ball. Pinch more dough to cover the holes if needed.
  7. Heat up oil in a wok, with low fire. Once fire is heated well, put the balls into the wok, estimate about 6 to 8 balls each time, slowly fry until it turned golden brown. This should take about 3 minutes.  Remove and drain on a paper towel.
  8. Repeat the frying process until all nian-gao balls are done. Serve immediately.
NOTE :
  • DO NOT discard the sides of the nian-gao cuts. I didn't waste any single piece of my nian-gao bits. They can be gathered and can be wrapped into balls too. This is how I make 50 nian-gao balls out of my 500g medium sized nian-gao :)
  • When wrapping the nian-gao with the dough, try to make sure that every corner of the nian-gao are well covered with dough. If not, the nian-gao might burst and leaked out of the dough during deep-frying process.
  • If you intend to make the nian-gao balls bigger, the deep-frying time will be longer. To ensure you are not eating half-cooked dough, do fry it slowly under low fire to let it slowly cook in the pool of oil.  
Here, get ready two sets of ingredients for two different dough.


Pinch a small piece of each dough and joint them together. 


Flattened the dough and wrap a piece of nian-gao cube at the center. 


With both palms, gently roll them into a ball. Pinch more dough to cover the holes if needed. And here, you will have taro and sweet potato flavor dough.


You can use one type of dough only if you think two flavor is too tedious. However, I felt that two flavors joint together makes great taste. I love this recipe and I like this way of eating nian-gao. The 'crust' stays crunchy quite long and it kept well too.

If you intend to make them in advance and store them, follow this method :
  1. Fry the nian-gao balls until cooked (pale golden color). Drain and set aside to let it cool. 
  2. Once nian-gao balls are cooled, pack them into a sandwich bag (preferably air-tight of course).
  3. Store them into the fridge if you are eating them in 2 to 3 days time OR if you are eating them after a week or so, store them into the freezer - Thaw it overnight before you reheat it. 
  4. To reheat : Deep-fry room temperature nian-gao balls under medium low fire until golden brown color. Serve immediately. For this step, you can use air-fryer to do the work if you don't want to deep-fry. It's just that the result of air-fry would be dryer and the crust will tend to turn harder.
Since you are going to reheat the nian-gao balls before serving, always remember that you only need to achieve pale golden color on the 1st fry. The 2nd fry (reheat) will then fry until golden brown and crispy.

For me, I prepared the whole batch, I serve 10pcs fresh, gave 20pcs away and and keep the balance 20pcs in the fridge for next time. Deep-fried food intake need to be controlled. This is a great way to prepare your nian-gao balls in advance. Just re-heat it before you bring them to the party as part of the party snacks. I'm sure your family and friends will love it.


This new way of eating nian-gao will definitely change the way you feel about eating sticky rice cake during Chinese New Year! Do give this auspicious traditional food a try! :)

Saturday, February 1, 2014

Superior Chicken Stock (鸡上汤)

When it comes to festive season that requires lots of cooking, I will prepare this. The broth produced by these simple ingredients could give you full flavor in almost every Cantonese cooking.

It's magical!


Some people called it superior stock, some called it chicken stock, some called it gou-tong (高汤) and some called it sheung-tong (上汤). Whatever. As long as you have this pot of goodness in your kitchen to standby, I bet you will be able to cook up some good Chinese food! :)


I shall cut this post really short. The trick is to use a good chicken and DO NOT opt out chinese ham. This ham gives the soup the superior taste!

Ingredients
  • 1 Kampung Chicken, preferably old hens (老母鸡)
  • 150g Chinese Ham (金华火腿) ** See Note
  • 2 to 3 Chicken carcass (鸡骨/鸡壳)
  • 15g Ginger, sliced (姜)
  • 3 parts Spring Onions, white part only (葱)
  • 4L Water
Note : You will have to prepare chinese ham in advance. When you purchase your chinese ham from the shop (usually shops that sells dried seafood), please ensure that you are using only the meat part. Those outer layer (skin and the dark surface part) need to be removed. Wash and blanch the ham with hot water to remove the oil. Put the ham into a bowl of hot water. Put two slices of ginger into the bowl. Steam the bowl of water with ham and ginger for 45mins or upto 1 hour. This is the preparation you need to do. If not, you will find that the chinese ham doesn't taste as pleasant as you expect. I always did mine way in advance. Steamed ham can be well kept in the freezer for 3 months or more. Try to prepare at least 400 grams at one time. If not, you waste your gas for steaming it for 1 hour. Hahaha...  When you need to use it, just take it out for your soup.

Method
  1. Clean chicken, and chicken carcass. You don't have to cut them into pieces. Just leave it whole. 
  2. Prepare ginger and spring onions accordingly.
  3. Using a big pot, put in all the ingredients and pour in 4L water. Bring to a boil.
  4. Scoop away the scums that float up, but do not scoop away the chicken oil. Those are flavors. 
  5. Let the soup boil for 10mins, and reduce to very low fire to let it slowly simmer for at least 4 hours.
  6. Once the soup is cooked for 4 hours, let it cool abit. Strain the liquid and discard all the soup ingredients, and keep only the broth. 
This is the result after 4 hours. It may looked pale and unattractive. But I tell you, this is magic broth for all Chinese cooking! I use this broth for stir-frying - noodles, vegetables, seafood. I use it to braise my mushrooms, radishes and alot more!

Divide the broth with plastic bags or small containers into portions. Remember to well seal them and air-tight. Freeze away. If you need to use them, just take it out, thaw and you have superior chicken stock!

You totally don't have to use any MSGs for your cooking!


Give it a try :)

Thursday, January 23, 2014

Melt-In-Your-Mouth Pineapple Tarts (黄梨酥挞)

Pineapple tarts is a must-have amongst many households during Chinese New Year, especially in Singapore. Baking pineapple tarts for Chinese New Year has become yearly affair ever since I picked up baking.


Baking pineapple tarts is a very laborious affair and it needs alot of patience and time. But I just couldn't help it. Shop-bought ones are either no good, or over-priced.Trust-worthy quality pineapple tarts are not easy to find. I might as well bake it then.

Max had been living with shop-bought pineapple tarts for the past 29 years. He has no complaint and he eat what his mom fed him. But after I started baking, I'm surprised to hear from him how precise he wants his pineapple tart to taste! He wanted buttery and melt-in-the-mouth pastry with some tang on the pineapple jam. For me, my personal requirement is flaky and NO to milky taste. So, I work based on that.


I did googled some recipes and flip some recipe books. I skipped those that uses milk or milk powder. I skipped those that ask for margarine or shortening. I tried baking using 3 to 4 recipes for the past three years. And I finally convinced and settled down with The Little Teochew's recipe, because I believe simplicity could deliver the best.

I baked 3 batches of pineapple tart last year. Used Lurpak and President butter for the first two batches. It was good. But my MIL complaint that the buttery taste is not what she's looking for. She said "That's not local taste!"

.... She makes my face turned green.

I had a sleepless night, thinking what she meant by local taste. And for the 3rd batch, I used SCS butter, as this is widely used especially for Chinese New Year baking. And the result, she says "This is local taste lah!".... I guessed it right! This is the buttery taste that she's looking for!

..... Duh!!! I keep calm and continue my baking. Hahaha...

This year, I used SCS for my pineapple tarts as well. And for the pineapple jam, I got myself some Morris pineapple, followed Wendy's home-made pineapple jam recipe and cook up a big batch from scratch.

Ingredients (for Pineapple Jam)
(Source : Wendyinkk)

  • 2 large Morris Pineapple
  • 400g Sugar
  • 1 small stick of Cinnamon
  • some lemon juice (optional, if you prefer more sourish taste)

Method (for Pineapple Jam)

  1. Peel the pineapple, cleaned, cut into large chunk, included the core. 
  2. Put half the pineapple chunks into a blender, add 1/3 water and blitz away. Pour 80% of the blended pineapple into a large pan or wok that has large evaporation surface. 
  3. With the remaining blended pineapple in the blender, add the rest of the pineapple chunks into the blender and blitz away. Always leave some blended liquid on the blender, so that you don't have to add water for the next blending process. 
  4. Cook pineapple paste with the cinnamon stick under medium heat until it turned pasty, like oatmeal kind of thickness. Stir it occasionally. 
  5. Add sugar and stir. The pineapple paste will turn watery when sugars are added. Stir once a while. 
  6. Increase the heat to high. Don’t stir and let the base take on some color. It will caramelize the jam. Stir once a while to check on the color. Stop when it almost reaches your preferred color.  Do take note that some pans will continue to caramelize even when the heat is off.
  7. Do take note that the jam will thicken further upon cooling. It is better to undercook the jam rather than overcook it. You can cool the jam and see the texture. If it is too wet, you can always cook it again to achieve dry texture.
  8. Once jam is kept in the fridge for a day, pre-roll pineapple jam into balls the night before your baking day. 
Note : You can prepare this way ahead. I did mine more than a week beforehand. Air-tight sealed and keep it well in the fridge. It's absolutely fine with. 


Ingredients (for Pastry)
(Source : The Little Teochew, with modification)

  • 400g Plain Flour
  • 50g Corn Flour
  • 1/2 tsp Fine Salt
  • 280g Cold, Unsalted Butter, cut into cubes. 
  • 3 Egg Yolks, beaten
  • 3 tbsp Ice-Cold Water
  • 6 tbsp Icing Sugar
  • 1/2 tsp Pure Vanilla Extract
  • For the pastry glaze, mix 1 Egg Yolk + 1 tbsp Water. 

Note : If you have lard at home, do add some. I did two batches of pastry. One using 280g Butter (follow recipe) for giveaway purpose. While the other batch that I want to keep it for own consumption, I used 250g butter + 30g lard oil. The result is seriously awesome! So, I'd highly encourage you guys to be more courageous and go ahead to do some experiment to find the right Oomph! taste for yourself :)

Method (for Pastry)

  1. Cut butter into small cubes. Put it back to the fridge. Take the butter cubes out when you are ready to use it. 
  2. Sift flour, icing sugar and salt together. Mix well. I keep mine in the fridge to keep my flour cold. The weather in Singapore is hot. I can't help it. 
  3. Using the pointed ends of a fork, rub the cubed cold butter into the flour until it looks like fine bread crumbs. If necessary, use fingertips to continue rubbing lightly on the bigger pieces of butter into finer pieces. 
  4. Beat together egg yolks, cold water and vanilla extract (and lard oil if you are using it). Add it into the butter flour mixture. Using finger tips, gently coax all the crumbs into one large dough ball. Do not knead the dough. As long as the crumbs comes together, you should stop working. 
  5. Divide dough into two balls. Wrap the dough using clingwrap, chill in the fridge for 10mins.
Note : The reason for dividing the dough into two balls is because the dough is very buttery and oily. It would be ideal to use a smaller portion at a time and keep the rest covered in the fridge, otherwise, the dough will ooze oil. 

Method (Baking)
  1. Take one dough ball out of the fridge, roll out to desired thickness. Cut out dough using tart cutter. Arrange neatly onto baking tray, with at least 1.5cm apart. 
  2. Glaze the tart shells (the entire tart pastry surface, not just the rims). Bake it at 175 oC for 5mins. 
  3. Take the tart shells out of the oven, glaze the tart shells one more time (but just the rims for this time). Place pre-rolled pineapple jam balls onto the centre of each tart shells.
  4. Bake the pineapple tart for another 15mins, or until the tart pastry looked golden brown. 

My butter is cold, and my flour is cold too. The task here is to coat the butter crumbs in flour, while doing your best to prevent the butter from melting. If your kitchen is air-conditioned, that would be the best! You might find it messy if you are doing this for the first time. But once you have the hang of it, it will be fine.


 I have pastry cutter to do the work, so, it is much easier compared to fork.


If you made shortbread pastry before, you will know how this should go about. Handling the dough is the key. If you overworked the dough, you will ruin everything. You have to be gentle to the dough, so as to achieve wonderful buttery, flaky texture.


.... my camera sucks. It doesn't bring out the color of the buttery dough. Sigh!

Okay. Move on.

You can choose not to glaze the tart. But I'd highly recommend you to do that. Because glazing the tart will makes the tart sturdier during baking. And glazing gives you a nicer orange-y festive looking tart too. Btw, Max says tarts without glaze looked like under-cooked tart. Hahaha... He and his very own logic.

Accomplishment! Alot of work, it sucks my energy dry. But definitely worth it.


Always remember that good food either comes with a price tag or it takes patience and effort to make it right. You can choose to buy shop-bought pineapple jam if you are not picky about it. It definitely save you alot of work. But if you are particular with that, like me, be prepared to do it from scratch. Cooking the pineapple jam can be quite strenuous.

So, if you wanna make some good pineapple tarts, you don't expect it to be easy. That's the simple rule. And no, my tart doesn't look like that on my 1st attempt 3 years back. Practice makes perfect. I need more of that for sure.


Will I make it again? Yes! This is indeed melt-in-your-mouth pastry and it taste really awesome!

I hope you like it! And I have to thank to the fellow ladies who shared the recipe and tips :)

Monday, January 13, 2014

Shrimp Roe Wanton Noodles / 虾籽云吞捞麺 - (AFF - HK / Macau #3)

I love shrimp roe noodles. I had this in Macau last month and I'm absolutely in love with it. The noodles itself has mild salty shrimp taste. And when I toss the noodles with the shrimp paste and soy sauce dressing.... Fwoh! Addictive!

Especially when it is cold weather, one serving might not be enough!


I stayed at 新马路 area when I was in Macau. Just walk down the road, I found 喜临门麺家 at 十月初五街38号. This shop sells authentic and traditional Shrimp Roe Noodles (虾籽麺) and some good quality Shrimp Roe (虾籽) as well.


Shrimp roe wanton noodles is common in Macau and also Hong Kong. I had a random chat with the noodles shop owner. I was told that this palm sized hard bundle of shrimp roe noodles is originated in Macau, and this delicious noodles then spread to Hong Kong. Whether it is originated in Hong Kong or in Macau, I didn't specifically do any research on that. I just listen to what the noodles owner say. However, it might be true, because the location of this shop is very near to the sea port. Getting shrimp roe should be easy I guess.


Since I knew Singapore seldom import good shrimp roe noodles and as far as I know, getting shrimp roe in Singapore is not so possible. Without even thinking, I immediately bought some shrimp roe noodles and shrimp roe. So that I could cook for AFF.

I walk down further. And I randomly walked into a noodle shop, and ordered a serving of Shrimp Roe Wanton Noodles (虾籽云吞捞麺). It is not difficult to identify what's in the noodles. Other than the wantons served, it has shallot oil, dark soy sauce, soy sauce, shrimp paste as dressing on the noodles, and then topped with shrimp roe and spring onions. This is the serving that I had in Macau.


Max is very excited to try this noodles. Less than 3 days after we are back to Singapore, he already kept telling me that he wanted to eat shrimp roe noodles. Looking at this piece of dried noodles. One of the special characteristic that distinguish this noodle from many other varieties of Chinese noodle is the salty shrimp roe forming tiny black spots on strips of the noodles.


You don't have to go Macau or Hong Kong just to get shrimp roe noodles. Cold Storage do sell. However, maybe the quality and taste might vary a little.

I also bought a bottle of shrimp paste from Macau. This shrimp paste taste like belacan (The usual shrimp paste found in Malaysia and Singapore), but this Macau shrimp paste is more fine and spread-ably soft texture. If you can't get this, I'd suggest you to use the ordinary belacan, mix with water until it achieve thick dripping consistency, just like dark soy sauce kind of thickness.


Because this noodle has mild saltiness on its own, the most common method of cooking is directly boiling the noodles and drizzle over some sauces for additional flavorings. This noodles is not difficult to replicate. All you need is to go to the Cold storage, buy shrimp roe noodles, get some belacan, and make some wanton to go along.

Ingredient (for Noodles)
  • 1 Shrimp Roe Noodles
  • ½ tsp Shrimp paste (or belacan), mix with water, until thick dripping consistency
  • ½ tsp Dark soy sauce
  • 1½ tsp Soy sauce
  • 1 tsp Shallot oil
  • 2 tsp Shrimp Roe as topping
  • some spring onions as garnishing
This makes one serving of noodle. For dressing wise, do play around with it to suit your taste. You may consider shrimp paste as an optional, as I know it is not easy to get. One serving of noodles only use a few drops of shrimp paste. So, don't stress yourself too much.

Ingredient (for Wanton) 
  • about 50g Minced Pork
  • 10 Fresh Prawn, deveined, shells removed, cleaned, pat dry, cut prawns into half.
  • Some store-bought Shanghainese wanton skin
  • ½ tbsp Soy Sauce
  • ½ tsp Sugar
  • ½ tsp Corn flour or Tapioca flour
  • a pinch of salt and dash of pepper to taste
This makes about 10 big wantons or more. It depends on the size of your wanton.

Method
  1. Put all wanton ingredients together. Using chopstick or fork, stir them vigorously until all ingredients are well mixed and the minced pork are well blended with condiments and looked gluey.
  2. Wrap wanton accordingly. Cook wanton in hot boiling water. Once they are done, remove from water. 
  3. Cook shrimp roe noodles in hot boiling water until noodles are soft. 
  4. Once noodles are cooked, drizzle over shrimp paste, dark soy sauce, soy sauce, shallot oil. And then top with shrimp roe and spring onion as garnishing.
  5. Serve noodles with wantons at the side. 

Look at the size of my wanton. They are big. I wrapped 1 prawns in each wanton. Hehe..


And shrimp roe wanton noodles done! Max says this taste really like the one we had in Macau!


Pretty straightforwared eh. As long as you get the ingredients right, I think this is not difficult to replicate. So, do go down to Cold Storage and buy some shrimp roe noodles and make some wantons today!


Do try it out!

I am submitting this post to Asian Food Fest ( Hong Kong + Macau ) – Jan+Feb Month hosted by Annie of Annielicious Food

Sunday, January 5, 2014

Hong Kong Egg Tart / 香港蛋挞 - (AFF - HK / Macau #2)

Both me and Max I loves Hong Kong egg tarts. This pastry-crust filled with egg custard and baked snack were introduced in Hong Kong in the 1940's by Hong Kong-style teahouses (茶餐厅). Hong Kong egg tart is an adaption of English custard tarts, as Cantonese had more frequent contact with the West, in particular Britain back then. 


When we talk about Hong Kong egg tarts, it is widely known that they have two kinds of tart shells. The puff pastry-like (酥皮), or some called it as water and oil pastry base (油皮水皮) and the other one is cookie pastry-like (饼皮), or some called it as butter pastry base (牛油皮).

I remember how HongKong Tai Cheong bakery (泰昌饼家) cookie pastry egg tarts got me crazy during my first visit to Hong Kong. Their egg tarts has the best consistency of both egg custard and the crust. Oh Yumm!!! Look at the snacks I bought from Tai Cheong bakery! Hahaha... No! You are supposed to look at the egg tarts only :)


The one I'm making here is cookie pastry-like (饼皮) egg tart. It takes me two attempts to get it right. The first time, I did the crust right, but the egg custard needs improvement. The 2nd time was much better. Both crust and egg custard's texture is achieved. Comparing to Tai Cheong's egg tart, mine is softer in texture and do fall apart easily.


Ingredients (Makes 6 Egg Tarts)
(Source : Wendyinkk, and iCook.tw as a reference)

for Pastry
  • 140g Plain Flour
  • 1 tbsp Icing Sugar
  • 1 Egg Yolk
  • ½ Egg White
  • 75g Salted Butter
for Filling
  • 75g Castor Sugar or fine sugar
  • 75g Hot Water
  • 2 Whole Eggs
  • 125ml Fresh Milk
  • ¼ tsp Vanilla Extract
  • a pinch of fine salt
Note : Pls do not substitute butter with Margarine, Planta, Buttercup or Farm Cows. They won't be the same. When it comes to recipes that ask for butter, do use butter - SCS, Anchor, President, Lurpak and so on.

Method (for Pastry)
  1. Cream butter with icing sugar, egg yolk and egg white. I'm using hand-held mixer.
  2. Add in flour and mix well. Once it is well mixed, using hand, press the mixture together and form a dough. If the dough is too wet or oily, do add some flour. Give it a few knead. But don't over-work the dough.
  3. Wrap the dough in a clingwrap. Put it into the fridge for 10 to 15mins to let it cool.
  4. Take the dough out of the fridge. Cut pastries into 6 equal portion. The individual dough should weight about 38 grams each. 
  5. Roll individual dough into a ball. Using both palm, press the pastry ball into a flat piece. Line dough in the middle of tart cases, lightly press the dough into the tart cases. 
  6. Refrigerate the tart cases for 30mins, and it is ready to use. 
Method (for Filling)
  1. Add castor sugar into hot water, mix until sugar completely dissolved. Set aside and let it cool. 
  2. Beat eggs with milk, vanilla essence and salt. Pour in sugar water. Mix well. 
  3. Sift egg mixture TWICE to achieve smooth egg mixture.
  4. Carefully pour egg mixture into each tart shells. 
  5. Bake tarts for 25mins at 180 degree, fan ON.


This is how the tart pastry looked like after pastry is pressed on the tart case. When you press the dough into the tart cases, you should make the pastry higher, so as to build a wall at the side, so that the tart will be able to carry more egg mixture.


Take tarts out of the refrigerator, carefully pour egg mixture into each tart shells.


Tart shells must be filled with egg fillings fully. So that the result of the egg tart would be nice. I don't like half-filled tarts by the way.


After baked for 25 mins, and tadaaaa!!!


Look at the egg custard. It's sweet, soft, smooth and satisfying. It was buttery and abit at the crumb side, but still hold it's shape. The aromas were mouth-watering, especially when the eggy custard was still piping hot. It melt in my mouth almost instant!


This recipe is a good keeper.

Do try it out!


I am submitting this post to Asian Food Fest ( Hong Kong + Macau ) – Jan+Feb Month hosted by Annie of Annielicious Food

Wednesday, January 1, 2014

Famous Shatin Chicken Congee / 驰名沙田鸡粥 - (AFF - HK / Macau #1)

This is my first post for Asian Food Fest for Hong Kong / Macau. I'm replicating Hong Kong's famous Chicken Congee from Shatin, originated by a well-known congee shop named Keung Kee (强记沙田鸡粥).


I was in Hong Kong last week. It was cold on the Christmas eve. We didn't go for feast on the eve of Christmas. Max brought me all the way to Shatin just to eat 强记鸡粥 instead, because I had been talking about it since months ago. It was good. And here (below photo), this is the actual 强记鸡粥. The one above is my replication.


If you watch TVB show or dramas, you probably know 沙田鸡粥 Shatin chicken congee, as it always appear on TV since 80's. If you've been to Shatin for Keung Kee chicken congee (强记鸡粥), you will know why people come back for it's congee. The congee texture is silky smooth and chicken pieces are nice to eat as they are well marinated with salt.

Congee is well known as one of Hongkie's supper choice. Usually, congee shops in Hong Kong will open till midnight or more than that. For 强记鸡粥, they open till 3am.


I had been asking around, included two Hongkie friends of mine, just to find out more on how to cook up a pot of good Hong Kong style congee. The silky smooth, gluey and creamy kind of white porridge, which we usually called it as 明火白粥 'ming foh bak zhok'. I even tried a few congee stall in Hong Kong. Actually, almost all of them are good. The difference is probably whether the chef will add MSG into their pot of white beauty or not.

After I finished my congee at 强记鸡粥, I peeped into their kitchen, and saw a big bag of Jasmine rice (茉莉米) and a small bag of glutinous rice (糯米) at the side. For instance, I have two questions in my mind. And I ask my Hongkie friend for answer.

1) 澳洲丝苗米 is supposed to be the most ideal rice grain to cook up a pot of good Hong Kong style porridge. But how come 强记 used 茉莉米 instead?
Answer : Maybe it is due to cost. 强记 expanded to 22 outlets in Hong Kong now. 澳洲丝苗米 is much more expensive.

2) What has that bag of 糯米 got to do with the 茉莉米? Are they mixed together in order to cook up their successful pot of porridge?
Answer : 糯米 probably has got nothing to do with that pot of porridge. To cook up a good pot of 明火白粥, flame control and long cooking time is the main factor.

In order for me to cook a pot of reasonably good congee, I think it is important for me to understand ahead. I fell sick after I came back from Hong Kong. And this gives me perfect reason to cook congee! I love congee by the way.

I walk to the nearest Giant and bought a fresh kampung chicken at S$7.50. This chicken is skinny. And it smells good after it is cooked. I kinda like it! It is not easy to find a good kampung chicken (as in real kampung chicken) in Singapore nowadays.


Although it is just a pot of congee. But in order to cook it properly, I won't pretend that this is easy. Ingredients are simple tho. All you need here is abit of patience and time.

Recipe (Serves 4 to 6)
(Source : 沙田鸡粥 with modification)
  • 150g Jasmine Rice (茉莉米), or 澳洲丝苗米 for better choice
  • 4500ml Water, or more
  • 1 Fresh Chicken, preferably Kampung Chicken
  • ½ tsp Salt + 1½ tbsp Salt (I'm using Sea Salt)
  • 1 tbsp Cooking Oil
  • a thumb sized ginger, finely julienned
  • some spring onions
Note : 
  1. If you have 澳洲丝苗米, please use it as it is better choice. In Singapore, we can't get 澳洲丝苗米. So, I can only use Jasmine rice.
  2. The ratio between rice and water is around 1 : 30, or more water.
  3. You need a stainless steel pot with high in body for ideal congee cooking.
  4. Of course, you need to go to the market to get a fresh chicken early in the morning.
Method (for chicken)
  1. Boil 4500ml water in a pot. Once water is boiled, hold the chicken head (refer to photo) and soak the chicken body into the boiling water. With your hand still holding the chicken head, pull the chicken up, and soak it in again. Do this for 4 to 5 times before you release the chicken head and let the chicken soak into the water completely. By doing this, water will go into the chicken body completely. This is to ensure that the chicken is well cooked too.  
  2. Keep an eye on the pot. Once you see the water is boiling again, heat off, and let the chicken sit inside the hot water untouched and covered for 15mins. If your chicken is big, you might need another 5 mins. For this part, you have to gauge it on your own. 
  3. Prepare a tub of ice-cold water, preferably with ice cubes. Once chicken is cooked, using chopsticks, gently remove the chicken from the water and place the chicken into the ice water. 
  4. Once chicken is completely cooled, drain. Apply 1½ tbsp salt inside out, and all over the chicken. Set aside and let it marinade. 
Note : It is highly advisable to marinade the chicken overnight (about 8 hours or so), because I knew 强记's one is marinated very well. You have to plan your time. Maybe you can cook the chicken the night before. Marinade it, and keep it in the fridge for the next day morning use. The longer the chicken gets marinated, the better the flavor it is. For me, I'm eating it on actual day. So, I marinated for about 5 to 6 hours only. Not good enough, but still fine :)

Step 2 : Hold the chicken head and soak the chicken body into the boiling water.

Step 3 : Gently remove the chicken from the water and place the chicken into the ice water.


Method (for congee)
  1. Wash rice and drained. Add in ½ tsp Salt and 1 tbsp Cooking Oil to marinade the rice. Marinade it for 2 hours. Or at least 1 hour if you don't have time. 
  2. With the water that I used to cook the chicken, reheat it under high heat. Once it is boiled, add in marinated rice. Still under high heat, let it boil for 1 hour without lid.  
  3. After 1 hour, reduce heat to medium high and let it boil for another hour. You may add some water in-between if you want. But don't forget to give it a stir.
  4. Once porridge is cooked, add in some ginger, and salt to taste. Give it a stir. 
Note :
  1. It is important to use high heat to cook the porridge at the beginning. When the water boils under high heat, the rice grain dances in the water. And this explains why the porridge won't stick at the bottom when high heat is used.
  2. I cook my porridge for 2 hours only. I knew it is not enough. To boil a pot of good Hong Kong style porridge, you need at least 4 hours. But I think it only makes sense to boil it for 4 hours if I'm cooking for 12 or more. Agree?
Step 2 : Add marinated rice into the boiling water.


To Serve
  1. Chop marinated chicken into pieces. Place it into a claypot. Add more ginger if you want. 
  2. Pour hot porridge over. Put the claypot on flame and bring the congee to a boil. 
  3. Garnish with spring onion. Serve immediately.

Put the claypot on flame and bring the congee to a boil. 


And Shatin Chicken Congee.... DONE!


The texture of the congee is pretty well cooked, although the cooking time is 2 hours only. I have to admit that my congee is not as smooth as compared to 强记's one. But it is indeed creamy and glossy. I like it! The two hours stove cooking is worth it! And oh! I have to confess... I always use rice cooker to cook my porridge by the way. It is the lazy way. But for this 明火白粥, I can't.


Max who's not a congee fan, tells me that my chicken congee is as good as 强记's one. I know he's lying. Hahaha... I know. Not 100% of course, but at least there's 70% to 80% similarity. I'm glad :)

Do try it out!


I am submitting this post to Asian Food Fest ( Hong Kong + Macau ) – Jan+Feb Month hosted by Annie of Annielicious Food