Pages

Thursday, February 21, 2013

Fried "Nian Gao" / Sticky Rice Cake (炸年糕)

I prepared this as part of the dish on the 7th day of Chinese New Year for my family. My mother says this dish need abit of kungfu 功夫 (skills) in order to make it perfect. Somehow, I do agree. Especially the heat control part. Haha..

My mother told me that Cantonese usually prepare fish porridge, stir fried rice vermicelli and fried sticky rice cake in celebrating of 7th day of Chinese New Year. Although I don't really know the significance behind, but this is what my family usually do when I was young.


This is not just for Chinese New Year. It makes great party finger food too. I always keep left-over sticky rice cake in my fridge every year :)


Ingredient (Makes about 10 pieces)
(Recipe Source : My mother - Mdm. Chai)
  • about 250g Sticky Rice Cake 年糕 (must use hardened sticky rice cake)
  • about 300g Taro 芋头 (I use Thai Taro)
  • about 300g Orange Sweet Potatoes 橙色番薯 
Don't buy exact weight of taro and sweet potatoes. You have to buy more. Because if you want to cut them into equal square piece like mine, get prepared to have some wastage. Oh well, if you don't want wastage, you don't have to follow my way :)

The Batter
  • 4 tbsp Plain Flour 面粉
  • 1 tbsp Cake Flour 蛋糕粉
  • 1 tbsp Rice Flour 粘米粉
  • 1/2 tbsp Tapioca Flour 薯粉
  • 1 Egg 鸡蛋
  • 40ml to 50ml Water 水 (or more)
  • 1/2 tsp Sugar 糖
  • a pinch of Salt 盐
Method
  1. Heat up some oil for deep frying using medium low heat. Once the oil is hot enough, reduce to low heat.
  2. Sandwich the sticky rice cake with taro at one side, and sweet potato at another side. 
  3. With the help of chopstick and spoon, coat the sandwich with batter, try to maintain it's shape, put the coated sandwich into the oil and fry it.  
  4. Under low fire, slowly fry the sandwiched sticky rice cake. This is to ensure the taro and sweet potatoes are equally cooked before the batter turned golden. If your fire is too high, the batter will turn brown very fast, and you get raw taro and sweet potatoes. This is very important. Do remember. Heat control is very very important. If you are not confident enough, use a skewer to test poke on the sandwiched sticky rice cake to see if the entire piece of sandwiched sticky rice cake is cooked. When you tested one, you should be able to gauge the frying time for the next batch. 
  5. Once it turned golden brown, dish up, drain on paper towel and let it cool down abit before serving.   

Tips : If you are so worried that the taro and sweet potatoes will not get cooked evenly, you can steam the taro and sweet potato for awhile (till half-cooked) before you sandwich the sticky rice cake for frying. Another alternative, slice your taro and sweet potato into thinner piece. Easier to get cooked :)

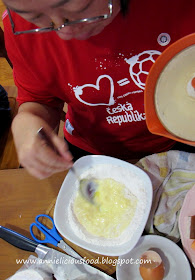
Chef Mdm.Chai at work. Hahaha...


See? This is the right consistency of the batter. It must be lump free and smooth. Not that thick and not that runny. If it is too runny, batter won't stick to the sandwich. If batter too thick, you will end up having thick crust.


Look at my sandwiched sticky rice cake again. Nice? I spent quite abit of time to do all the cutting. And by the way, the hardened sticky rice cake will be much easier to cut than when it is soft and sticky. If your sticky rice cake is soft, do consider to put them into the fridge overnight before cutting. It would be easier.


I need certain level of oil, deep enough for me too deep-fry. So, I used a pot insted. Because smaller pot use less oil. But of course, it will slow down my work. Because with this small pot, I can only fry 3 sandwiches at a time. Not more than that.


Ahhh.. I love seeing the sandwich. Orange, brown, pale purple. Nice! Wendy commented that the taro at the bottom layer looked raw. But it is not. It's soft! Hahaha. Don't get cheated. The reason why I could halved it nicely is because I let it down before I cut them into half. I want it looks nice on photos lah. Cooled down sandwich gives better cutting result. If I cut it when it is hot, then you will see the softness of the taro. But the sticky rice will just ooze all over.


My niece is standing beside me when I doing the deep-frying work. She's pinching the hot slices right off the hot oil and eating them at the risk of burning their mouth! Duh!

But seriously, this is really very hard to resist :D

Saturday, February 16, 2013

Steamed Taro Cake (芋头糕)

Steamed taro cake aka woo-tau-koh  (芋头糕) in Cantonese is another dish that people like to make during Chinese New Year. Anything with the word "koh" 糕 (高) is auspicious during CNY. As I mentioned before, "koh" (高) means achieving great heights in all endeavors. Sounds auspicious, exotic and colorful looking kuih!

After Serene grumbled to me that she did drastic failure of her steamed pumpkin cake, I decided to get her to come to my place and I do a demo of this steamed savory steamed taro cake. I prefer taro cake than pumpkin cake by the way.


This is one of my favorite savory kuih during my childhood time. We usually had this for breakfast :)

I have my own steamed taro cake recipe last time. But I lost that paper during house moving. So, no choice. I googled around for a good steamed taro cake recipe, read a few recipe book. Finally, I decided to follow the recipe from Y3K recipe book. Simply because Y3K's version ask for five spice powder. Haha! I call this Malaysian style steamed taro cake!


Recipe 
(Adapted from : Y3K Recipe Book)

Ingredient (A)
  • 300g Rice Flour
  • 3 tbsp Plain Flour
  • 1200g Water
Ingredient (B)
  • 450g Taro (I used Thai Taro), diced
  • 300g Water
  • 75g Fried Dried Shrimps
  • 1.5 tbsp Minced Shallot
  • 1.5 tbsp Minced Garlic
  • 6 tbsp Cooking Oil
Seasoning
  • 1.5 tsp White Pepper
  • 1.5 tsp Good Quality Five Spice Powder
  • 2 tsp Salt
For Garnishing
  • 1 Spring Onions, diced
  • 1 Chinese Parsley, chopped
  • 2 Red Chillies, sliced
  • 1 tbsp Toasted Sesame
  • 50g Fried Dried Shrimps
  • 100g Fried Shallots
  • some Shallot Oil
Steamed taro cake can be simple, but can be tricky too. So, searching for the recipe that gives you the right flour and liquid ratio is very crucial.

Preparation
  1. Do all the necessary cutting and chopping for spring onions, parsley, chillies, shallots, garlic and yam.
  2. Soak dried shrimps (75g + 50g) till soft, drained, and finely chopped. Some cooking oil on a heated wok, pan-fry chopped dried shrimps under medium low heat till dry and fragrant. It depends on the quality of your dried shrimps too. If your dried shrimps is at salty side, add a teaspoon of sugar during pan-frying. Once done, dish up, divide 50g out and set aside for garnishing use. 
  3. Peel shallots, washed, sliced, and fry till golden brown. Dish fried shallots up and put it on kitchen towel. Set the shallot oil aside. You need it later. 
  4. Combine Ingredient (A) together, stir well to dissolve. Strain trough a sieve to free batter from lumps, rest it for 15mins. 

Method
  1. Prepare a square pan, about 8.5cm. Grease it with some oil.
  2. Heat up a wok with oil, add in minced shallots and garlic in, and fry till fragrant. Add in 75g pan fried dried shrimps and stir well.
  3. Toss in taro cubes, add in seasoning (pepper, five spice powder and salt), give it a toss. Add 300g water. Simmer the taro for awhile, like 2 minutes or so. 
  4. Turn fire into medium low heat, mix the rested batter into the taro. Keep on stirring batter till it turns to a thick consistency and then heat off.
  5. Pour the thick batter into the greased pan. Steam the taro cake on high heat for 45mins or till cooked. Use a satay stick to test the cake. If the stick comes out without stickiness, then, the cake is cooked. 
  6. Garnish the cake while it's hot. This is to prevent the garnishing from falling off. 
  7. Cool the cake well before slicing.
Step 4 : Turn fire into medium low heat, mix the rested batter into the taro. Keep on stirring batter till it turns to a thick consistency.


Step 5 : Pour the thick batter into the greased pan. Steam the taro cake on high heat for 45mins or till cooked.


Step 6 : Garnish the cake while it's hot. This is to prevent the garnishing from falling off.


Here's the garnishing that I've prepared. Sprinkle everything on top of the steamed taro cake except shallot oil. Drizzle some shallot oil on top of the steamed kuih when served, this is to add another level of fragrance.


Every family has different recipe. Be it the ratio of flour and liquid, or the garnishing part. It all depends on personal preference. Some people prefer to add some Chinese sausage, some recipe is without five spice powder. For peranakan version, they add pork belly in it too. But for this recipe, it taste very very close to the one I had during my childhood time.


I like my taro cake filled with chunks of taro with bite texture. But Thai taro get soften easily, and I did a mistake for dicing the taro too small. So, my taro cake end up didn't have visible taro cubes on the picture. Well, you could adjust the amount of taro cubes as you desire.


I steamed quite a big portion of taro cake actually. Serene took some home. Max had some as supper, and I keep a portion for next day breakfast. All of them gave good review on my steamed taro cake. I'm so so so glad. Max is very particular over steamed savory cake. So, if the texture is not right, he will just walk away. This is how fussy he is towards such kuih.


 If you are feeding a small family, half the recipe. If you have left-overs, keep the cake into the fridge. When you want to eat, add abit of oil and pan fry it and serve hot  :)

I hope you like it :)

Wednesday, February 6, 2013

Crispy Chinese Roasted Pork 脆皮烧肉

Max enjoyed this crispy roast pork very much. He said this taste exactly like shop-bought one's. But for me, yes, it taste close to shop-bought one, but not exactly.


We were debating about it while we are having it over dinner. And I come to a conclusion that this taste more like Singapore's roast pork version. Not Malaysia version. To be precise, it doesn't taste like the one that I had in my home-town. I know, I had cursed tongue. So, please ignore me.

Roasting this piece of pork is not difficult. Getting the right piece of pretty pork belly is a challenge. Especially you don't know how to sweet talk with the butcher. Haha...

One fine Saturday, I woke up really early. Reach wet market 8.30am just for the sake of buying a piece of nice pork belly. (I usually wake up at 9.30am earliest during weekend. It's weekend you know? Haha)


I supposed to buy a piece of pork belly that gives me nice even layer of meat, fats, meat and fats. But I can't. Max will complain. Hahaha... Well, I picked this piece of nice pork belly. There's only a very thin layer of fats in-between. Not too fat. It's good enough to make him eat the whole piece of roasted pork without splitting out the fats when he eat. My butcher really not bad and I never regret for waking up early just to get this nice piece of meat.

After I bought my pork belly, I walked to the nearby Chinese medicinal hall to get a nice pack of five spice powder. And for the rest of the ingredients, I already have it at home. Easy! All I need is five spice powder, garlic, ground white pepper and salt to make our spice rub.


Ingredient
(Recipe Source : Nasi Lemak Lover, with modification)

1.2 kg Pork Belly, with skin on 
1 tbsp Salt (for the skin) 

For dry rub2 cloves Garlic, mashed (about 1 heaped tsp in total)
1 tsp five spice powder
1 tsp ground white pepper


1.5 tsp Salt

Nasi Lemak Lover's recipe is meant for 2.8kg pork belly. But I want my roast pork more flavorful. So, I just retain the ratio of five spice powder and ground white pepper. Also, I used fresh garlic instead. How flavorful you want your roast pork to be? Well, that's individual. So, please just take this as a guide. You can use the same recipe but make 1.5kg pork or 2kg pork. It's absolutely up to you.

Method 

  1. Heat up a wok of water. Blanch the pork belly in the wok of hot boiling water for about 4 to 5 minutes. 
  2. Fish up the pork belly and pat dry with paper towels. Be careful, the pork belly is hot. 
  3. With the ultimate skin torturer (skewer actually), prick the skin all over. Try to prick as much holes as you could. The more the better. 
  4. Mix dry rubs ingredient together, and apply on the pork belly all over. Give it a good massage. So that the dry rubs will go into every nook and cranny.
  5. Once massage is done, place the pork on a wire rack. Rub 1 tbsp salt on the skin. Yes! Only the skin. 
  6. With the pork belly on the rack, place a tray underneath to catch the drippings, uncovered, place it in the fridge overnight and let it dry out. By keeping it overnight also allow the pork belly fully absorb the flavor of the dry rub. So, no short cut please. 
  7. Pre-heat oven 200C, top + bottom heat + Fan ON. With the pork belly still on the wire rack, put it into the oven. Let it roast for 25mins. 
  8. Switch the oven to top heat, increasing temperature to 230C. Grill until the skin is evenly blistered and browned. This takes me about 40mins. I did take the pork belly out twice during roasting to kinda check it and turn to another direction to let it roast evenly. 
  9. Once it's done, let it cool on a wire rack. I know it's hard to resist, but please leave the pork belly alone and let it cool down before you chop it. 
  10. Once the pork belly cooled down. Use knife to scrape away the charred skin (if any). Then, cut it into long strips, and chop them into bite size. Serve. 


The ultimate skin torturer (skewer) that I used to prick the pork belly skin. I got it from Malaysia. Cost me RM 12.90. I think Singapore do sell too. If you want, you could try to hunt for it at places like Sia Huat or Lau Choy Seng at Chinatown. I think they should have this.


Step 6 - Place pork belly on the rack, place a tray underneath to catch the drippings, uncovered, place it in the fridge overnight and let it dry out.


Skin dries out after overnight drying in the fridge.


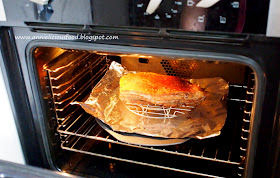
Make sure the pork has certain level away from the top heating element.


After 25mins roasting. Only very minimum blister on the skin. Not yet!


This is what we want! Nicely browned, and skin blistered all over! And slightly charred! But nevermind about the charred part. We could scrape them away. Mine charred actually. And when you achieved this, I assure you, your kitchen smells heavenly roasted pork! Hahaha...


One thing that I need to warn you is that, please be prepared to do thorough cleaning for your oven. Once my roasted pork is done. I let my oven to cool down, and then I spent alot of time cleaning it. Hahaha... Roasted pork smell~!!! LOL~!!!


Step 10 - Cut cooled roasted pork into long strips. Did you see how juicy the pork is? Yes! Let the meat rest is very important. It retain it's meat juice in there. If you chop your roast pork when it's still hot, the meat juice will all gone! And what will happen? You've got very soft meat pieces (because they are still hot), meat juices moisten the crispy skin, and your roast pork pieces will end up having soggy skin. Also, the meat will dry when you eat it. You just visualize that and you will know what I'm saying.


Did you see? Did you see that piece? The piece of roast pork at the side, with big and thick piece of crispy crackling skin on top!!! Yes!!! I want that piece~!!! I love it~!!!


I'm going to do this again. The next attempt, I will want to find back the taste like the one that I had in my home-town. That version contains chinese red fermented beancurd. So, it's gonna be different. Stay tuned!